
Manage notifications on Ring Stick Up Cam
A critical element of any home security device is effective notifications, and perhaps more so, a minimum of false positives. As any system admin will tell you, false positives are not only annoying, but create a crippling level of complacency. This is a major reason a disturbingly large number of home alarm systems remain disarmed, home owners simply get sick of false alarms, especially if they come with a cost as some monitored alarm solutions do.
The same issues apply to connected devices that provide home status monitoring or security features. If your smart cameras are constantly nagging you about that tree blowing in the wind, or the neighbours cat skulking around at 3am, then you are not going to receptive to an actual event requiring your attention.
I've had a number of people ask about setting their motion alerts on Ring's Stick Up Cam, so I've put together a quick tutorial on the various settings and optimal set up. As all of Ring's security products use the same app, these tips will apply to those as well.
The first thing to get right are the Motion Zones. These define where an alert will be generated within the cameras field of view, which also trigger the camera to begin recording.
Motion Zones
Within the Ring App, go to the device to configure, and tap the Motion Settings button.
There are three options here, but we'll focus on the Motion Zones first.
Tapping that option gives you a radial zone map and a range slider. The rings include indicative detection range in feet from the inner ring at 5, to the outer edge at 30.
You can tap each zone to enable to disable it, if disabled, any motion in that zone will be ignored. You'll typically want all of them on, but if you have areas of the view which are not a concern, or are covered by another camera, you can turn those off. As an example, I have a Ring Video doorbell with a Stick Up Cam at the corner further down. I don't want notifications from both of these for the same event, so I disabled Zones 1 and 2 on the Doorbell as they are covered by the Stick Up Cam. This still gives me a notification if someone stands in front of the door, or approaches from the other side.

Motion Zones
Once you have the field of view covered, you'll want to adjust the range to avoid spurious traffic. Depending on your camera placement, you may be close enough to the street to want to reduce the range to avoid passing cars and pedestrians. Simply adjust the slider and the shaded area on the zone map will shrink accordingly.
Ring's marketing material suggests the cameras use some level of thermal profile to discriminate human activity from other motion. While I don't think there is any thermal technology in the cameras, they do appear to effectively determine valid motion based on the size of the moving body. I have found that the Stick Up Cam does not trigger often on cats nor cars, and I suspect swaying trees would also be eliminated, although I have adjusted my zones to avoid such anyway. This discrimination goes a long way to reducing false positives in itself.
Smart Alerts
OK, now we have the detection area configured for this particular camera, you can also adjust the notification sensitivity. This is done in the section called Smart Alerts. Essentially this is a frequency setting that you can use to adjust how many alerts are generated for a particular period of motion. The default 'Standard' setting is reasonable, but you may want to reduce it if you're getting repeat notifications. Likewise, you may be watching a particularly sensitive area that should not be getting much traffic, that could be reasonable to increase to 'Frequent'.
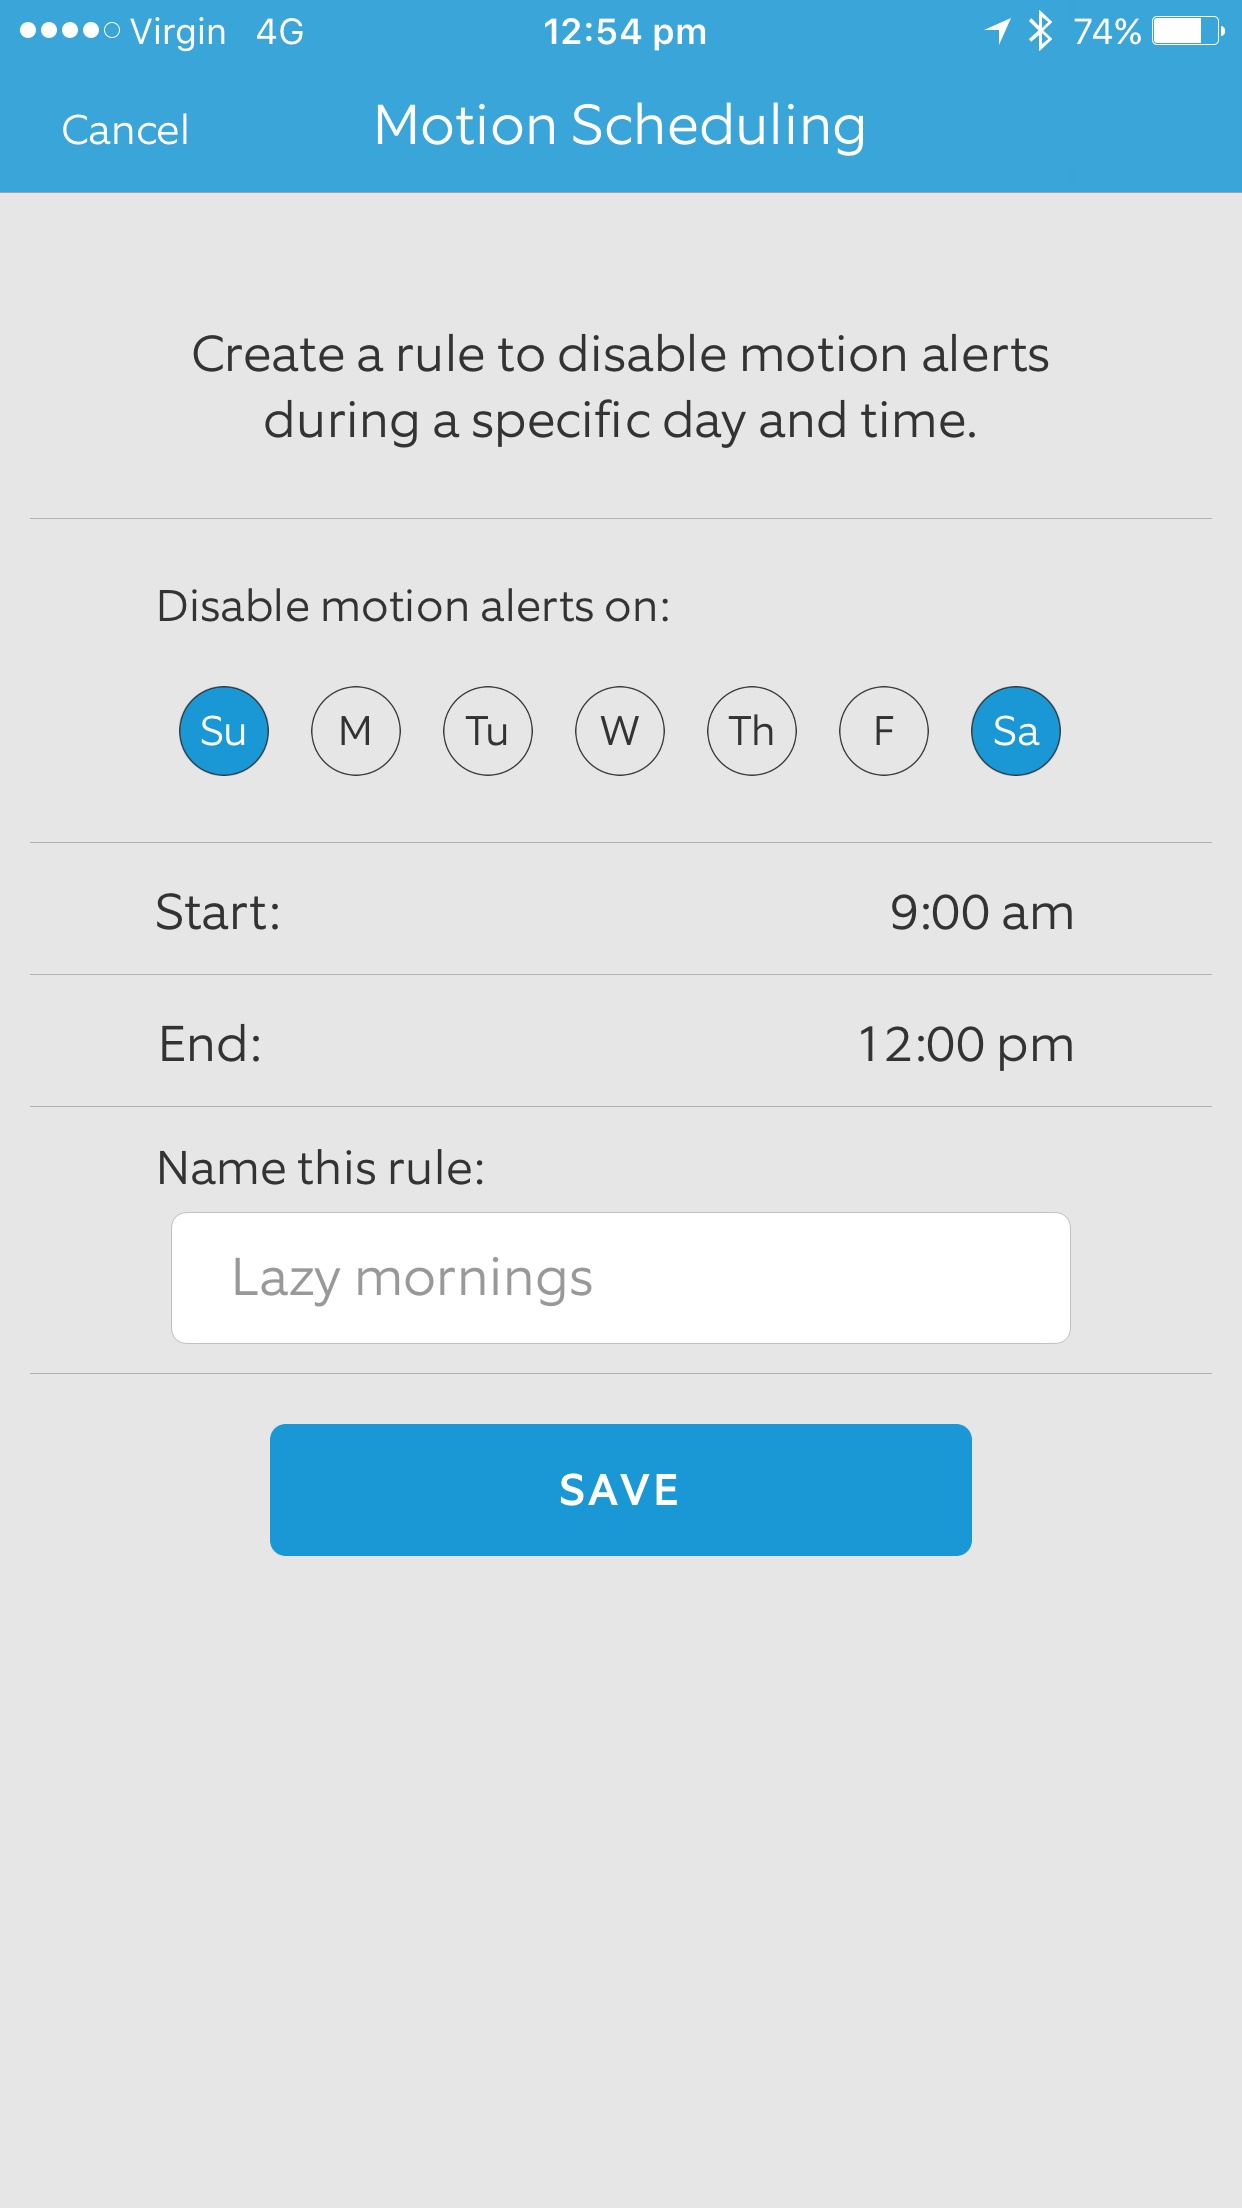
Motion Schedule
The final section on the Motion Settings list is Motion Schedule. Here you can specify times where you don't want any monitoring to occur at all. You can set up multiple rules for specific days and time periods.
To create a rule, simply tap the '+' in the top right corner (if you have no rules it will create the first one automatically), tap the days to activate the rule, and then enter the start and end times. Finally, add a name for your own reference and Save.
For example, you may want to turn off alerts in the backyard during the after-school period, or alerts in the garage during the morning rush. This allows a fairly fine grained approach tailored to your household routine.
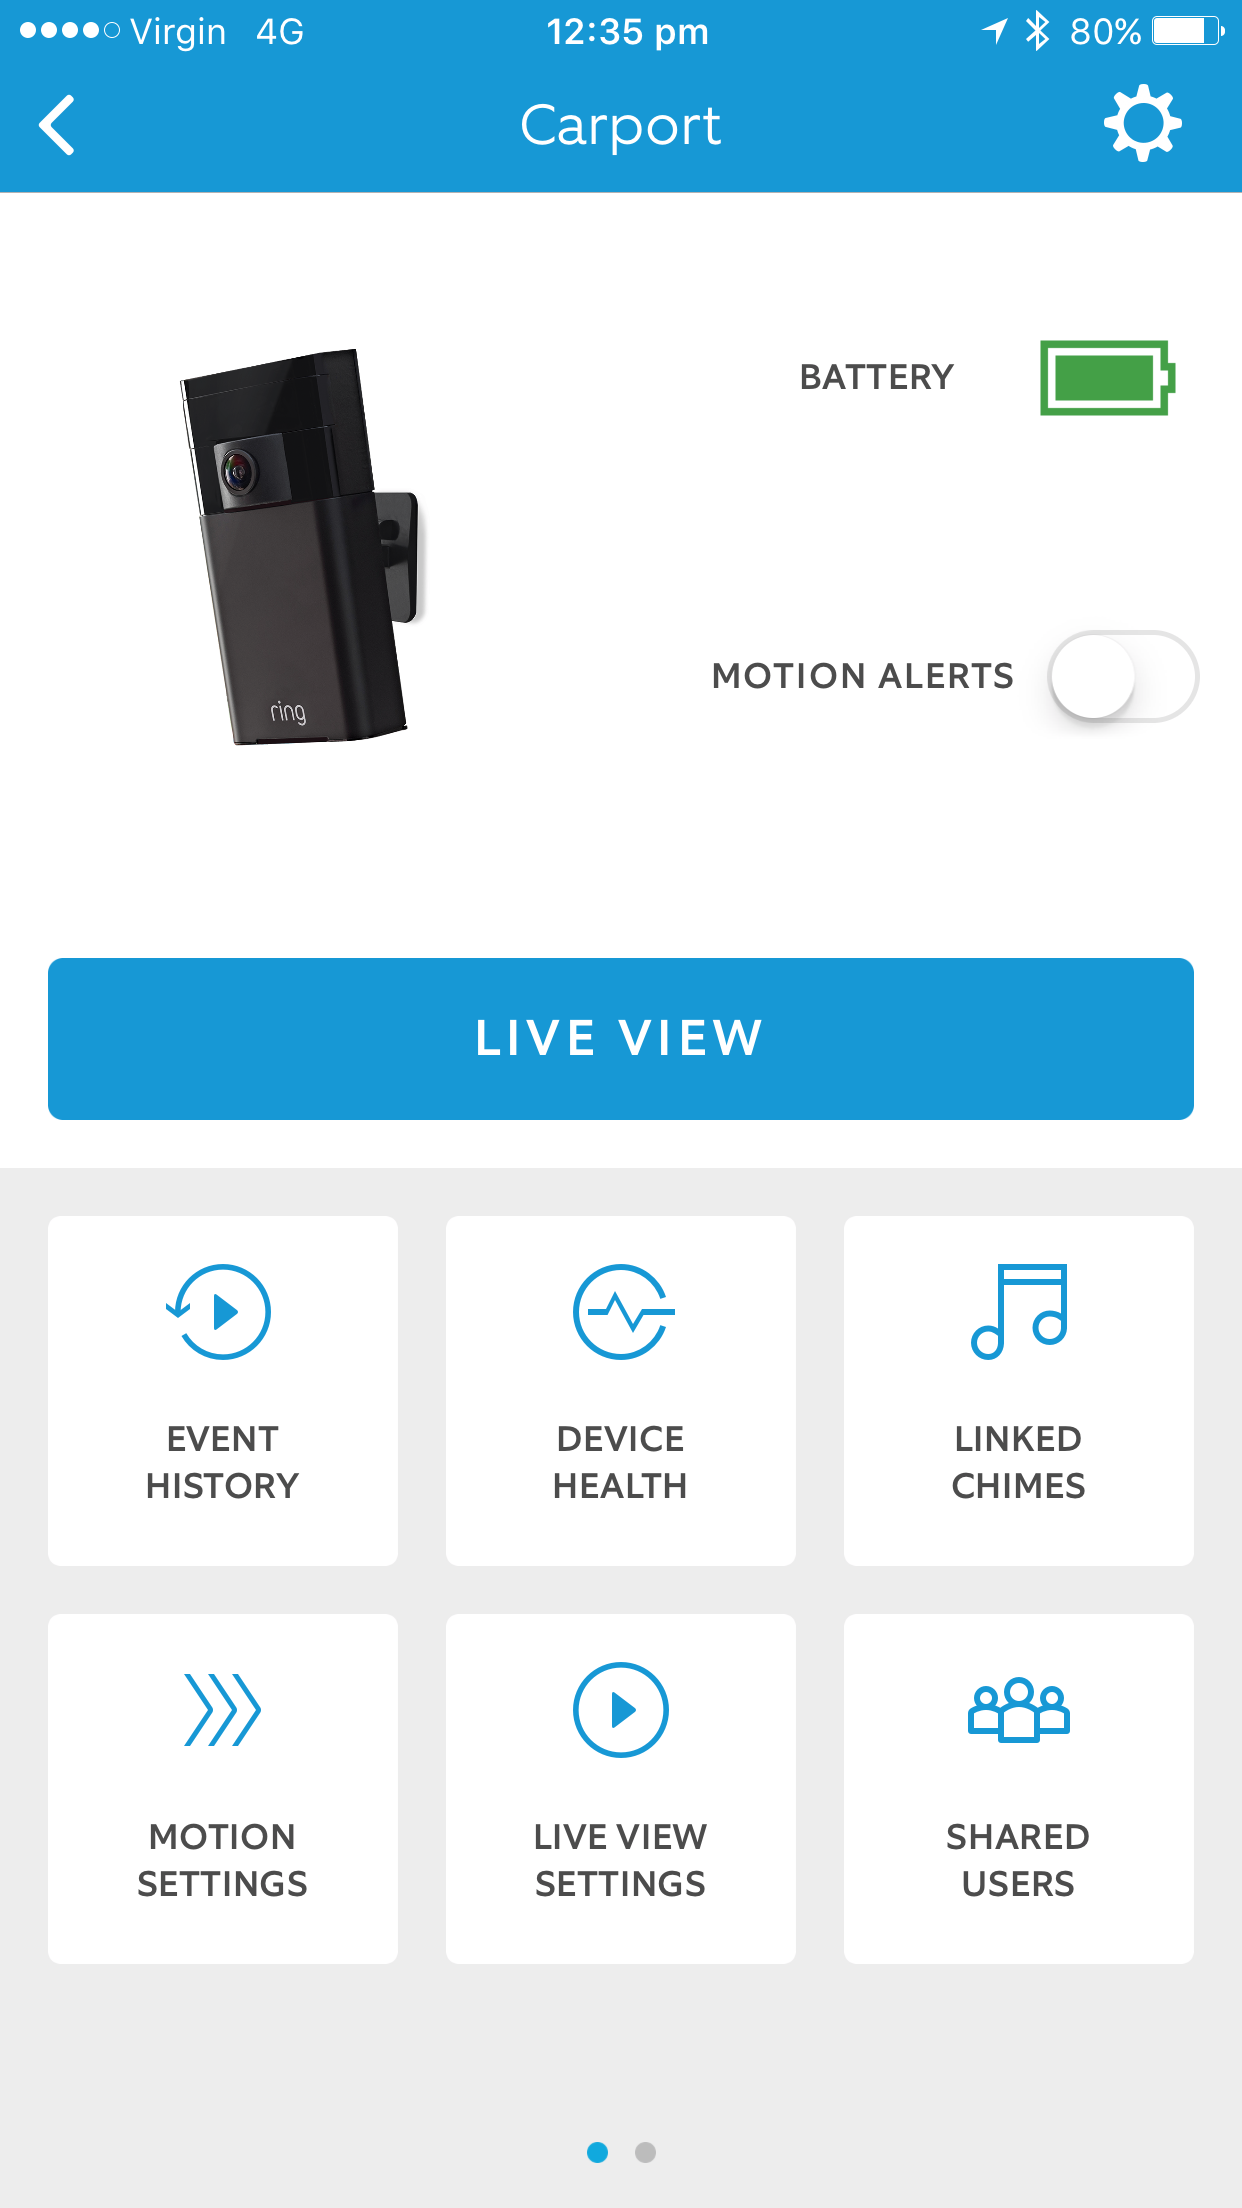

The three section on the Motion Settings for each camera provide a good level of control over what and where events are triggered, but there is a final control which is worth noting. On the device page of the app is the Motion Alerts toggle. As you would expect, turning this off will stop all alerts. What is not clear though is that this is camera and device specific. That is, if you have the Ring app installed on multiple devices, either under the same account or shared with others, the Motion Alerts toggle applies to only the device you are on when it is set and will not effect any others. So you can easily specify which device gets notifications for which cameras. You and your other family members can turn them on and off without effecting each other.
What is also not clear if that's this only affects notifications, not event generation or recording. All of you other Motion Settings will still be in effect, and events and videos will still be triggered and recorded (if you have a paid storage plan) in the Ring app events list. What this means is not only can you temporarily turn off notifications if required, but you can have multiple cameras watching an area and only have notifications triggered from one of them, while capturing video of the event from all of them for later review.
Combining these settings for your specific set up should ensure you minimise false positives, and still capture useful history of the goings on around your home., while getting alerts only for things you need to check up on.