
Local Tuya Device Control In Apple HomeKit
Tuya based smart devices are cheap and plentiful, but they only support Google Home and Amazon Alexa natively, and it’s all controlled through Tuya’s cloud platform. If you’re like me and aren’t too happy about your smart devices being controlled over the internet, it’s good to know that Tuya devices can actually be controlled locally.
The tried-and-true method for doing this has been to replace the firmware on the device with an open-source version, called either Tasmota for general use, or HAA for HomeKit. That usually involves taking it apart and messing with circuit contacts, memory flash devices and other stuff. All good if you’re into that, but it’s possible to use the Tuya platform itself to get the device data you need to get that local control.
Does Tuya Work With HomeKit?
Tuya devices can’t integrate with HomeKit natively, local control or not. Instead, we need to use the open source Homebridge solution to give us an interface we can plug the device data into. I feel that having a Homebridge install as part of your HomeKit setup is well worth it, it’s easy to install now, and only takes a little maintenance in the form of updates now and then, like any other smart device.
Once you’ve got a Homebridge or HOOBS install up and running we can look at getting the Tuya data we need.
Extracting device keys from the Tuya platform
Before we do this, you’ll need to have the TuyaSmart app installed on your iPhone, and have an account set up (you can use Login with Apple). Make sure the device we’re going to work with has been added to the TuyaSmart app so it’s provisioned in the Tuya platform.
Next we need to create a new Developer account with Tuya on https://iot.tuya.com/
Don’t worry, we’ll just use the trial plan which will give us what we need for free. Once you have the account set up, log in and you’ll be presented with the developer dashboard.
1 - Create a project
Now create a Tuya project by clicking Cloud (1), Development (2), and then the Create Cloud Project button on the right (3).
Fill in the details with whatever you like and click Create. Pay attention to the Data Center you select. You’ll need to have this matched up in later steps.

Steps to Create a Project
2 - Link accounts
Now that we have a project, we need to link it to our user account, the one used on the app with the devices we want to control.
Again, click Cloud (1), Development from the slide out menu, then click on Open Project to the right of the project you created above. A new menu at the top will appear. Click on Devices (2) at the top, then select the correct Data Center (3) in the top right corner. Then select the tab Link Tuya App Account (4) and click the Add App Account (5) button on the right.
This will open a QR code. Go into the TuyaSmart app on your phone and tap the Me icon in the bottom right corner, then tap the [-], button top right to scan the code. Use the default settings on the following linking screen.
Your two accounts will now be linked and that will show in the list on the website (eg: my ‘Integration’ project in the screenshot).

Steps to Link your accounts and access your devices
Extract the Device ID
Click on the All Devices tab. Now we should be able to see the devices that have been added to your Tuya app.
You should still be on the project settings screen, and your linked devices will now be shown in the list. If not, follow the previous steps to get back into your cloud project and select Devices (1) from the top menu again. We’ll need to select the correct data center from the drop down (2) in order to see the devices, in my case this is Central Europe. If you’re not sure, just try them all until you get your devices come up in the list underneath. Make sure you are on the All Devices tab for the project.
The first value we’re interested in is the Device ID (3), that’s the long hex value under the device name in the first column. Don’t get it confused with the Product ID in the next column, that won’t do anything for us. You can copy and paste this somewhere or we can come back here later.

Steps to get the Device ID
Get device permissions
Before we can do anything with that ID, we need to add some API permissions. Tuya packages these up under various subscription products. Not to worry, we’ll just use the Basic plan which is free.
From the Cloud (1) menu click Cloud Services in the slide out menu, then IoT Core (3). Sign up for the Trial Edition plan and that will give us the three permissions we need to control our device, which in turn allows us to see the device details. This may take a while to set up, but it typically comes through straight away.
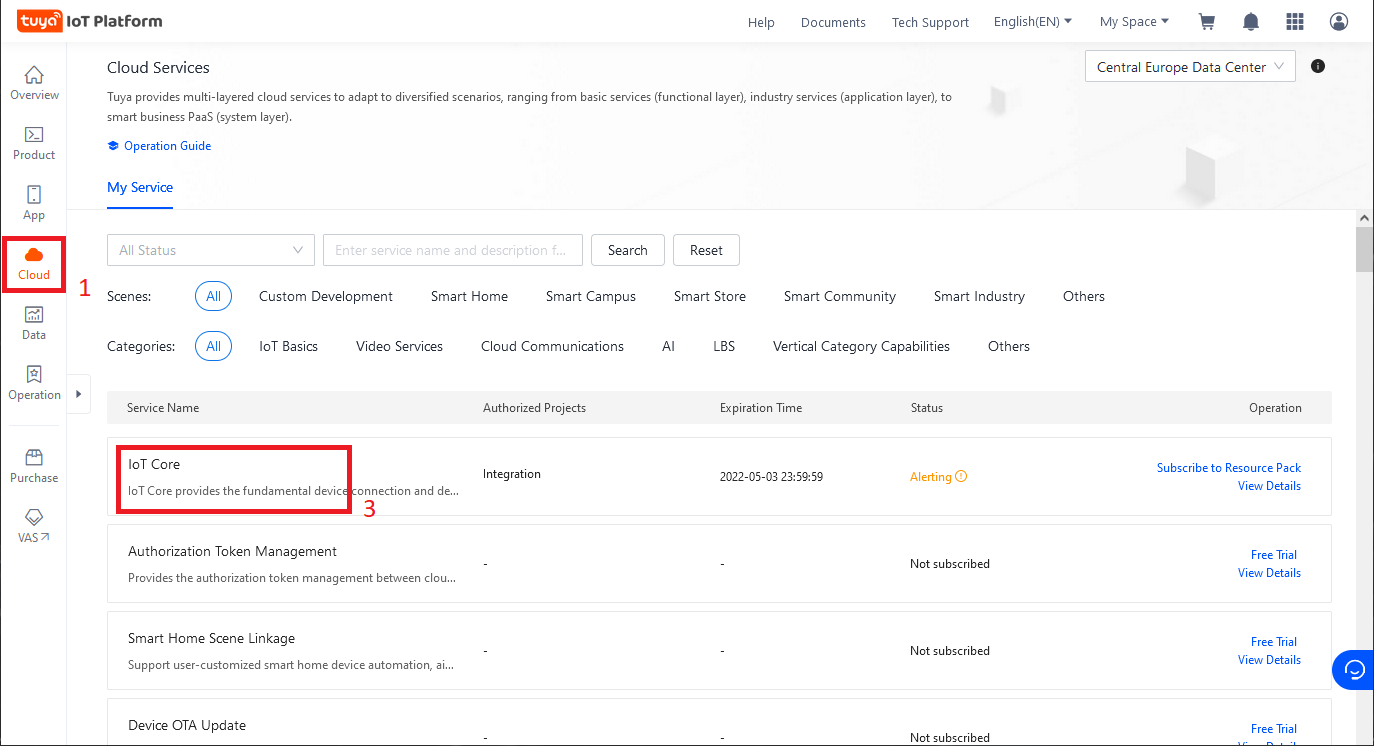
Subscribe to Device Management
Extract the local key
Once we have the access click on Cloud, then API Explorer. This will open a new tab for the API Explorer app. In here, under Devices Management (1) click Query Device Details (2), select the correct data center you identified before (2), paste the Device ID into the Params section (3) and hit Submit Request (4). Voila. If all is well, we should get the device data come up on the right side.
In that list is the “local_key” (5) that we need to communicate with the device. Copy that, along with the Device ID for entering into our bridge.

Extract the local key
Setting up Homebridge Tuya
Now that we have the device data we need, we can go ahead and set that up in Homebridge. Note that these same details can be used to get local control in other platforms that support this with a similar plugin, such as Home Assistant.
Install the Tuya plugin
I’m using HOOBS for this example, but the native Homebridge interface is similar if you didn’t opt for HOOBS.
From the HOOBS dashboard, click the plugin button (1) on the left. Select Library (2). Type Tuya into the search box (3) and press ENTER.
There will be quite a few results, so scroll down and find the one simply called ‘Tuya’ with the note “Official Homebridge plugin for TuyAPI”. This one is the most up to date and well supported. Click on the tile (4) to install.
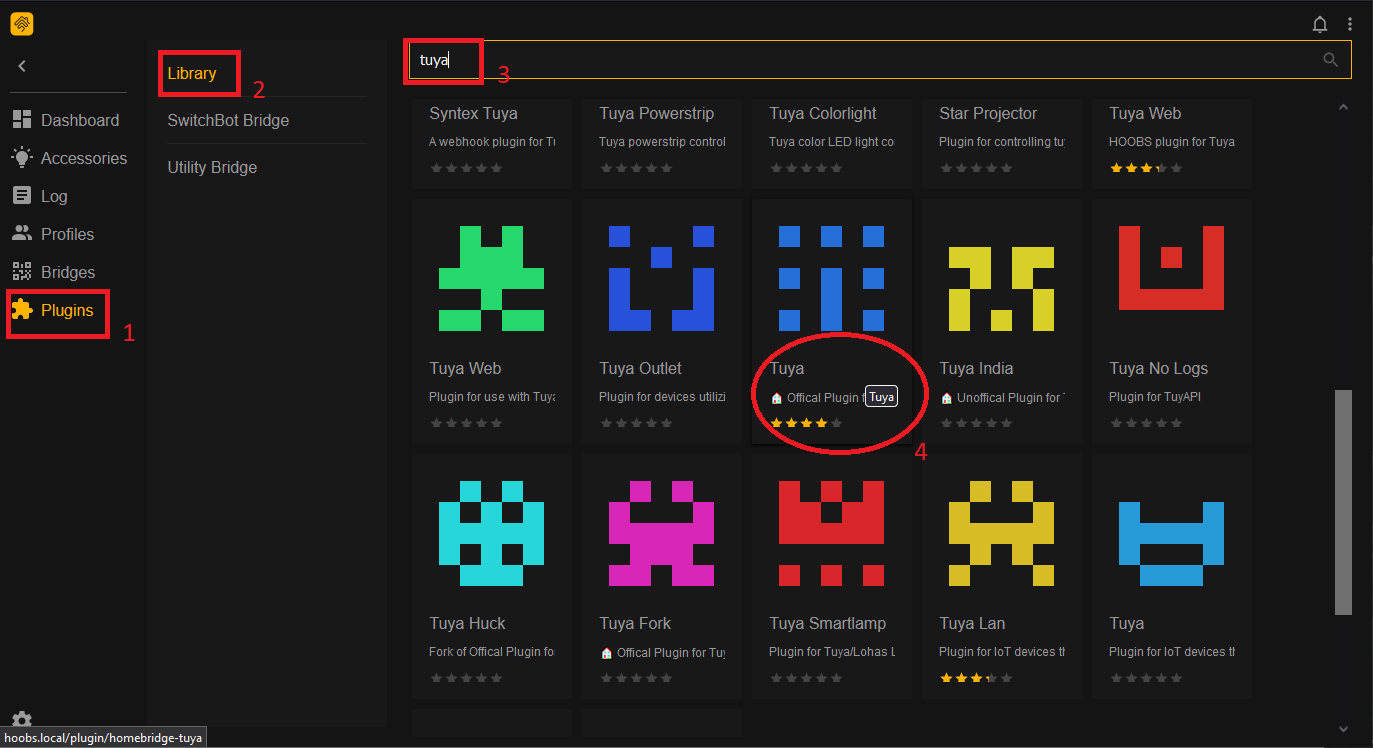
Install the Tuya plugin
Configuring the Tuya device
Now the plugin is installed, we need to add the config information for the specific device to control. Navigate through the Plugins (1) menu again, select your bridge instance (2) and then the Tuya plugin. Click Configuration (4) to access the plugin details. The guided configuration for this plugin is a bit sparse on information.
You can add a new device with the + icon and fill in the fields, or we can add it manually by clicking on Advanced. It’s not too hard, just be careful to get the syntax right and click Save when done.

Accessing the plugin configuration settings
The manual configuration block will be as shown in the example below. We need the first 6 fields, the seventh in the screenshot is specific to the device type in my example (the MultiOutlet).
Here’s a template example to copy and paste. Note that if you need to add additional fields, place a comma after each line except the last one:
{
    "platform": "Tuya",
            "devices": [
                {
                    "name": "nameit",
                    "type": "type",
                    "manufacturer": "mname",
                    "model": "model",
                    "id": "5516...",
                    "key": "3ea4..."
                }
            ]
}
“name”, “manufacturer”, and “model” can be anything you like. I’ve copied them from the Tuya platform device info screen. The “name” value is what will appear in HomeKit so you’ll probably want to change that.
“type” defines how the plugin will interact with the device, so it needs to be correct. You can get the correct value from the Tuya plugin wiki. For each type, you need to follow the Instructions link for any additional values you need to configure the behavior of the device correctly.
“id” and “key” are the two values we extracted from the Tuya platform above.

Tuya device configuration
For easy reference, I’ve grabbed the supported “type” values from the wiki here:
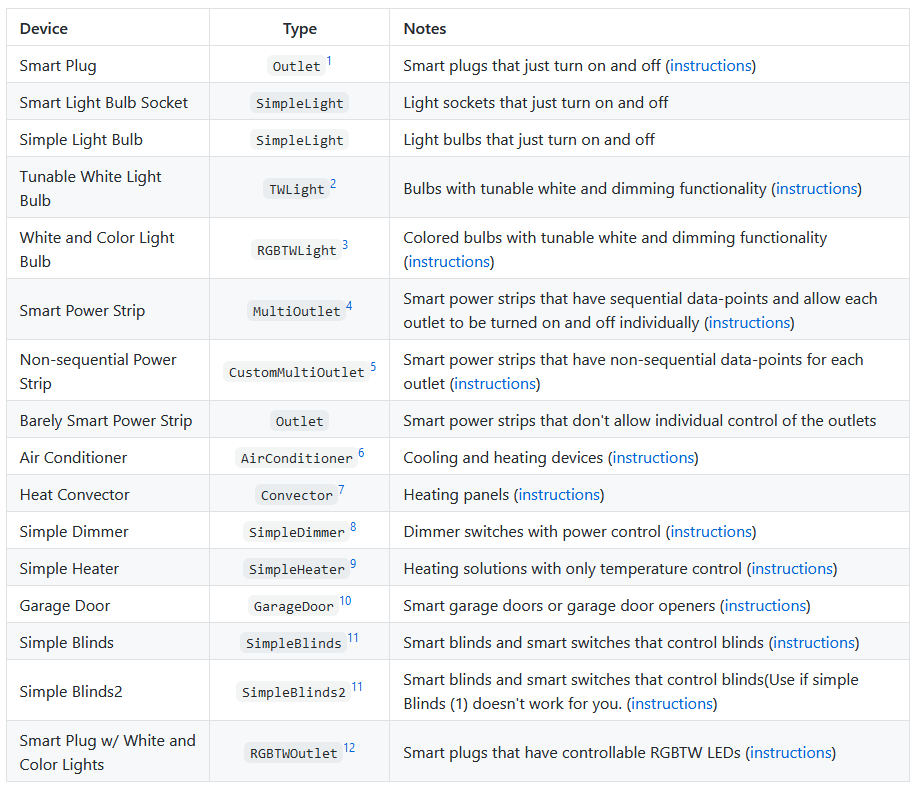
Tuya plugin type values
Once done, make sure the TuyaSmart app is killed on your phone as it won’t allow the plugin to communicate with any devices while you have a login active to the Tuya cloud. Restart the Homebridge service and your Tuya device should appear in the Apple Home app. It will be in the room associated with your HOOBS bridge device initially, but it should add it to the Favorites in the Home app by default.
If you have any problems, you’ll be able to see what’s going on by using the log view from the left-hand menu bar. Most likely it will be a configuration issue. Tuya also updates their website frequently, so if things look different drop me a comment below.
I’ve found the local control to be fast and (so far) reliable in my testing. That’s potentially going to vary by device maker, but given they all use Tuya’s provided hardware and firmware we should get reasonably consistent results across brands.


