
How To Use MyQ With Apple HomeKit
When you buy through links in this article, I may earn an affiliate commission. Learn More.
Chamberlain, along with their various subsidiary brands like LiftMaster and Merlin, might be the biggest name in garage door motors, but they also have their own smart home aspirations via their proprietary myQ technology. myQ is a system that provides for integration of things like door motors, lights and security cameras allowing them to work together and be controlled via a smart phone app. It works well but doesn’t hold a candle to a real smart home platform.
Integrating your garage doors with a more capable smart home platform carries plenty of benefits, and for fans of Apple’s HomeKit ecosystem getting your garage door to work with HomeKit is a natural and very practical extension of your smart home, but not one that necessarily comes easy. We can, however, get your garage door working in HomeKit a few different ways depending on your technical skills, budget, and motor model.
Let’s address the basic question first: Is myQ even supported?
Does myQ Work With Homekit?
HomeKit has good support for garage door openers in general, and Chamberlain has provided an official way to add your myQ devices into HomeKit, but this requires using a bridge device. This bridge (aka hub) provides a translator between the myQ signals and your home network so that HomeKit can talk to them.
Unfortunately, Chamberlain has officially discontinued this product citing low demand, and this device was only built for the US market, so it uses US voltages and US garage door frequencies. If you’re outside the United States you probably won’t be able to use one, even if your garage door supports myQ.
“As our products continue to evolve, we have decided to discontinue production of our myQ Home Bridge Hubs”
Chamberlain pledged to continue to support the devices which are out there but, unsurprisingly, has now dropped that support. The devices will still work but you won’t get any help if you have problems.
So, What Are Our Options Now?
Chamberlain hasn’t been great when it comes to supporting smart homes. They’ve been restrictive with what support they do offer, like only allowing ‘Close’ actions through IFTTT, trying to charge for that access, region locking access, or dropping support on a whim, like recently with Google Assistant. HomeKit support is going the same way with this bridge being discontinued. Given their history in this area I’d be concerned buying into it at this point. Chamberlain’s pledge of ongoing support probably isn’t worth much.
What’s worse is they’ve become openly hostile to smart home users making use of the hardware they paid for by blocking any ‘unofficial’ use of the myQ API. This API has allowed various open-source solutions to provide a way to integrate with myQ, such as Homebridge and Home Assistant. Home Assistant has been trying to work with Chamberlain on this, but they’ve been uncooperative.
Even more damning is the fact that Chamberlain has quietly dropped out of the Connected Standards Alliance just as garage door functionality makes it in the Matter smart home standard. A move that really shows how much they support the wider smart home ecosystem.
Main ways to add myQ support to your HomeKit setup:
Use the official Chamberlain HomeKit bridge device. The easiest option, providing you are in the USA and can source the hardware somehow.
Use a software solution to make a non-HomeKit bridge work in HomeKit. This one requires was a good option, but it’s now more broken than not thanks to the API shenanigans, so I don’t recommend it now.
Forget myQ and use a third-aprty smart device to operate your Chamberlain garage door motor. This is likely more reliable than the first two options, and may be cheaper as well, but doesn’t support all door models.
My Recommendations
When it comes to adding myQ support to HomeKit, Chamberlain has basically given us the middle finger unless they can milk out an ongoing revenue stream for the privilege.
For US residents you might still be able to find a LiftMaster Home Bridge which is likely the cheapest and simplest method. It’s not guaranteed though, given how many people have problems getting the thing to work in the first place. Once you get it set up, however, you should have smooth sailing...at least until Chamberlain reneges on their promise to support it.
The easiest alternative is to go with a third-party door opener. These can be cost effective, and will provide guaranteed, long-term, reliable control of your garage door in HomeKit - providing your door motor is compatible. That’s the main sticking point with this option, but if it is, this is the way to go.
1 - Use The Chamberlain Home Bridge
Support Status
While the official Home Bridge has been the easiest option to add support for HomeKit, I've had reports that the iOS18 update has broken the MyQ app integration with the device and, in what comes as a surprise to know one at this point, have given up supporting it after pledging to continue to do so. As such I cannot recommend going with this option even if you can find one for sale.

819LMB Home Bridge
The official bridge for connecting myQ to Apple HomeKit. While discontinued it continues to be available from various sellers and provides the only officially supported way of using the two systems together.
If you are in a supported region (USA) you might be able to pick up a myQ Home Bridge new. The only ones I’ve seen available are the LiftMaster branded MYQ 819LMB, but this is the same Chamberlain product just with a different name printed on the case.
Advantages
Plug and Play setup.
Official product support.
Works with all myQ door openers.
Disadvantages
Long term Uncertainty.
Poor documentation.
Often problematic to get initially connected.
Reported reliability issues with HomeKit.
How to set up the Home Bridge device
Once you have the device physically installed and turned on you can begin the setup process. This needs to be done in both the Apple Home app and the myQ app, so you’ll need both ready to go.
Connect your iPhone to the Home Bridge hot spot under Settings > Wi-Fi. This will appear in your Wi-Fi list as MyQ-xxx.
Accessory Setup will start where you specify the Wi-Fi network to connect the bridge to. Select your 2.4 GHz network here and tap Next.
Tap Done if you already have the myQ app installed.
Go to the Apple Home app and tap the + icon in the top right.
Tap Add Accessory.
Scan the HomeKit QR code on the back of the Home Bridge and confirm you’re adding the bridge.
Once added you’ll need to specify the HomeKit Room to add it to, and the name you want to use.
The Home app will now tell you Additional Setup Required. This is to configure the bridge to communicate with your garage door in the myQ app.
Go into the myQ app. You’ll need to have an account set up here, so do that if required.
Tap the + button in the bottom right to add a new device.
The myQ app will try to discover the new device. You’ll need to enter the 10-digit serial number on the back of the device and tap Submit.
Name the bridge device as you’ll see it in the myQ app and tap Save.
Select the type of device to add, select Garage Door Opener.
Follow the instructions to activate your garage door motors Learn mode. This will vary by opener model and is required to program the Home Bridge with your specific door motor’s security code.
Name the door and tap Save.
You can add multiple doors by repeating this process.
Back in the Apple Home app you should now have the doors you added. You may need to rename them here.
2 - Use A Software Solution With A Non-HomeKit Bridge
myQ Smart Garage Hub
Using some open-source software we can create a virtual bridge between a standard myQ hub, like this myQ-G0401, and HomeKit. This provides the same functionality as the official Home Bridge, but works in any region, and isn’t dependent on the support of a specific product.
The use of third-party products to provide a bridge between unsupported devices and HomeKit has become fairly common for power users. Some device manufacturers have even taken it upon themselves to provide such a bridge where their own smart devices don’t have HomeKit certification, like Soma, and there are various commercial solutions for specific products available on top of that, such as the Starling bridge for Google Nest devices.
For myQ we’ll need to use the most popular software solution, kown as Homebridge. This is a bit confusing since Chamberlain named their official product with the equally generic name ‘Home Bridge’, but they are very different.
Homebridge (one word) is an open-source software bridge that was created in the early days of HomeKit to address the lack of supported devices. While the market has improved considerably since then, there are still plenty of reasons to use it, myQ being one of them for anyone outside of the USA…and soon to be within the USA as well.
Homebridge acts like any other smart hub, but uses a system of plugins to allow it to be extended to cover any product or service you might need. You simply install the plugins you want to add that functionality to your HomeKit setup. You’ll need something that can be left running for the software to work, and Homebridge supports a wide variety of hardware platforms to make it easy to choose something that works for you. From a low-end PC or Mac, to a Linux server, a small Raspberry Pi device, or even some NAS products.
Advantages
Full myQ compatibility
Works without myQ Home Bridge
Enables over 2000 devices to work with HomeKit
Disadvantages
Can suffer short outages when Chamberlain changes their API
Extra cost and effort to setup
Requires some ongoing maintenance (updates)
How to set up Homebridge for myQ
Installing and maintaining this software does require a bit of extra effort, but it’s arguably worth it given all the other uses you’ll likely find for it over time. My preference is to use a Raspberry Pi because it’s a small, low power device that can sit somewhere inconspicuous like any other smart hub. These have been harder to find since the pandemic, unfortunately, but things should start to improve soon.
An alternative to using vanilla Homebridge is to use the commercial variant, HOOBS (Homebridge Out Of Box System). HOOBS makes this a bit easier by providing a preconfigured boot image for you, regular updates, and an official support channel. You can also buy a pre-built device from them, so you don’t even have to deal with the setup part.
Set up an inexpensive non-HomeKit myQ bridge like the Chamberlain MYQ-0401-ES. Any myQ bridge will do, this just provides the connection between the myQ system and your home network.
I have a comprehensive guide on installing HOOBS, so check that out for details on this step.
With Homebridge or HOOBS set up, you’ll be able to find the myQ plugin in the Plugins section under Library with a simple search. Here is the one you want:
HOOBS Certified myQ plugin page in the HOOBS Plugin directory.
The same myQ plugin on the NPM repository (source location).
Click Install on the plugin and add the requested details to link it to your myQ account.
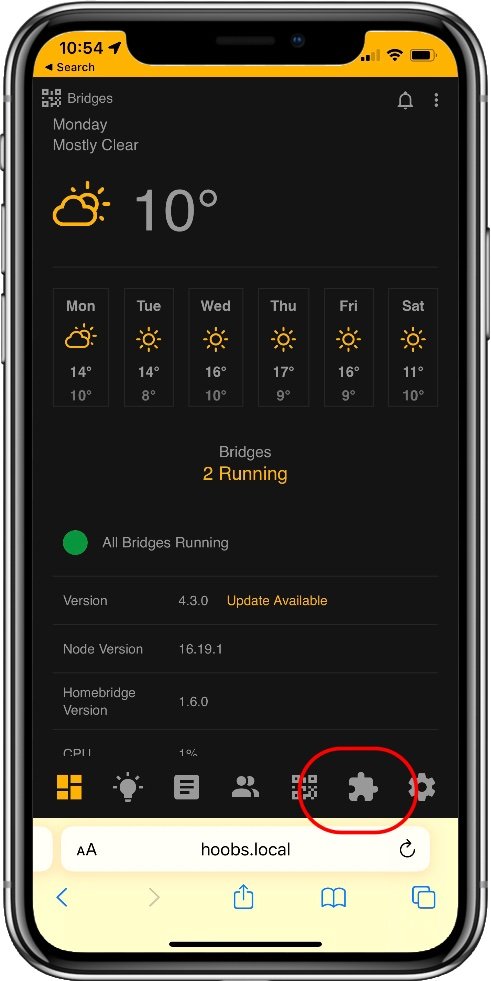
Access the plugins here
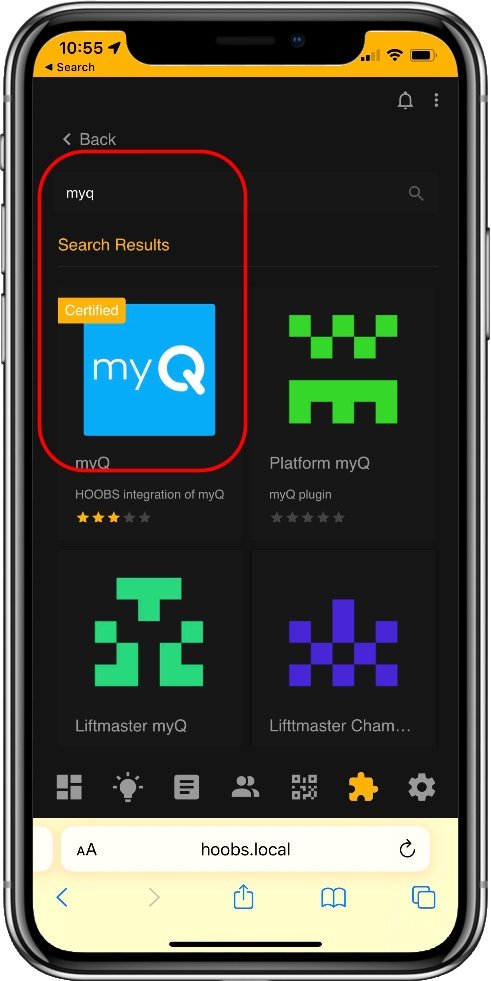
In the Library search for ‘myq’
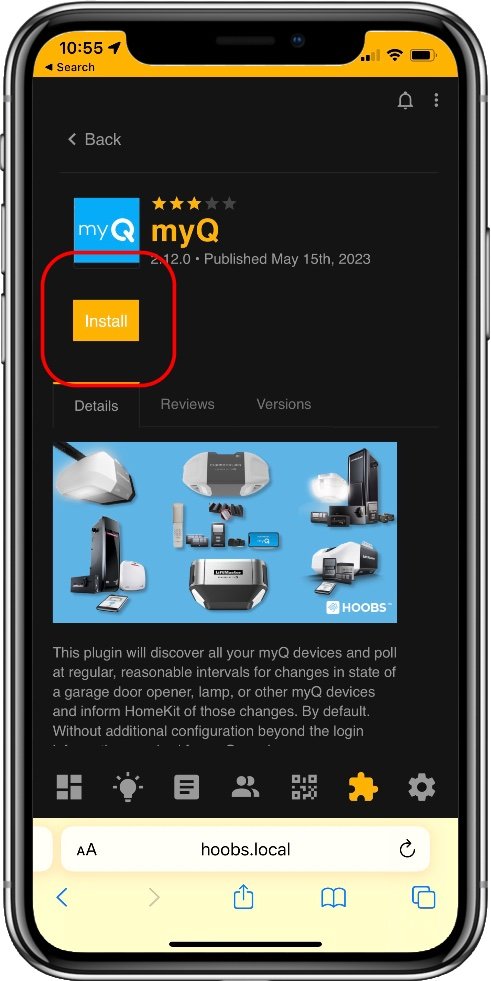
Click install on the plugin page
3 - Use A Third-Party Smart Opener
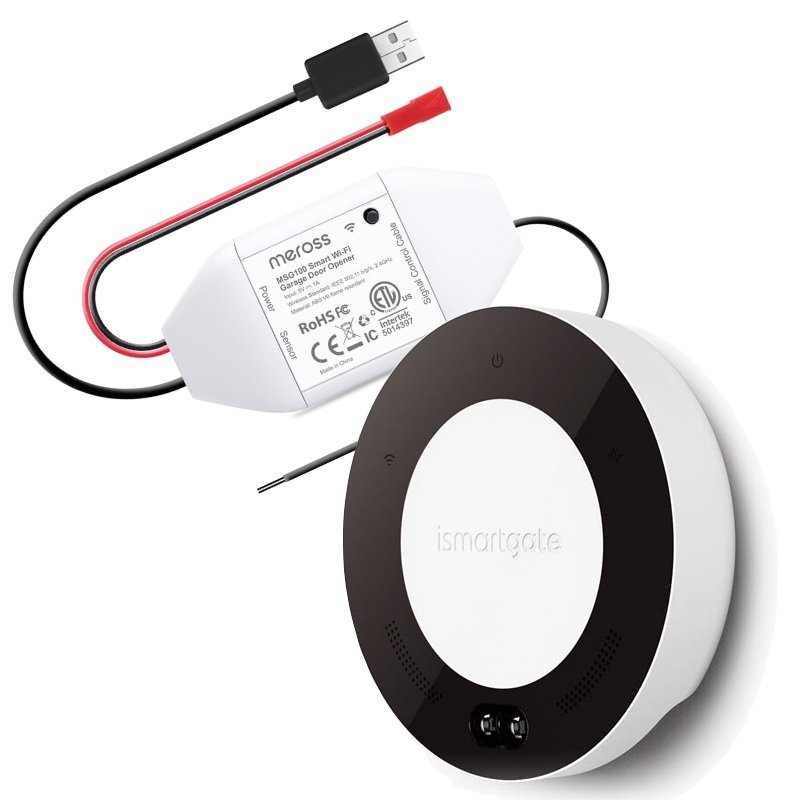
Third Party Garage Openers
These two devices, the Meross Smart Wi-Fi Garage Door Opener, and the iSmartGate are both good alternatives for controlling your garage door in HomeKit. Not all Chamberlain door motors are compatible, though, and some may need adapters to work with these devices.
For many HomeKit users going with a third-party smart device is the better solution. These devices support a wide range of door motor models, but not all Chamberlain models will work with them, and some may require an adapter. Thankfully both of these device makers also have a range of such adapters to suit different models that they can provide.
Adavantages
Native HomeKit support, no third-party account required.
Easy setup.
Highly reliable.
Disadvantages
Don’t support all door motors.
May require an adapter from the device maker.
How to Set up a third-party door opener
These devices work by connecting to your garage door motor manual switch terminals. By simulating a manual button push they can trigger the motor to open and close, and use a separate door sensor to determine the door status and if there is an obstruction. I recommend two products here, depending on if you want a wired door sensor or a wireless one. The wired option is zero-maintenance, where a wireless one is easier to install, but needs battery replacements over time.
For Security+2.0 wired sensor installation use the Meross Smart Wi-Fi Garage Door Opener. See their compatibility checker here.
For Security+ 2.0 wireless sensor installation use the iSmartGate Lite. If you have multiple garage doors, iSmartGate also have a pro model that can support up to three door motors. See their compatibility checker here.
Home Assistant users would be better off trying the ratgdo module, which does a similar job, but not for openers with Security+ 3.0.
For Security+ 3.0 you’ll need to use a genuine MyQ remote along with the THIRDREALITY Smart Garage Door Opener. This new device is Matter certified along with newly added garage door functionality in the standard. Demand may make these a bit scarce.
As these are basic HomeKit devices, the process is the same as with any other HomeKit accessory apart from connecting it to your door motor.
Perform the connection to your door motor first according to the setup instructions provided.
Power up the device.
Open the Apple Home app.
Tap then + in the top right corner.
Select Add Accessory.
Scan the HomeKit QR code on the device and confirm.
Select the Room and name to use.
What Can You Do With MyQ In HomeKit
When Chamberlain has provided some level of integration with smart home platforms, the functionality has often been limited. IFTTT and Googe Assistant, for example, are only allowed to close the door, not open it. Alexa doesn’t have any official support at all. HomeKit, on the other hand, did enjoy full support including open and close actions, visibility of transit in the Home app, and obstruction alerts. You can also configure notifications for when the door opens and closes based on time of day and who is at home.
HomeKit considers a garage door opener a security-sensitive accessory, and as such it does place some limits on ‘open’ actions. Specifically, it won’t allow these to be done via voice command on a HomePod. Doing so will either deny the request or, if you have personal requests enabled, hand off the command to your personal devices such as an iPhone or Apple Watch.
This is to ensure that the door cannot be opened by accident, and that only an authorized user can open the door and not through misinterpreted or accidentally triggered voice commands. Similarly, attempting to open the door with a location-based Shortcut or automation will cause a confirmation request to come up on your device. This limitation can be worked around using another Homebridge plugin, the Dummy Switch.
By having your location trigger the dummy switch to turn on, and then another automation to open the door triggered by that switch turning on, the garage door automation is no longer location-based. It’s a risk as you can cause your garage to open by simply driving (or walking) within the trigger range of your house, but many people like to automate it in this way.
Frequently Asked Questions
How do I link myQ with HomeKit?
There are a few ways to do this, both using the official myQ enabled garage door opener, or a third-party solution. You’ll need a device that will provide a bridge between myQ and Wi-Fi in order to see it on your home network and allow HomeKit to control it. This article covers the best options using off-the-shelf products and DIY solutions depending on what you have, and what you want to get out of it.
Does myQ Smart Garage Hub work with HomeKit?
Out of the box, no it doesn’t, it will only work with the myQ app. You’ll need the HomeKit-enabled myQ Home Bridge instead, but given this is now discontinued you might want to explore using the free Homebridge solution to integrate with the myQ Smart Garage Hub. Setting up Homebridge by using the well supported HOOBS version makes this fairly easy now.
Does a myQ smart garage door work with Siri?
Yes, you can use Siri voice control. You’ll need the HomeKit compatible myQ Home Bridge, or you’ll need to use a cheaper myQ Smart Garage Hub along with a third party Homebridge setup to connect your myQ devices to Wi-Fi.
Siri treats garage doors as security sensitive devices, so there will be some extra precautions applied when using them via voice control. In the case of Siri, if you use a HomePod to issue an ‘open’ command, you will be prompted to confirm on your iPhone. If you use an Apple Watch to issue the same command Siri will consider this authorized already, but if you are not at home it will ask you to confirm on the screen.
Do I need a hub to connect myQ to HomeKit?
If you only want to add your garage door to HomeKit then no, you can use a third-party Wi-Fi garage door opener like the Meross Garage Door Opener or iSmartGate that doesn’t require any extra hub. If you want to use other myQ devices, then you’ll need a myQ hub device of some kind and potentially some DIY work to integrate it with HomeKit.
Does myQ have an Apple Watch app?
Yes, there is an official myQ Apple Watch app that allows you to control your garage door through a myQ bridge device conncted to your home network. The bridge device doesn’t have to support HomeKit for this functionality, it just has to be able to receive commands from your watch via the internet and send the control codes to the door motor.
Is there a monthly fee for MyQ?
For using myQ with the official myQ app, or through HomeKit, there is no monthly fee required at this time.
Can myQ close my garage door automatically?
You can use the myQ app to set your garage to close after a set time period, or you can set up an automation in HomeKit to tell the garage door to close based on your location, such as when you leave home.


