
HomeKit Automation Guide - Taking Automations Beyond the Home App
Apple HomeKit, Apple’s smart home platform, offers a number of benefits for building a smart home, particularly around privacy, security and ease of use. A vital feature for smart home platforms, though, is the ability to create automation rules (which Apple simply calls automations), and HomeKit actually offers more in this area than Apple’s own Home app exposes or makes obvious.
We’re going to go into all the types of automation rules HomeKit supports, and how to implement them. This will involve some third-party apps, as this is the only way to access some of these features for the time being.
It’s worth pointing out at this point that for any of these home automations to work reliably, or at all, you’ll need a home hub such as an Apple TV as part of your HomeKit set up.
In This Guide
Automation Rule Basics
Smart home platforms implement rules in different ways, but they generally fall into some broad categories, not all of which are supported by every platform. These can be classified as:
Trigger Actions (if A then B)
The most common, and indeed the basis of the platform IFTTT. One input is used to trigger another action. The input can be a device control event (a device did something), a sensor detects something (motion sensor, temperature, light level etc), a schedule event (a fixed time or date), or a geofence event (someone arrives or leaves a given location) which are useful for location based routines. HomeKit supports all of these to some level.
Conditional Actions (if A and B then C)
See How to Create Conditionals
An extension of the above with the ability to define filters that must be passed before the actions will be performed. The filters are similar to triggers being device state, sensor thresholds, geofence presence, time and date. If conditions are supported, more than one can typically be combined with AND and OR options (all conditions, or any one of the conditions). HomeKit supports all of these to some level.
Delay Actions (if A then B after X mins)
Actions can be delayed by a given time interval before being performed. This can be as an overall capability allowing the entire rule to be delayed up front, or it can be a delay to undo (or turn off) the actions after the fact. HomeKit supports the latter only.
Stacked Conditionals (if A and B then C while/until D)
See How to Create Stacked Conditionals
This extends conditional rules to include exceptions and limits. These can be loosely defined with terms like while, unless, and until. Some uses of this kind of rule include things like seasonal changes, and manual overrides which can make your home a lot smarter and avoid some of the frustration that can result from inappropriate automatic behaviors. HomeKit does not overtly support these, but these are some ways around that.
Now we know the kinds of things we could do, let’s look at how we can accomplish these in HomeKit and what the limitations are starting with the tools we’ll need.
Third Party Clients
In order to unlock some of the advanced functionality of HomeKit, you'll need a third party app. Here are a few that have automation specific benefits. Apart from the Eve app, these are not free, but if you want to get the full benefits of HomeKit automations it’s a small outlay compared to your likely spend on accessories.
Home+ by Mattias Hochgatterer is a good all-round client with a highly customizable accessory display and comprehensive access to automation capabilities. The overall display of the home is not as practical as the Home app, in that there is no status view, and Apple limits access to camera features, but you do get a lot of control over how accessories are shown, including which characteristics and services are displayed or hidden.
Controller for HomeKit by Jan Andre is similar to Home+ but very much a power user focused app. This client forgoes any pretense of looking nice and just gives it to you straight, showing all the dirty internals of what’s going on. Additionally, it includes configuration backup and restore features, an additional way of automating actions called Workflows, and advanced push notifications about your home status.
While the Eve app by Eve Systems GmbH is ostensibly Eve’s own app for their devices, as they are exclusively a HomeKit manufacturer their app is actually a full featured HomeKit client. The Eve app sports the prettiest design of these three while still enabling greater access to automation features than the Home app. I still prefer the Apple Home status display, but this one at least gives a lot of presentation control of your rooms and devices, and has, in my opinion, the nicest accessory control interface of all the clients, including Apple’s. As a bonus it also includes the only way to view the network status of Thread-based devices in your home, at least those connected to HomeKit.
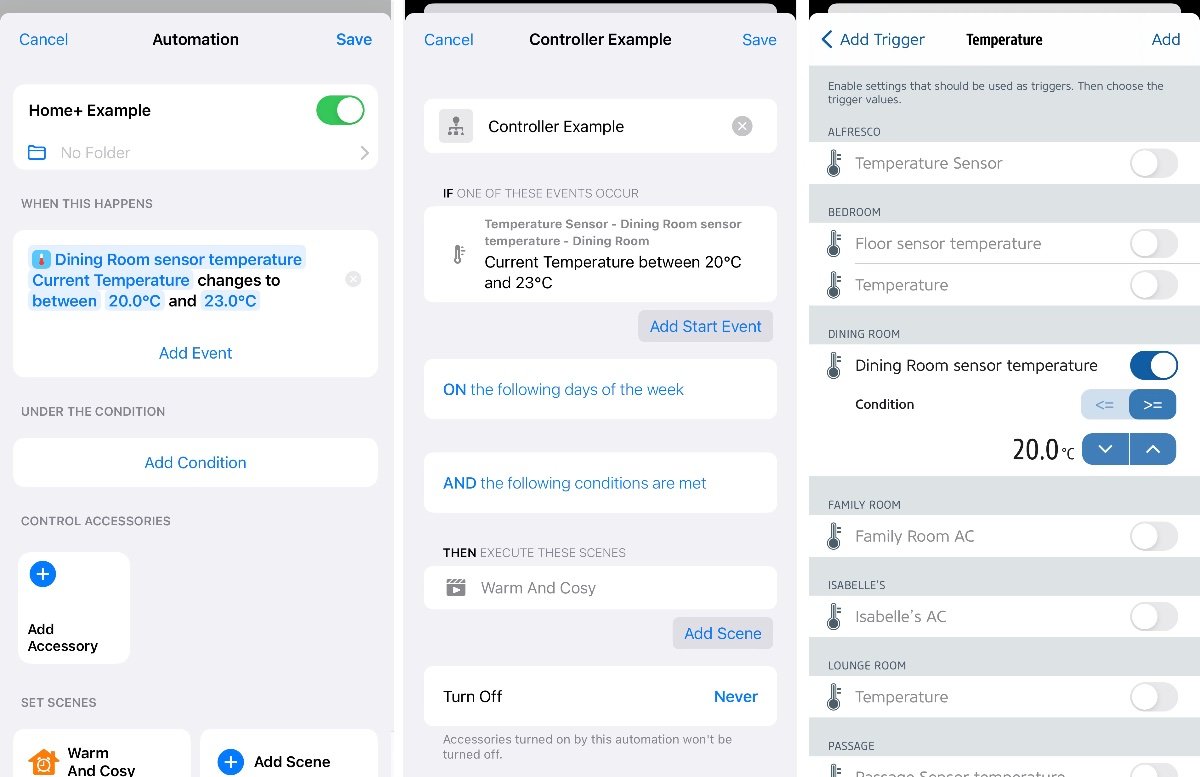
Rule editors in Home+, Controller, and Eve
How To Create Trigger Actions
Being the most basic automation type, these are easily created in the Home app. The first step in creating any automation is to select a trigger. The Home app allows almost full use of the trigger types support by HomeKit, with some limitations. Here’s how to create these various trigger actions:
Tap Automation.
Tap the + in the top right corner.
Select the type of trigger you want to use from the list.
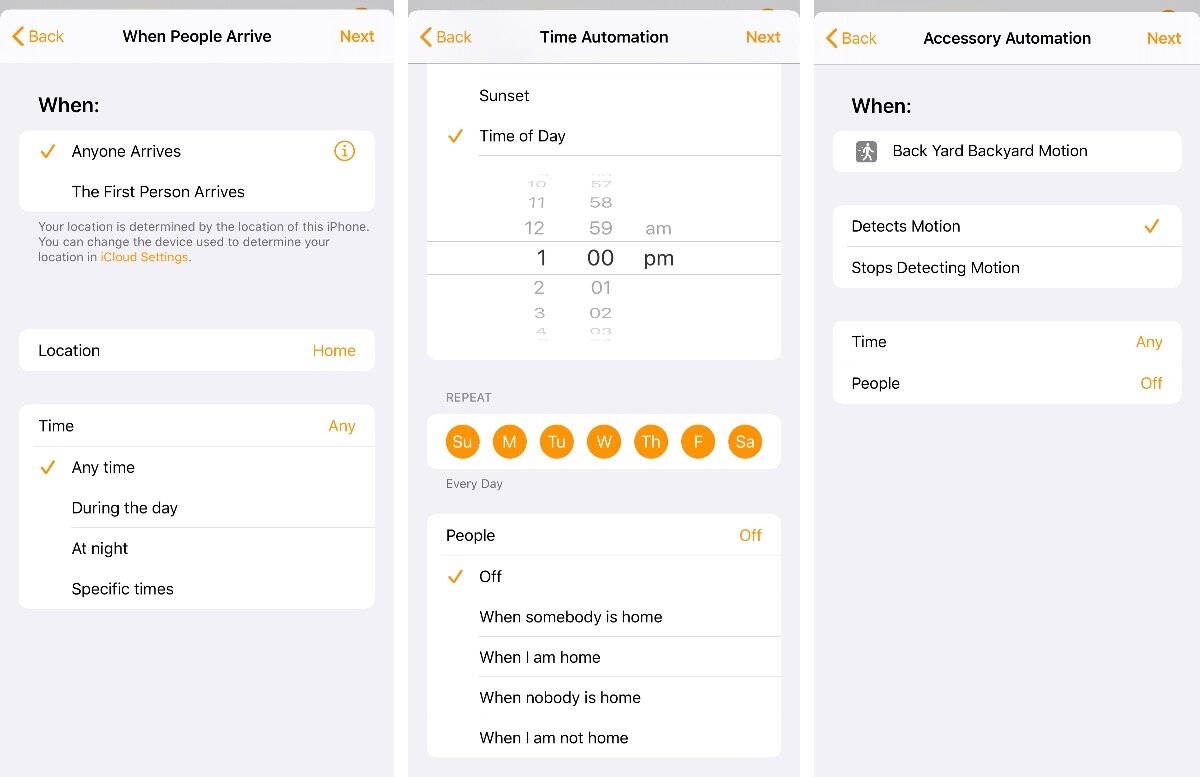
Geofence presence. The Home app calls these “People Arrive” and “People Leave”. These events can be for one or more members of the Home specified as Anyone or by selecting specific users. Interestingly the ability to select specific users is limited to the Home app, the third party offerings can only use Anyone. You can also specify events based on the first to arrive and last to leave rather than specific people, but these can also be based on a filtered group of home members.
Select whether you want to trigger on anyone arriving, or the first person to arrive.
For both of these options, you can tap the info icon to the right to select which people to use for the trigger.
If you specify one or more people for Anyone Arrives/Leaves, any one of those people will trigger the rule.
If you specify one or more people for The First/Last option, this will use only the selected people rather than every member of the home.
Scheduled Time, which is limited to Time of Day and Day of Week rather than allowing specific dates. All of the apps expose the same functionality, either being able to enter a specific time of day (hour and minute) as well as the days of the week that it will trigger, or a Sunrise/Sunset value along with an offset time before or after that. This allows HomeKit to calculate the correct trigger time based on your location and time of year.
Select Sunrise, Sunset or Time of Day.
For the first two, tap the info icon to the right to set an offset either before or after that time.
Turn off any days of the week you don’t want the rule to run in the Repeat section. They are all on by default.
Accessory State. These use data from an accessory to determine a trigger threshold. The Home app breaks these into two types; “An Accessory is Controlled”, limited to on/off type events such as smart plug or smart light accessories, and “A Sensor Detects Something”, again limited to certain accessories such as motion sensor, water leak sensor, smoke detector, and contact sensor types. Third party apps will allow you to select basically any characteristic value from any accessory, and in many cases a range of values, to act as a trigger.
Select an accessory from the list. The accessories available will depend on which trigger option you use.
For An Accessory is Controlled, you’ll be able to choose on/off, open/close type devices.
For A Sensor Detects Something, you’ll be able to select sensors that report specific events like open/closed, motion/no motion, as well as certain sensors that have values, like temperature or light level. For other sensor types you’ll need to use a third-party app. Here’s how to create HomeKit sensor triggers in third party apps.
A list of all your sensors will be shown by Room. Select the sensor to use as a trigger.
Tap Next in the top right corner.
Select the triggering value from the options presented. This will depend on the accessory you chose. It may be a binary value like Open or Close, or when a value Rises Above or Drops Below a certain number. These value-based triggers will likely need some trial and error to get the right threshold.
With the trigger defined, you can now complete the rule by assigning the actions to be performed. This part exposes another difference between the Home app and third parties. The Home app allows the selection of specific accessories and actions, not just Scenes. Third Party apps can only select Scenes. The Home+ app tries to mitigate this somewhat by allowing you to select accessory actions during the rule creation and then creating a Scene automatically for you in the background.
Tap Next in the top right corner.
Select the scene to run as the action, or select specific accessories to control at the bottom of the list.
Tap Next at the top right.
Review the rule and adjust any accessory actions as required then tap Done.
How to Create Conditional Actions
The Home app does actually allow some limited conditional actions to be defined, but they’re scattered through the rule creation screens. Conditions in the home app are essentially limited to People and Time based constraints. For Time based conditions, you can select Day, Night, or a specific time window. For People it’s “When I am Home”, “When Somebody is Home”, “When nobody is home”, and “When I am not home”.
Where these options appear depends on the type of Trigger being used
For People based Triggers, the Time option is presented on the first page after selecting the trigger type, where you select the people to use for the trigger.
For Time based triggers, the People option appears below the Repeat bar for selecting days of the week.
For Accessory based triggers, both the Time and People options appear on the screen after selecting an accessory, where the trigger value is selected.
Home app conditional settings
HomeKit does allow considerably more flexibility than these options, though. To create them requires third party apps, and once created the Home app does show the conditions and allow them to be toggled off individually.
Each of the third party apps handles conditions in a similar way. When creating a rule a conditions section will be present where one or more conditions can be added. There is some variation in the naming of the options, but generally all three offer Accessory State and Time based conditions. The Time options are the same as the Home app, with either a specific time window, or an offset period before or after sunset and sunrise.
Home+ and Controller both offer the People conditions as well, with the same options as Home. The Eve app doesn’t have any location based condition options, but these can be added using the Home app after you’ve specified any other conditions you need.
To add an accessory based condition to a rule in each app, open the automation and then:
Using Home+:
Tap Add Condition.
Tap Accessory State.
On the Choose Accessory page:
Select the Accessory to use.
Select the characteristic to use.
Edit the the operator and value in the Condition rule on the Automation page.
Using Controller for HomeKit:
Tap AND the following conditions are met on the Automation page.
Tap Accessory.
the Room containing the accessory.
Select the accessory to use.
Select the characteristic to use.
Edit the operator and value for the trigger
Tap Save in the top right corner.
Using Eve:
Tap the row under Conditions
Tap Add Value Condition
Select a room
Turn on the characteristic to use
Tap the operator and select the value to use.
Tap Add.
Eve filters the available characteristics to those it thinks make sense for the device type. This just helps to keep the list of options a bit cleaner, but it can hide some useful values in certain cases, especially accessories with multiple functions. If you do need to access custom characteristics, then Home+ exposes everything the accessory offers (even more than Controller does), including the ability to do string comparisons.
One important distinction between the apps here, Eve and Home+ need ALL conditions to be met, where Controller allows you to specify ANY or ALL.
Examples:
How to Create Delay Actions
Delays both before and after an automation (or even during) can be a useful tool when crafting more advanced automation behaviors that include linked smart home automations or timed activities. HomeKit is a bit lacking in this area when compared to other platforms, and only supports one kind of delay; an undo timer.
The ‘Turn Off’ option
In the Home app any automation your create will have a Turn Off option at the bottom of the rule, or at the end of the creation steps. The default, naturally, is Never. This can be changed to a number of preset values from 1 minute up to 4 hours. This is a useful feature that is supposed to allow for anything that was turned on by the rule to be automatically turned off again, but seems to only work for lights at this time.
This is the common use as this would be used for motion sensor triggered smart lights so that all the lights turn off after a period of no motion. The motion sensor triggers the rule, the lights turn on, and the countdown starts. A key point here is that the countdown is reset every time the rule is triggered, which means so long as motion is detected again in the specified time, the lights won’t turn off.
Dummy Switch Timers
But what if you want to delay when an action starts? That gets a bit trickier. A good way to do this is to use a dummy switch. While this is a useful automation tool, HomeKit doesn’t support this functionality natively. A good solution is to use Homebridge and the homebridge-dummy plugin. This plugin allows for stateless (button press), stateful (toggle), and timed switches to be added easily to your HomeKit setup.
An example of this use is my nightlight function. My Goodnight scene turns everything off, and I typically kick that off with a Siri command right before I head to the bedroom. Because I’m not triggering the scene with an automation, I can’t use the automatic Turn Off feature (which also wouldn’t work if the light was already on when the scene ran). The problem is that Goodnight makes it very dark, and I need a way to get there in one piece.
The solution is to use a timed dummy switch with a 2-minute delay. The Goodnight scene now turns on the hall light with a 1% brightness, that gets me to the bedroom, and turns on the dummy switch as well. Another automation is triggered when the dummy switch turns off which turns off the light.
Shorcut ‘Wait’ actions
Another option is to use Siri Shortcuts. You can actually use a form of Siri Shortcuts to build automated behaviors now, but only through the default Home app. This is done in place of the Select scenes and accessories step. Check out the guide on using shortcuts in automations.
Essentially you’d be looking to use the Wait action to insert delays, both fixed and calculated from other data, and then send whatever commands to your accessories you need. Currently the Wait action has a limit of 10 minutes, so if you need longer than that you’re back to using the dummy switch method.
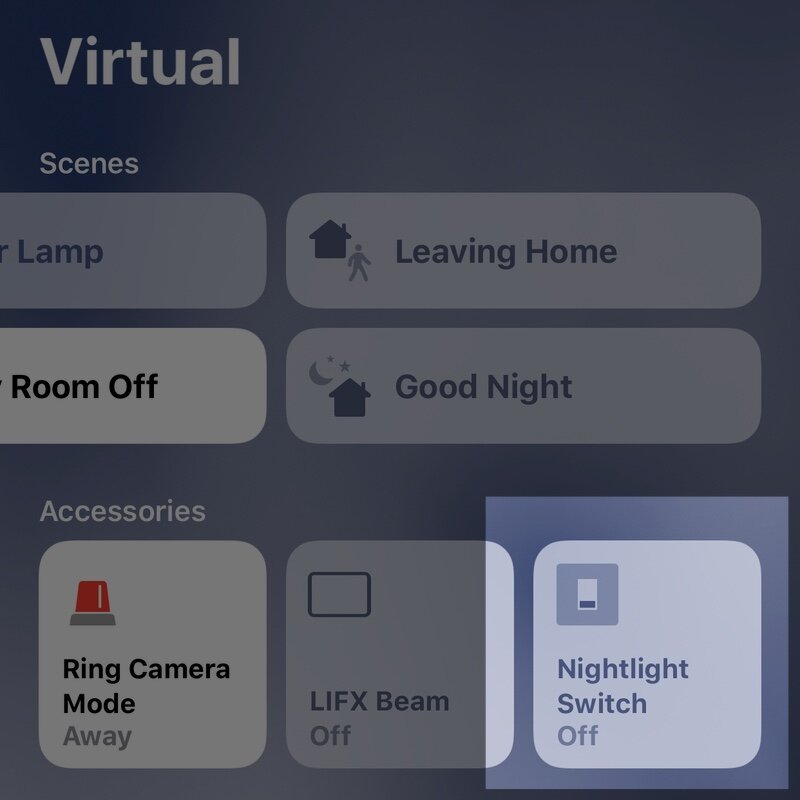
Dummy switch (The Virtual room keeps them tidy)
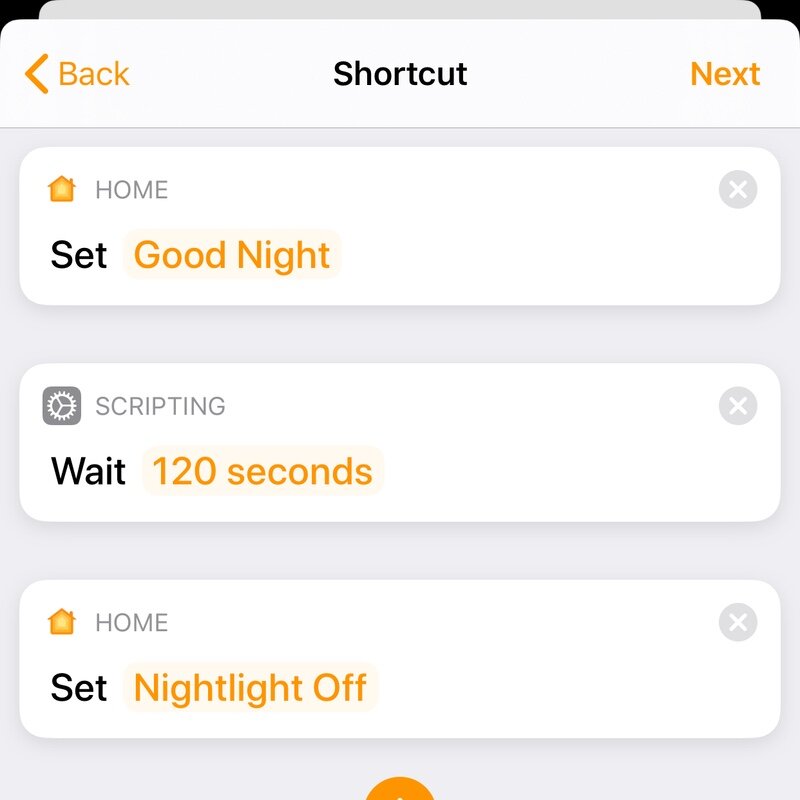
Basic Shortcut automation in the Home app
How to create stacked conditionals
This level of complexity was something completely absent from HomeKit for a while, but we are starting to get the tools to build these more complex automation rules, although again, it’s not obvious at first glance.
We can use some kludges to achieve these results and I’ve touched on these a bit so far, such as the use of dummy buttons and Shortcuts. Still, it is here that we start to run into hard limitations for the time being.
If we want to have a branching condition, for example, being one which does different actions depending on conditional results. This would typically be an if-then-else function; if condition A and B then do C, otherwise if B and D do E. You may also have additional conditions on the second action.
We can do this in HomeKit by creating multiple automations off the same trigger and use the conditions to determine which path to take. The toggle switch example uses this approach in a simple way, but you can build up the conditions to make it “smarter”.
We can do this a bit more directly using Shortcuts as we can use an actual IF-THEN-OTHERWISE scripting action (this alternative is also covered in the toggle switch example), and these can be nested as well for more complexity. There are still some limitations with this approach though, as you can’t access the People conditions or sunset/sunrise time constraints within a shortcut. If you need those you’ll have to make do with the multiple automation method.
Having an action continue UNTIL something happens or WHILE a condition is true can also be achieved with a dummy switch and multiple triggers. The process is very similar to creating a delay action. It could look something like this:
A trigger would activate and run a scene, flipping on a dummy switch in the process.
When the UNTIL event occurs, this is used as a trigger for another automation that flips the dummy switch off.
The dummy switching off is the trigger for another automation that completes the full sequence.
A practical example
Here is a good example of more complex logic using multiple automations that was also featured on LeadsRating.com. I have an outdoor water feature that is fully automated through presence and time conditions via an Eve Energy smart plug. This works well as it only turns it on during the day when someone is home and turns it off as required.
However, on a windy day it sprays water all over the place, so I wanted a way to turn it off while it’s too windy. I need to use IFTTT for this particular case as HomeKit doesn’t support wind speed as a sensor input, but the same process would apply for other scenarios with HomeKit supported values.
As an aside there are few ways to hook IFTTT into HomeKit, Homebridge being one of them, but I’m using the awesome Pushcut app for this. It’s not free, but it’s a lot simpler and adds a bunch of other automation capabilities.
What we want here is a rule like this:
IF anyone is home AND it’s daytime, Turn on the fountain WHILE the wind speed is low.
That’s the simple way to do it, and some more advanced automation platforms support that kind of rule structure. HomeKit absolutely does not. But we can achieve the same result with multiple HomeKit automations like this:
At 6am, if the wind switch is off AND if someone is home, turn on the fountain
When anyone arrives home, if it’s daytime AND if the wind switch is off, turn on the fountain
When the last person leaves, turn off the fountain
When the wind switch turns on, turn off the fountain (the switch will reset after whatever delay you set on it)
When the wind switch turns off, if it’s daytime AND if anyone is home, turn on the fountain
At 6pm, turn off the fountain.
So if the wind is over a certain speed, IFTTT flips a Homebridge dummy switch. The event triggers an action to turn off the fountain (I also set a particular lamp to Yellow so I know what’s happened).
The switch has a 30 minute delay, so it will turn off only if the wind has been below threshold for 30 minutes (because repeated triggers will reset the timer). When it turns off the Fountain is restored IF the day and presence conditions are still valid.
The rules 1 and 6 can be simply added to your Good Morning and Good Night scenes, or a similar scheduled scene you already use to simply this a bit. You could also leave rule 5 out and just leave it off until someone comes home again.
If you think about using accessory changes to trigger other actions, combined with multiple conditions, you can start to see how you can achieve a lot of interesting results that can result in more intelligent home automation behavior.
HomeKit Automation Ideas
Adjust your blinds based on daylight and temperature
A set of automations can be created along with an outdoor temperature sensor that can make your smart blinds more useful. Have them open at sunrise (or an offset past then), and then have the close automatically if the temperature gets too hot outside, as well as at sunset.
Filter Outdoor lighting triggers
Triggering your outdoor lighting when a motion sensor detects movement is a nice convenience, but you may find it lighting up the yard every time a cat or other animal strolls through. You can pair the motion trigger with a condition based on something else, such as a gate or door being open when you are actually entertaining.
Filter your outdoor lights to turn on only when you are going outside
I have a situation where there are a number of outdoor smart lights I like to have on if I’m going out to the garage. I don’t have a motion sensor out there, but I do have one in the lobby, as well as a contact sensor on the front door.
I could turn them on when the door opens, but that would turn on all the lights when I’m going into the house as well, which is pointless. Instead, I pair that with the motion sensor so it only turns them on when I open the door from the inside, along with a Turn Off time out.
Open door alerts
This one requires a more advanced shortcut and a third-party app to provide custom, dynamic notifications. Both Controller and Puschut can do this depending on what other features you want to use.
Creating a shortcut that queries the state of all the door sensors in the house (like the front door, garage door, laundry door etc), I can then trigger a custom notification by calling a URL with the list of which doors are open. I can also include some quick actions in the notification that allows me to respond, for example by closing the garage door if that has been left open.
The shortcut required to do this is included in the custom notification guide, so check it out if you’re interested.
Power User Tools
As an addendum to this discussion, I wanted to call out some of the most useful third-party tools that can be used to enhance your HomeKit automations. These are most definitely power user tools, so will take some learning and configuration, and possibly additional hardware as well. In many cases, though, you’ll find they add a lot of utility that can solve some of the deficiencies in HomeKit.
As discussed in some of the how-to pages linked from this guide, Homebridge is a powerful and fairly mature third party, open-source integration bridge that supports over 2000 non-HomeKit devices and services. You can then use these in HomeKit as normal accessories and in automations, sometimes with better results than native HomeKit support. The community HOOBS project has made installing this a lot easier, and it’s so useful you should definitely check it out.
This third-party app provides a few useful functions that I’ve found plug some gaps in what I’ve wanted to do, such as in the stacked conditional example above. It provides the ability to create custom, actionable notifications that can be triggered from HomeKit. It also enables the execution of Siri Shortcuts without any confirmation or pop ups, and provides further integration options with services like IFTTT, Integromat, and Zapier. These do require a small subscription and a spare iOS device to act as a server, but if it solves a problem for you, it might be worth it.
OK, so this one is a totally separate home automation platform in itself, but it does offer full HomeKit integration which gives you a lot of flexibility in terms of which devices you can add, as well as opening up more powerful automation capabilities. Combining the two can get you the best of both worlds.
Conclusion
Apple HomeKit may not overtly offer the kind of features seen in some more enthusiast focused platforms, but that doesn’t mean you can’t do them.
With the addition of some third-party tools, and thinking about how to use triggers and conditions a bit differently, it’s possible to unlock much smarter and more complex HomeKit automations than just using the features exposed in the Home app. Indeed, these capabilities will become an important competitive advantage as major platforms move to the new Matter smart home standard.
As such, Apple will hopefully be expanding these features to make these tasks easier and more robust over time, adding those capabilities for third party apps even if they choose to keep the default app focused on the everyday consumer.


