Use A Homebridge Dummy Switch To Link Your Automations
While Apple’s HomeKit offer considerable flexibility in defining your home automation actions, one thing that is distinctly missing is the ability to have timed actions outside of the built in Turn Off timer. If you have the open source Homebridge installed, you can easily accommodate these kinds of behaviors using the dummy switch plugin.
A dummy switch is a common automation tool that provides a simple way to send a signal to other automated actions within a platform. It’s essentially a virtual switch or button accessory that can then be turned on or off through one automation as a signal to another, either as a trigger in itself, or as a conditional value to determine if something should happen or not.
HomeKit doesn’t provide this natively, but as with many other devices, Homebridge provides a way to add this to your HomeKit setup.
What Can It Do?
The Homebridge Dummy plugin allows you to add any number of dummy switch accessories to HomeKit, each with one of four behaviors.
By default the dummy switch will act as a stateless switch, like a conventional button. When turned on, it will automatically turn off 1 second later. This is useful for triggering another automation using the An Accessory Is Controlled trigger in the Home app.
This behavior can also be reversed so that the switch turns itself on 1 second after being turned off. Although largely symbolic as you can drive automations either way, it may make more logical sense in some cases.
Each Dummy switch can be set to be a stateful switch instead, which means it will act like a manual light switch in that it must be manually turned off once turned on. This allows for the on and off states to be used as triggers. One use for this might be to flag that a particular condition is in effect that can be checked by other automations before they run.
Finally, you can create a timed switch by specifying a time period in milliseconds. This will change the default 1 second switch behavior and can be very useful for adding timed delays into more complex actions. An example here is wanting to trigger something else to happen 1 minute after a scene runs. The first scene can turn on the switch, and the turn off behavior can be the trigger for another automation.
Setting Up a Dummy Switch
If you don’t have a Homebridge instance running already, it’s worth taking a look as you’ll start to find other things you can do with it. It’s much more accessible now if you use the HOOBS project that will get you up and running fast, and make managing your setup far easier without needing to dig around in SSH shells.
Using the HOOBS interface, we can add the dummy plugin fairly easily.
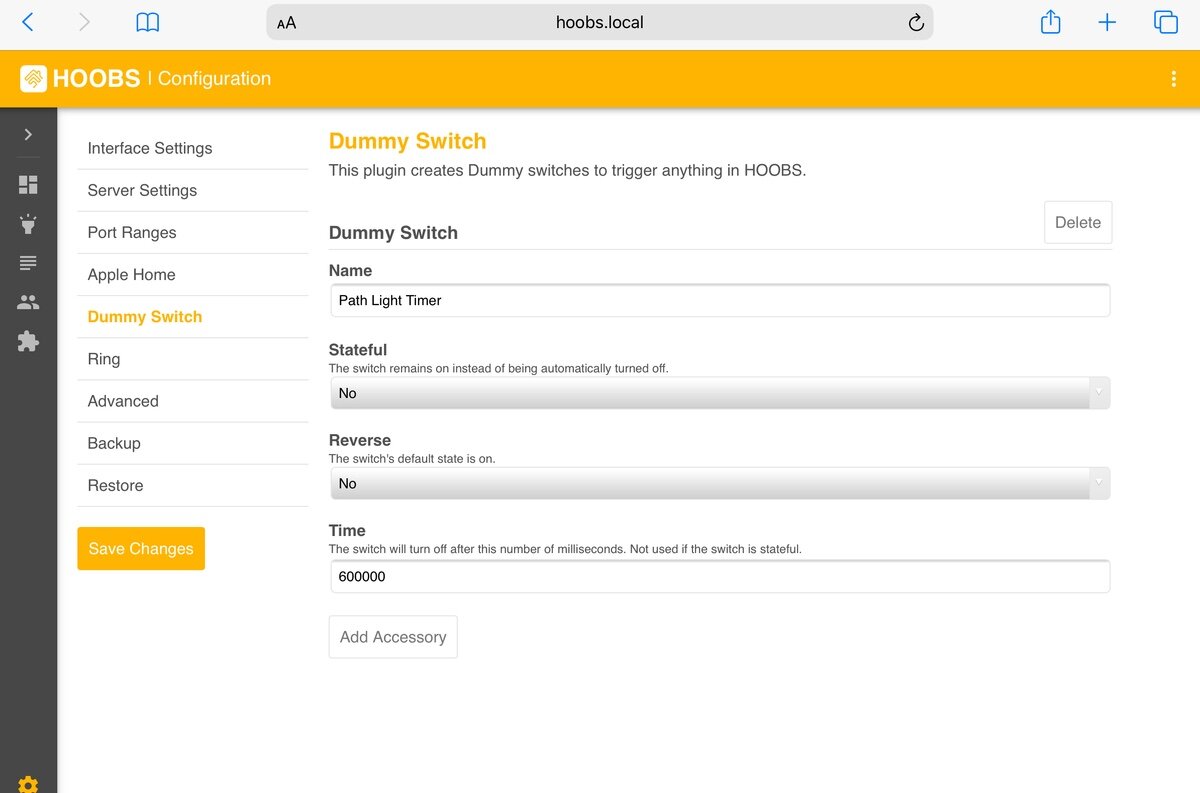
Dummy Configuration in HOOBS
Go to the Plugins section one the side toolbar.
Click Search.
Enter the name dummy in the search field.
Locate the result for the HOOBS Certified Dummy, which should be at the top.
Click Install and wait for the install to complete.
You’ll be taken to the configuration screen for the plugin. Click Add Accessory.
Give it a Name (this will appear in HomeKit),
You don’t have to do anything else for the default button behavior, just Save Changes. But we’ll add a time delay on this one.
Enter 60000 in the Time field, this is milliseconds so that will be one minute.
Make sure you don’t have another blank switch entry below, delete it if you do as a blank name field will cause Homebridge to fail to start.
Click Save Changes on the left.
The HOOBS service will restart and you should have your new switch in HomeKit right away.
The switch will appear as a normal switch type accessory and used in automations and scenes as normal. Typically you’ll need a separate switch for each specific automation behavior you want to drive, so just repeat the process to add additional ones with the necessary behavior options, such as time delay or statefulness.
Summary
Dummy switches can be all sorts of useful when working around the limitations of the Apple Home app. Whether it’s setting timers for automation actions, or linking accessory behaviors together like multiple motion sensors in the same room, a dummy switch can be a simple solution that unlocks really useful automations.
This alone can be worth getting a Homebridge install up and running, and the dummy switch plugin is very low maintenance on it’s own. I’ve lost count of how many times I’ve been asked ‘how can I do this…’ only for the answer to be ‘Use a dummy switch’.