
How To Use Node-Red With Home Assistant
The open-source smart home platform Home Assistant provides a very powerful way to automate your home on your own terms. Not only does it provide a vast array of device integration options, but it also doesn’t lock you into specific compatibility requirements. New integrations are being added by the community all the time, and you can even build your own if you have some coding chops.
Along with that integration flexibility, Home Assistant offers more powerful automation capabilities than the big tech offerings. These capabilities are accessible through a comprehensive rule building user interface, but also through directly entering structured data in YAML format. This is needed for some automations that the user interface can’t accommodate, and it also provides the added bonus of being able to copy and paste an entire automation between Home Assistant instances, which great for sharing your solutions with others.
Already Sold On Node-Red?
I'm going to provide a brief summary of the limitations of Home Assistant's automations and how Node-Red solves these. If you've already made that decision and just want to get to the install instructions you can skip ahead here. You can either:
Install Node-Red Within Home Assistant or
The Home Assistant user interface is great for building simple automations, but when you start to get into more complex examples it can begin to become unwieldy. With multiple layered conditions it can be difficult to understand what’s really going on.
This ‘unwieldiness’ comes from need to cover all the options at each level. This is needed to allow for complex automations in a system that is unconstrained by design. The interface has to make some necessary concessions to accommodate all the layers of logic you could need, and the possibilities at each level. With complex automations it can lead to some uncertainty both when building out the logic and when debugging it.
Have you factored in the conditions you need correctly?
Which branch was that setting in?
Are you referencing the same entities consistently?

A compressed view of the actions in a branching automation
Jumping into YAML can help with some of this, but only if you are comfortably familiar with the format and how Home Assistant uses it. It’s also much easier to make mistakes using direct entry as there’s no validation to cross check your work.
There are also some inherent limitations with Home Assistant automations in general in that they are basically a series of steps that run in a sequence. Jumping to different parts of an automation and passing data between steps is difficult, if not impossible. While many smart home users aren’t going to run into this as a problem, those with more advanced use cases can become frustrated.

The same automation in YAML view
How Can Node-Red Help?
Node-Red is another open source tool that offers a very focused role in automation and data processing. It takes what is known as a ‘low-code’ approach which utilizes a simple drag and drop user interface to place and join action nodes.
These nodes can be ‘wired’ together to create a what is called a ‘flow’. A flow can be as simple or complex as you like, including branching, jumping, and looping as required, all while handling data collection, conversion, and transport through the flow, and out into other integration services…like Home Assistant.
“From home hobbyists to large scale industrial operations, Node-RED has found a place in a wide range of applications, supported by an active community that has built over 5,000 Nodes and Flows to help you get started quickly.”
Node-Red provides an easy to implement tool that solves all of the issues with Home Assistant’s automation limitations while also providing a fun and easy way to build automations in a visually clear way that is also super easy to iterate on, monitor, and debug.
Below is a simple example of a Home Assistant automation built in Node-Red. When motion is detected, turn on the lights for 5 minutes. The nodes in the middle are a little extra logic to keep the lights on if motion is detected again within the five minute time limit. I triggered the sensor, let it run for two minutes, then triggered it again. You can see the difference between the ‘on’ and ‘off’ actions is seven minutes (give or take), showing the timer reset correctly.

A simple Node-Red example using Home Assistant
To show a more complex example and how it makes understanding and debugging a lot easier, I’ve converted the example shown in the Home Assistant screenshots above into Node-Red. This is an automation I use to control my Sensibo device to fully automate my AC.
You can see how much clearer it is to understand what’s going on, and I can chop and change things around as required with simple drag-and-drop mechanics and re-linking the nodes with a few clicks. The green debug nodes tap the messages being sent out of a given node which make it super simple to see what’s going on, collect the right values for any logic you have, and figure out any data formatting issues that arise between components.

Control the AC based on room temperate and operating mode
Installing Node-Red In Home Assistant
Node-Red is such a good match for Home Assistant that it’s included as an officially supported add-on. You can install it directly from within Home Assistant and it will run on the same host device. Node-Red doesn’t require a lot of resources, so this won’t be an issue and provides a much simpler way to get an instance up and running.
From your Home Assistant dashboard click on Settings then select Add-Ons from the menu.
Click the button for the Add-on Store in the bottom right corner.
Find Node-RED in the list and click it.
Click the INSTALL link under the description.
Once the install is complete the page will update. Click the Configuration tab at the top.
Near the top of the options will be a field called credential_secret. You’ll need to create a secure password to put in there. You can use anything, but as you’ll need to securely store this it’s a good idea to use a password manager.
Further down is an SSL option. If you don’t have this enabled for Home Assistant (your user interface is not using a https), make sure this is disabled.
Click SAVE in the bottom right of the window.
You’ll probably want to enable the Watchdog, Auto Update and the Show in Sidebar option for easy access, then click START.
Once the new instance is running, a new option will appear on the right side to Open Web UI. That will jump you right into the Node-Red interface.
Connecting Node-Red To Home Assistant
If you have already installed Node-Red and have a working instance that is outside of Home Assistant, it’s quite simple to make the connection between the two.
Prepare the security credentials
From your Home Assistant dashboard click on your user account at the button of the sidebar.
Click the Security tab at the top of your account details.
At the bottom of that page is a section called Long-lived access tokens. Click Create Token at the bottom.
Enter a name for the token. This is simply to identify what the token was created for so you can clean up later if needed. I just used ‘Nodered’. Click OK.
A token string will be shown. You’ll need to copy this and keep it secure somewhere. You won’t be shown this again. Close the popup.

Creating an access token in HA
Set up the Nodes
Go into your Node-red UI and click the hamburger menu in the top right corner.
Select Manage Palette from the menu.
Click the Install tab.
Type in node-red-contrib-home-assistant-websocket in the search bar. Learn more about the node.
Find the entry matching the name from the list and click the install button.
Once it’s installed you should see the new palette on the left.

Installing the Home Assistant nodes
Configure the Home Assistant link
We need to create a new configuration node to hold the credentials we create previously. Drag one of the home assistant nodes onto the canvas.
Double-click the new node to configure it.
There will be a Server field. Click the pencil next to it.

Editing the Server configuration node
We just need to add two fields here. First is the Base URL. Enter the full URL of your Home Assistant instance in the format http://<a.b.c.d>:<port> (eg: http://192.168.4.34:8123)
Paste the access token create above into the Access Token field.
Click Update at the top, then Close on the node.
Click the Deploy button at the top of the Node-Red UI to save it all.

Entering the base HA connection details
To test your connection, drop an events: state node onto the canvas. This node monitors an entity for state changes so you can trigger other actions from it. Double-click the node to configure and you’ll see an Entities box. This is a drop down, and you should be able to access the list to see all of your Home Assistant entities.
Select any entity from the list and click Done. Then click Deploy up the top right. A green icon will appear under the node to show the connection is working. Entities like this one make it easy by providing a drop-down list. Other don’t, and you’ll need to copy and paste the entity name from HA yourself.
Building An Automation
With the connection up and running you can start to experiment with using the nodes. Finding the right state values is the main challenge, but through the use of debug nodes you can fairly quickly determine these from the output values a given entity provides. To demonstrate we’ll take a look at a simple automation example: motion activated lighting.
This automation will take an input from a motion sensor, add a 5 minute timer which resets if triggered again, and a decision to turn the lights on or off. The finished flow will look like this:

A simple motion activated light
Adding a trigger
First, we need to have something to trigger a flow to be processed. We can do this will a timer, but in this case, we need only process the flow when the motion sensor detects something. The palette has a node for this called events: state. This node will trigger when an entity changes its state. Drag the events: state node from the palette to the canvas and double-click it to configure.
We’ll give it the name ‘Motion Detection’ since that’s what we’re looking for. This can be anything that makes sense to you.
Select the entity to use for your trigger, in this case I have a Dining Room sensor, so I select that from the drop-down list. This node can start the flow every time the state changes, but we’re only interested in the triggered state. We use the section below the entity to filter this. What the entity outputs as its state values are unknown, so we need to figure out what to look for first. To do this we add a debug node and link it to the events: state node.
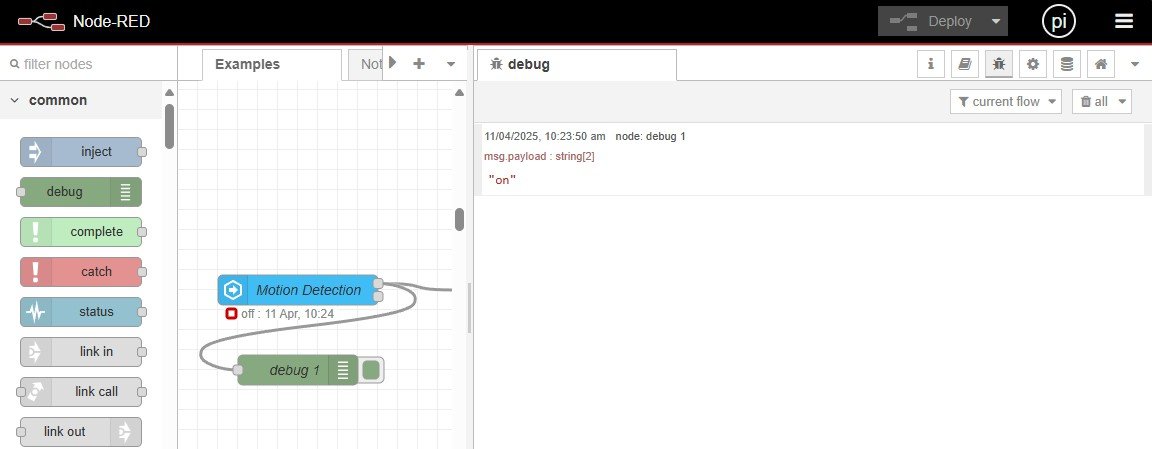
Looking at the debug output
If we now trigger the motion sensor, the debug node will publish everything the state nodes outputs on the right side of the UI. If you scroll down the configuration window of the state node, you’ll see it outputs three different messages by default, I’ve deleted msg.data and msg.topic as we won’t be using those this time and we can just zero in on what we need - the state values.
The debug node shows that this sensor outputs ‘on’ and ‘off’ string values, so we can now put that into our filter. If the state is on for 0 minutes, and this is a string type state.
By default, the entity state will be put into the default msg.payload object, which is what the debug node is showing us. This will also be passed to the next node (or nodes) in the flow. We will often need this data to do things later on. This time we won’t, but by specifying a filter we now have two outputs from the state node. The top one is for if the filter is true, and the bottom one for any other value.

Configuring the trigger values
Setting a timeout period
At this point we could just link to the action to turn the lights on, but what about turning them off again when the motion stops? We could use a simple delay for a time period and turn them off as a single liner flow but could cause unexpected results if motion is triggered again. To mitigate this, we’ll use the handy trigger node first. The trigger node is a timer, but it allows us to modify the output and, importantly, reset the timer is input is received again. Using this ensure that the lights will stay on so long as we keep receiving motion within the timeout period and turn them off if the timeout expires.
Drag the trigger node to the canvas and link it from the top output of the state node, since we only want to do anything if the state filter passes. Double-click to edit the trigger node. Looking through the fields we can deduce that the node will send one value immediately, then wait for a defined period, then send a different value. We’ll set the time limit for 5 minutes, which is a reasonable time to wait for additional motion. I’ve set the message values to booleans (true/false) for simplicity, and we need to tick the extend delay if new message arrives box. This is what will reset the timer if the motion sensor fires again.

Setting up the trigger node
Deciding what to do
Now we have a timer, we need to control the lights based on that timeout period. If motion is detected, turn them on, wait for further motion and if none is detected, turn them off. The trigger node is giving us the information we need - keep the lights on or turn them off. To choose the right action, we use a switch node. This is basically an if statement based on the msg data coming in.
Drag a switch node to the canvas, link it to the output of the trigger node and double-click to edit. You’ll see the switch node has a box which can hold any number of conditions to evaluate. This is very powerful and can handle all sorts of data structures and expressions. In this case we have it easy since we known we’re receiving a boolean value as the msg.payload. This means we need only set the first condition drop down to ‘is true’ which gets rid of the rest of the line. Click the small +add button below that to add another condition. Set this one to ‘is false’.

Configuring the switch node
Taking action in Home Assistant
Now we actually do stuff to make this all work. To control something in Home Assistant we use the action node. This allows us to send a command action to specific entities. We’ll drop two of these into the flow and link one to each of the outputs of the switch node. The top output (true) will turn on the lights, and the bottom one will turn them off when the timer expires and causes a false message to be sent.
Double-click the top action node to configure the ‘on’ action. In the Action field we need to select what we want to do. These are the same Home Assistant automation actions you’ll see in the normal user interface. We’re looking for light.turn_on in this case.
Now we just need to tell it what to turn on by selecting the right value in the Targets drop-down list. In this case I’ve select the room Dining Room. This is a quick way to turn on or off all the lights in that room, but just beware that it will affect everything, so make sure you aren’t going to have any unintended side effects. You may want to be more selective by specifying specific light entities instead. This action is now complete, so click Done.
Set up the other action node the same way, but with the lights.turn_off action.

Configuring the action node to turn on the lights
Now the flow is completed, we just need to click Deploy at the top right to make it live and go test it.
If all goes well, you’ll see the state and time displayed under the events: state node, a blue icon appear under the trigger to indiciate the timer is running and a green indicator under the turn on action node to show the action has been called as shown above.
The debug node, if it’s still in place, will show the on-state change, but keep in mind it will only show the messages sent from the connected output. As the state node has two outputs, we’ll only see the on state from the top one.
To see all state outputs, we can simply connect both outputs to the debug node (or add a second debug node). Node-Red is highly flexible in this way and allows you to connect any number of inputs and outputs to as many nodes as you need. Just remember to click Deploy after ANY changes, or you’ll be left wondering why it’s not working as you expect.


