
Motion Controlled Lighting With HomeKit
Automating your home lighting is one of the simplest and most effective ways to start getting benefit from your smart home. Getting this right can provide clear convenience and energy saving benefits. Doing that in Apple’s HomeKit should be simple - they did provide an automation option specifically for it, after all - but it’s not always going to work how it should.
Getting the lights to turn on when triggered by a motion sensor is straightforward and will always work. Getting them to turn off again when no-one is around can be a little frustrating. You should try the built-in functionality for this first, this will usually work and is easier. If that doesn’t work in your situation then there are two good alternatives you can try. I’ll cover all three of these methods in detail.
Requirements
There are three basic things we need for motion controlled lighting to work:
1 - A smart light (any HomeKit compatible light).2 - A motion sensor (any HomeKit compatible sensor).
3 - An automation to control the lights.
In an ideal world, one simple automation will do the job reliably, but things are not always ideal. Let’s start with the built-in functionality. We’ll need this step in any case as it’s what will be used to turn on the lights regardless of the method we ultimately use to turn them off again.
Basic Motion Controlled Automation
Make sure you have the basic set up of your smart lights and motion sensor working in the Apple Home app. Then we can set up the automation like this:
Create a scene for the light state you want to trigger with the motion sensor (which lights, color, brightness, as applicable). You technically don’t have to create a scene, but it makes future maintenance easier, especially if you are controlling more than a single light.
Create a new automation.
Select the Event A Sensor Detects Something.
Select the motion sensor from the list.
Leave the default action Detects Motion and tap Next.
Set the Time option to At Night, then tap Next.
Select the scene you create for the desired light state.
At the bottom on the final screen tap Never next to the Turn Off option and select how long you want the lights to remain on. I recommend going for 10-15 minutes as this helps avoid lights going off during shorter periods of stillness.
Tap Done in the top right.
This automation will trigger the scene you create when motion is detected and turn it off again after the selected time so long as no further motion is detected. If motion is detected during that time, the timer will reset.
As a more advanced option, you could add conditions into this automation to only turn on the lights when other values are in effect. For example, if you have an ambient light sensor, you could limit turning on the lights to when the ambient light level is below a certain threshold. To see how to do this, refer to my HomeKit Automation Guide.
A Note on Time
Ordinarily you'd set to At Night option for the Time value if you only want to turn on your lights at night. This option is dynamic and factors in season and lattitude to determine sunrise and sunset, so it's quite flexible. You could opt to turn them on at all times, of course, depending on the room.
Alternatively you can use the During the Day and Specific Times options to create different automations for different times. By using a unique scene for each you can have different lighting effects that a more appropriate to the time. The turn off options here and below are unaffected by this approach.
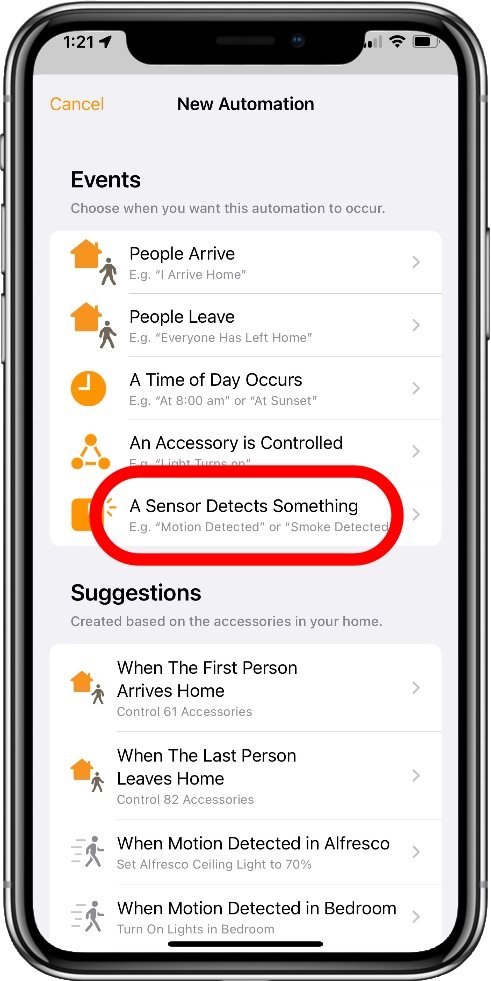
Select the sensor trigger

Select the sensor state

Set the turn off time
Why do we need other methods?
The Turn Off action used in this automation doesn’t always work for some reason. Certain combinations of lights, or scenes with other types of devices included, can fail to turn off. I haven’t found a consistent pattern to what causes this, but it does require some alternatives.
Use A Shortcut To Control Turn Off
One way we can work around a failed Turn Off action is to use a shortcut script instead. This method makes use of the ability to use a limited set of Shortcuts actions in the Home app directly. It’s fairly cumbersome and can put a lot of load on your home hub if you use it extensively because of the way it constantly checks you motion sensor state.
We set up the ‘On’ action the same as above, but we need to create a second automation, and a second scene to go with it. This new scene will set the ‘Off’ state of the lights.
With the new scene created we set up the automation like this:

The complete shortcut
Create a new automation.
Select the Event A Sensor Detects Something.
Select the motion sensor from the list.
Leave the default action Stops Detecting Motion and tap Next.
On the Scene selection page, don’t select the off scene. Scroll all the way to the bottom and tap Convert to Shortcut.
You’ll be taken to the basic Shortcut editor.
Delete the existing action.
Tap +Add Action and search for ‘repeat’, then add the Repeat action.
Tap 1 Time and change it to the number of seconds you want to turn off the lights after. (You have to hold the + button unfortunately).
At the bottom, search for Wait and add it. Tap and drag it between the Repeat and End Repeat blocks.
At the bottom again, search for If and add it. Drag it up under the Wait block.
Tap Input and Select Accessory. Select the motion sensor you’re using. Leave the default Motion Is Detected condition.
Search for, and add, Stop This Shortcut. Drag it up under the If.
Search for, and add, Control Home.
Tap Scenes and Accessories and select the off light state scene you created up front.
Tap Next in the top right.
Tap Done in the top right.
This automation will now run a shortcut that checks the motion sensor every second to see if no motion is detected. So long as none occurs for the number of cycles you selected, the lights off scene will run. If any motion is detected in that time the countdown will be cancelled. The two automations - one to turn on and this one to turn off - will work together.
Using A Dummy Switch
My preferred workaround is to use a Homebridge dummy switch. Homebridge is a small software bridge that you can run on a cheap single-board computer in your home set up that can host a number of very useful plugins. One of these is the Dummy Switch plugin. Check out my Dummy Switch guide for getting this set up.
The advantage of a dummy switch is that you can configure it to act as a timer on its own. You create a new dummy switch in Homebridge and set it to turn off automatically after your required duration. Your motion activation automation will also turn on the dummy switch, which then starts a the timer. A second automation is triggered by the dummy switch turning off that runs your lights off scene as with the shortcut method above.
Every time motion is detected, the dummy switch turns back on and restarts the timer. This avoids the clumsy status checking loop in the shortcut method.
Set up the automation to turn on the lights the same as the basic method above, but ignore the Turn Off option, and add the Dummy Switch with an ‘On’ state to the scene.
Create a second automation triggered by the event An Accessory Is Controlled.
Select the Dummy Switch and the action Turns Off as the trigger.
Set this automation to run your lights off scene from the selection list on the next page.
Tap Done in the top right.
This method provides a reliable and configurable way to turn off not just lights, but any other device type you might want to automate as well. It’s also useful for linking multi-step automations in the same way as this example, such as where you want to wait for another trigger to perform a related action without having to use long looping checks in a shortcut.
Hardware Specific Alternatives
There are some motion sensors that provide other ways of turning off the lights, or even turning them on.
Two examples come to mind, the Eve Motion and the Hue Motion sensor devices. If you’re controlling Hue lights, then the Hue motion adds the ambient light condition automatically, and also provides for a nice dimming effect as a warning when the lights are about to be turned off. This gives you the opportunity to move around to reset the countdown before they actually go dark. See my Hue Motion review for details on setting this up.
The Eve Motion (and other Eve devices with motion sensors, like cameras), have the additional configuration option of a Duration which determines how long the motion detected state will remain in effect. Most motion sensors will switch to Motion Detected only while motion is actually occuring, then immediately go back to a No Motion state. With Eve’s Duration value, you can keep the motion detected state for a pre-determined minimum time.
This allows you to create automations triggered by the No Motion detected state that can turn off the lights, as the duration will reset when motion is detected again. This is very similar to the dummy switch method but requires no additional setup.


