Quick And Dirty Bookshelf Smart Lighting
Adding smart lighting to shelving is something I’ve always wanted to do, but it’s not usually very practical. This kind of accent lighting is a great way to add interest to a room and contributes well to the overall ambience when you have a large shelf arrangement along a wall which would block other types of lighting features.
I’ve long put off attempting this because getting cables to shelving discretely is not easy to do in most cases, and in larger shelving units it would require significant modification such as routing channels and drilling holes in the cabinet work. If you have some of the common cube shelves, however, there is an easy way to add some degree of lighting without modifying anything.
I’m talking about the flatpack shelving units where you have a stacked cube arrangement, Ikea has these in various models like the Kallax range, and they’re also common at hardware and big box stores at various price points. The build quality may vary, but the basic design doesn’t much, which makes this a viable option for any of these shelving setups.

The Basic Idea
What I realized with my shelving is that I could put the light strips on the back of the shelves themselves to reflect diffuse lighting onto the books from the wall. By attaching the light strips to the back of the shelf I could run them invisibly without having to drill of cut anything. This obviously requires some space behind the shelving unit.
I my case this is provided by the skirting on the wall, which gives some standoff distance that is sufficient to both allow installation and prevent obvious light spots from the LEDs in the strips. This distance is important to provide a good effect as I’ve discussed in my light strip guide.
What you’ll need
For this project to work there are some prerequisites:
Cube storage unit with a shelf thickness of 15mm (~5/8 inch).
Smart light strips for each shelf span <15mm wide. This can be a base strip plus a number of extensions.
Standoff distance from the wall of 20mm (~3/4 inch).
Extension cables to extend the strips between shelves.
I opted to try this experiment with only one light strip per every two shelves. This works but would be much more effective with a strip on every shelf.
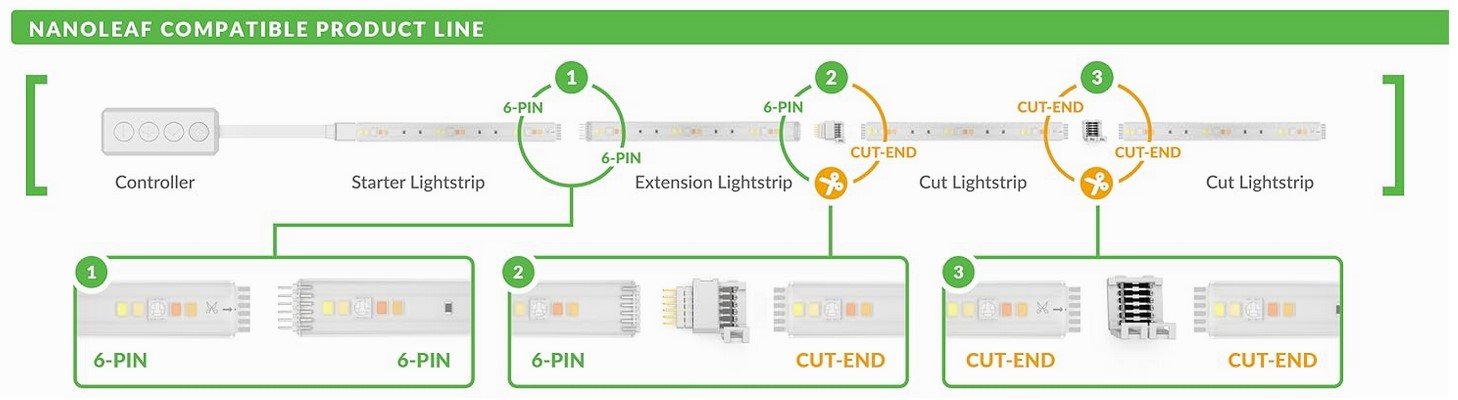
For light strips I chose the Nanoleaf Essentials 2m base kit plus several 1m extensions. These are nice and bright, work with Matter over Thread for broad smart home compatibility, and have a handy manual control box on one end for additional control options. Importantly, they’re also covered by the Litcessory range of extension accessories.
These guys make third-party cable extensions, splitters, and joiners for a range of popular light strip models. You’ll need these to be able to extend the one light strip between multiple shelves without lighting up the sides of the cabinet.
Installing The Strips
With sufficient stand-off from the wall, you can actually install the light strips without moving any furniture, which makes this method even more appealing. You will have to take all the books out, though…sorry.
If you use a light strip with a control box, like the Nanoleaf, you’ll want to mount that higher up for access. Because of this your first strip will be on the upper shelf. If you don’t have manual controls to worry about you can start at the bottom, which makes running the power cable a bit easier.
Light Strip Length
With my Nanoleaf/Kallax combination, one 2m base strip is the perfect length to cover 6 cubes (I have a 4 and a 2 side-by-side). Light strips can be cut shorter for smaller runs. Be sure to use the marked cuting locations. If you need to cut, you'll need Licessory 'cut-end' connectors as well as extensions to join them up.
Attaching the strips behind the shelves
Attach the control box to the side of the cabinet next to the top shelf. Make sure to orient it so the feed to the light strip points backwards towards the wall. You don’t have to connect it just yet, but it may be a good idea if you won’t have easy access to the strip connector once it’s attached to the back of the shelf.
Lay out the base light strip behind the storage unit, leaving the starting end protruding to grab for the next step.
Take the starting end and peel about 10cm of backing tape off.
Lift the end of strip up to the top shelf. Reach through the first cube and hold it with your thumb and pointer finger.
Using this over-top-top grip you can center it on the back of the shelf by feel. Stick the starting end into place.
Using your other hand, peel back another 10-15cm of backing tape.
Use both hands to slide along the strip to center and stick the next section.
Continue this action along the whole shelf. At the end of each cube, reach one hand around the vertical wall and hold the strip while you bring the other hand around before continuing.

Start with the control box on the side. This arrangement makes the connection to the light strip tidy.

A view down the back of the shelf with the strip attached. Note the extension cable in the foreground.

The Litcessory 1m extension and cut-end connectors we need.
Connect the extensions
Once you reach the end of a shelf, you need to use a Litcessory extension cable to run down to the next one. Using these avoids the odd look of having the lightstrip run down alternating sides of the cabinet between shelves. They’re also more flexbile which makes the corners easier to manage. A 1m extension will nicely bridge between every second shelf, as I have done, but to do every shelf will require coiling the extension to take up the extra slack.
Attach the Litcessory extension to the end of the light strip.
Carefully run it down the back of the cabinet side wall and secure it using tape or bluetac.
Coil the excess and secure it near the start of the next shelf.
Attach the next light strip or extension strip.
Attach it to the back of the second shelf as per the above method.
Cable Management
Keeping the extension cables hidden is the messiest part of this project. You could go for the short 6 inch extensions, but then you'll probably need two to reach between shelves, which adds reliability concerns. Using a single 1m (3ft) extension and stowing and hiding it behind the books is my preference. This can be attached to the back of the shelf, on the inside of the side wall or the top of the shelf at the back. The underside of the shelf would make it too visible and ruin the effect.
Caveats
This method provides good results if you have some space behind the shelf, but it still has some shortcomings. The light throw is effective, but won’t illuminate the front of the books well, and you can still get some spotting on the wall from lower viewing angles.
Ideally, the more labor intensive method would be the way to go. This would involve dismantling the cabinet, routering a channel for the light strips in the underside of each shelf and drilling a corresponding hole in each wall to pass the strip through. Doing it this way keeps the light strips out of sight, provides good overhead illimunation for the books, and doesn’t require stand-off gaps at the rear. It’s obviously a lot more work, and requires the necessary tools and skill to do.
The method in this article is a pretty good substitute and gives a very nice lighting effect if ambience is the goal. It can be done by anyone, and doesn’t require any permanent damage to the furniture.