Integrate IFTTT With HomeKit Using This Tool
Sometimes we have automations we’d like to create the need the use of devices that don’t support HomeKit. There are various ways to integrate these devices such as the popular Homebridge tool, but even that doesn’t cover every situation.
In some of these edge cases the device will support the automation platform IFTTT. This can provide a simple way to trigger automations using unsupported services and is especially useful for values which HomeKit doesn’t even support, such as wind speed. IFTTT has become less appealing as a workaround since they went with a subscription model, but you can still create one applet for free.
Key Takeaways
- IFTTT can trigger custom notifications, scenes, or Siri shortcuts locally.
- These integrations require a PushCut server which must be run on an always-on iOS device.
How Can We Use IFTTT With HomeKit?
The tool I use to integrate IFTTT with HomeKit is called PushCut. This iOS app does a whole bunch of useful power user things relating to HomeKit and Shortcuts, such as allowing the execution of full Shortcuts from HomeKit automations, create interactive custom notifications that can also be called from automations, and create custom widgets incorporating any of PushCuts features.
The feature we’re interested in here, though, is its support for various automation platforms. These include Zapier, Make, Microsoft Power Automate, as well as IFTTT. Unfortunately, to use these integrations requires a subscription in order to run a PushCut server instance, and that requires a spare iOS device to run it on. This makes the cost quite high if you only want to use it for this one purpose.
What can PushCut do with IFTTT?
The most obvious use case for this integration is to allow non-HomeKit devices, or unsupported sensor values, to trigger actions in your HomeKit setup. Pushcut allows the following actions to be triggered in IFTTT:
Send a Notification - this uses Pushcut’s custom notifications feature. This can also be done with JSON input for dynamic content.
Execute a shortcut - this will run any Siri shortcut you have defined from your pushcut server.
Execute a HomeKit scene - run any scene from your HomeKit setup.
Update a widget - update the data shown in a PushCut widget. Variants of this also allow changing the widget action to open a URL, run a scene, run a shortcut, or run an third-party integration (like IFTTT) when tapped.
You can also use Pushcut as a IFTTT trigger. In IFTTT you can define an Action identifier which can then be called from PushCut server actions. Server Actions can be called through schedules or location-based triggers on the Pushcut server. This can then trigger any other IFTTT service that provides actions.
How To Set Up IFTTT triggers for HomeKit
Once we have a PushCut server up and running, and we have an active IFTTT account, we can proceed to create a trigger. This one-time setup is the bulk of the heavy lifting and once done the actual IFTTT integration is a breeze.
Any notifications, scenes, or shortcuts you want to trigger from IFTTT will need to be created and tested up front. You’ll then need to ensure they are synchronized with PushCut so it can use them. For HomeKit scenes this should be automatic, but for shortcuts you’ll need to run the import task on your PushCut server.
The process is as simple as creating any other IFTTT applet. For this example, we’ll use the wind speed value from weather station to trigger some HomeKit behavior.
Select and Configure the Trigger service (If This…)
We’re going to use the Weatherflow smart weather station (Now called Tempest with their newer models), so we’ll select the Tempest Weather System service.
In the trigger configuration screen, we select the service account to use, and the specific device we want to take the measurement from. Then we specify the threshold value for the trigger, and what kind of data we want to base that on. In this case, we want the average wind speed in knots.
Select and Configure the Action service (then that…)
Here is where we select the PushCut service. We’ll need to select the action we want PushCut to do for this trigger. In this case we’ll execute a HomeKit scene. In the action details we simply specify the name of the scene from the list (PushCut will populate the list with all your HomeKit scenes). We can optionally configure this as a delayed action, but we won’t for this one.
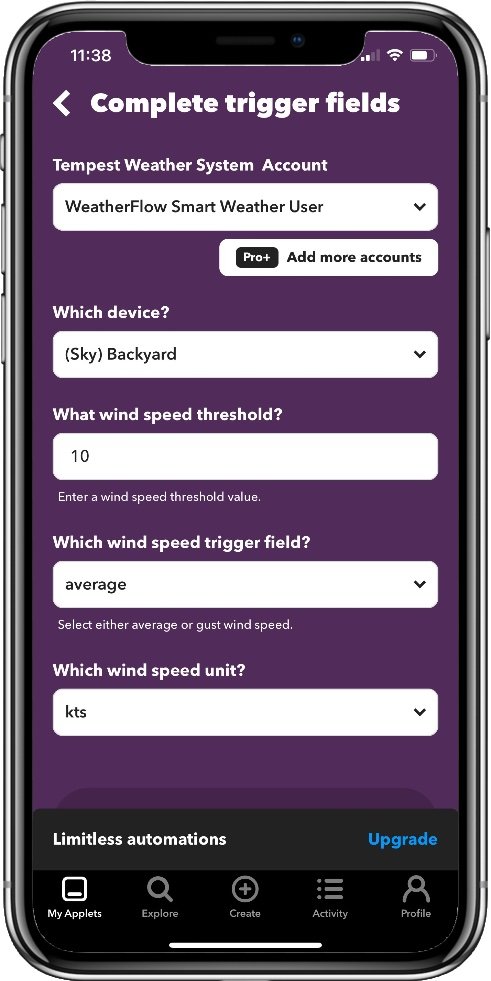
IFTTT: Configuring the Tempest trigger
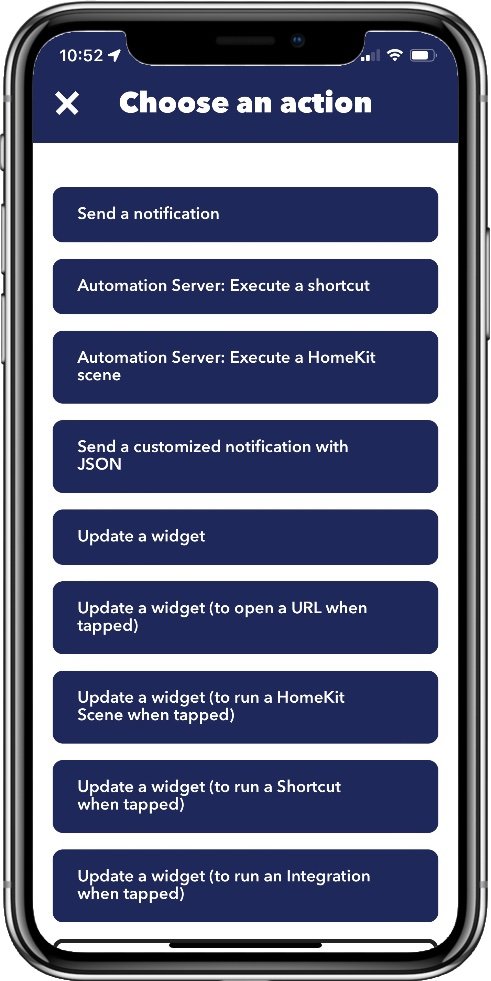
IFTTT: Choosing the Pushcut action to use
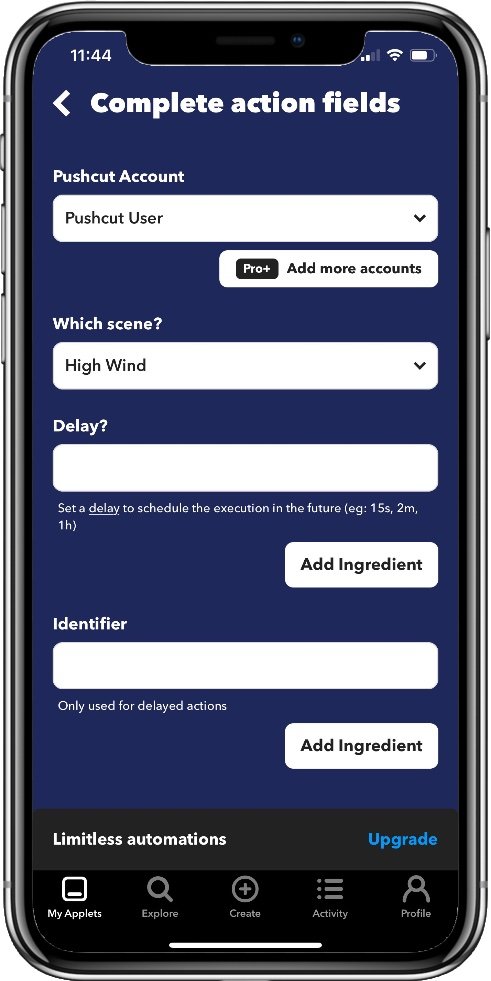
IFTTT: Configuring the Pushcut scene action
The High Wind scene is configured to turn off a fountain to stop water being sprayed everywhere when it’s too windy, and it also uses a Homebridge Dummy Switch to create a timer that will automatically turn the fountain back on after 30 minutes. Every time the IFTTT trigger fires, the switch will be reset and prevent the fountain coming back on until the average wind speed has dropped.
This is a simple example showing how IFTTT can be useful in some cases where HomeKit simply doesn’t have the features required to do it any other way. Keep in mind that IFTTT provides integration with a wide variety of services as well as devices, and any of these can be used as triggers. In this example we could, for instance, use the wind speed from Weather Underground instead of a local weather station.
In Summary
IFTTT provides a wealth of services and devices that can be used as triggers for HomeKit scenes or Siri shorcuts. You can also trigger these services through Pushcut using automations of shortcuts as well. This provides a way to use devices that don’t support HomeKit at all, or even web services to provide data or trigger events.
A huge variety of services are available, from social media events, media publications, data providers, and productivity tools that could be used or triggered by some cleverly crafted shortcuts thanks to Pushcut. While getting a Pushcut server up and running does carry some cost, it’s a tool that provides power users with a host of additional integration option to level up our HomeKit automations. This is just one of the benefits of using Pushcut, and I see it as more of a bonus given the usefulness of some of its other functionality.