
How To Use Arlo With HomeKit Secure Video
Arlo undeniably make good wireless security cameras and are one of the few outdoor options that offer native HomeKit integration. That integration is limited to basic camera functionality, however, as they have chosen not to support Apple’s HomeKit Secure Video (HKSV) cloud storage solution.
That means you can get basic motion notifications, snapshots in the Home app, and view the live feed. That’s it. HKSV offers much more in terms of smart object detection, facial recognition, custom motions zones, and rich notifications.
Key Takeaways
- You can leverage the full capabilities of HomeKit Secure Video with Arlo cameras
- The Scrypted tool requires setting up a dedicated host device and some technical knowledge
- Arlo cameras can record to iCloud without a subscription, but notifications are slow.
Why Doesn’t Arlo Support HomeKit Secure Video?
The reasons for this are a bit strange. Arlo claims that they value customer privacy so much that they won’t send your data to another company’s servers. Ok, that’s nice. Here’s the thing, though: HomeKit Secure Video is specifically designed for privacy and is the only cloud solution that does it correctly from a cryptographic standpoint.
All notification and video processing is done locally by your Home Hub, and only data encrypted with your local keys is sent to iCloud. Apple literally doesn’t have the keys. They just store a blob of random noise for you as far as they as concerned.
The security of Arlo’s cloud on the other hand is based on…what? We don’t actually know, and I’m not aware of any technical disclosure of their security design. Arlo’s knowledge base gives some fairly generic statements about what they do which all sound good, but they miss key details. For example, the data is ‘encrypted when stored’. How? With what key? At what point is the encryption done? Where is the key stored?
Without more detail we don’t know if they have access to our videos, and how easy it is for a hacker - or employee - to get access to them. In most of these cloud solutions the servers require access to the videos in order to provide for sharing of the recordings between authorized accounts, and for processing advanced motion detection features as the camera hardware isn’t up to the task.
Using HomeKit Secure Video With Arlo Cameras
The good news is that if you are willing to get a little hands-on you can actually integrate your Arlo cameras with HomeKit Secure Video. Even without paying for a subscription to Arlo’s cloud. I’ve done this with a basic Arlo Essentials Spotlight camera as a test, so we’ll run through that below.
To do this we can use an open-source integration tool called Scrypted. Scrypted is a software bridge solution that can take plug-ins for a wide variety of camera providers and technologies and integrate them with Alexa, Google Home, or HomeKit - with full HomeKit Secure Video support.
For this to work you’ll need a Home Hub and a device to run the software on 24/7. Scrypted provides installs for a variety of operating systems including:
Windows
Mac
Linux
ReadyNAS
Synology
QNAP
Unraid
My preference for these types of integration tools is to run them on a small Raspberry Pi device. This is a compact, cool, quiet, single-board computer that you can hide away somewhere and not worry about once you’ve set it up, much like any number of other smart home hubs and bridges. In fact, some commercial bridges are actually a Raspberry Pi in disguise.
The global chip shortage has made these are bit harder to find and unfortunately pushed up the prices. If you have one on hand, you’ll want a Raspberry Pi 4 at a minimum, or you can buy a Raspberry Pi 4 starter kit new. I maintain this link to the best one I can find and update it periodically, but you might be able to find a better deal.
Before You Jump In
Scrypted is a great tool for getting virtually any IP-based camera integrated with your smart home. It provides a LOT of technical options and additional plugins to enhance the capabilities of your particular setup. Cloud-based cameras will significantly underperform basically any RTSP model, however. This isn’t Scrypted’s fault, it’s just a factor of the extra steps and latency between the camera and the service.
There is quite a bit of information out there to help you get things working and, in most cases, it should work right away. As with any of these unofficial solutions, complications are also common, so you’ll need to be willing to dig for answers.
There is an official Discord available with a lot of help, but you will be expected to have followed any provided instructions before asking questions. That includes readme sections for the various plugins, the Scrypted wiki, and Discord rules. You might also want to read up on what the various protocols and acronyms mean when dealing with camera streaming.
Oh, and it’s strongly recommended to use a wired Ethernet connection for whatever you are going to run Scrypted on. This will help reliability greatly and will be the first thing you’ll be expected to do if you have any issues and ask for help.
How To Setup Scrypted For Arlo
You can access Scrypted from any web browser, and both the desktop and mobile views are well built and equally functional. I’ll be showing the mobile screens in this guide.
1 - Install Scrypted
With your chosen host platform ready to go, install Scrypted using the instructions on the Github page under the Installation section. In the case of the Raspberry Pi I went with the recommended Docker Compose option. This is literally a matter of copying one line into the console and it took care of everything for me.
Once the install is complete, the service will be running at port 10443. Use a browser to go to that port. In named my Raspberry Pi ‘scrypted’ so my example is https://scrypted:10443. Note that the connection is secure but as it’s a local certificate you’ll have to accept the warning in your browser that it’s not verified. This is fine as you’re not connecting to an external server, you know what it is.
The first time you connect you’ll be asked to create an account for the Scrypted service. This is a local account for your install used to prevent just anyone accessing the management console.
2 - Install plugins
You’ll see a lot of stuff on the console, but we only need to deal with the top two main menu items (under the three lines in the top left corner): Plugins and Devices. The default view is the Plugins page, with the option to install a new one at the top. Clicking the Install link will take you to the plugin search page.
We need to install two plugins on top of the defaults already in place, Arlo and HomeKit. Type ‘arlo’ into the search and the plugin will be shown. Click the Install button.
Once installed you’ll be taken to the plugin setting page for the Arlo plugin. Read the information on that page about the authentication requirements, specifically about needing a second Arlo account just for Scrypted.
With any cloud-based camera plugin like this you’ll need to provide authentication details to connect to your cloud account for that service. Scroll down to the bottom and enter email and password for your second Arlo account and click Save at the bottom. This will trigger a login attempt and prompt Arlo to send you the two-factor code. Put that in and Save again.

Install is used to add new plugins

Install the plugin from the search results

Connect the plug in to your Arlo account
All your Arlo camera devices will now be discovered and added to the Devices list.
The HomeKit plugin is next. Follow the same search and install procedure. On the HomeKit plugin page you’ll see a big pairing code, but don’t use that code. We need to adjust the Arlo camera settings for each device first.
On this page you’ll see a Settings section below the plugin information. For many plugins, and all devices, you’ll see this is where various settings can be accessed. They look a bit like category tags but clicking on one will expand the related settings box.
Click the Network ‘tag’ button. It is recommended for HomeKit Secure Video to work better that you put the IP address of your Scrypted server in here. This should be the wired connection address if it has both wired and Wi-Fi connections. You can leave the other settings as defaults. Click the Save button at the bottom.
You’ll also see a Reload Plugin button on this page. We’ll need to use that after we configure the camera settings.
3 - Configure Cameras
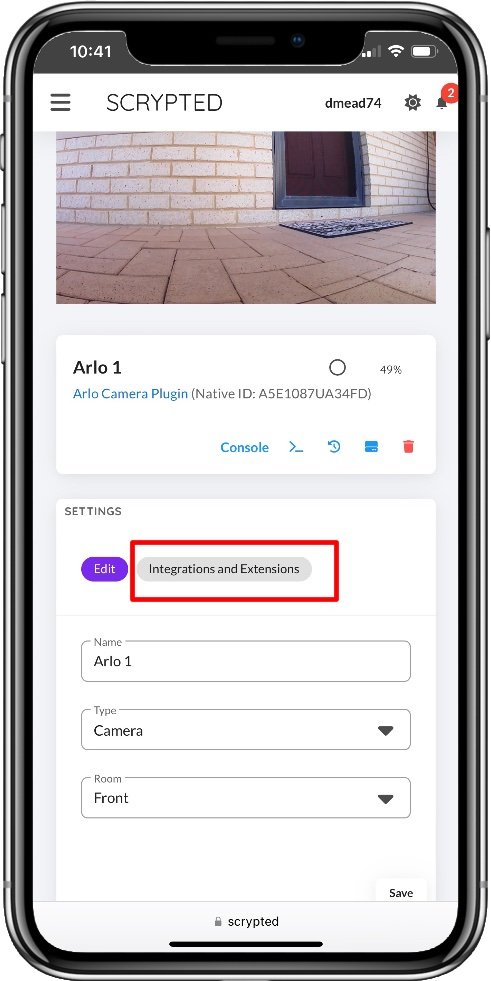
Select Devices from the main menu in the top left, this will give you a list of all the individual device components. Many of these are Scrypted system components, but you’ll also have any cameras listed in here. Scroll down and find one of your Arlo cameras and click on it.
You’ll see in the Settings section an option for Integrations and Extensions. Click that and make sure HomeKit is ticked. Doing so will give you more options in the Settings section. You can optionally set a Room name here, but that’s for Scrypted automations and doesn’t affect HomeKit.
All we need to do here is click on HomeKit Pairing and tick the Standalone Accessory Mode. By default, the HomeKit plugin will add all compatible devices through a single bridge accessory, this is how Homebridge would do things. It is recommended that we do cameras as individual accessories for better performance, so ticking this option means we’ll be able to pair each camera individually. A little extra work, but it means we can add only those devices we want.
This option is where you select integrations
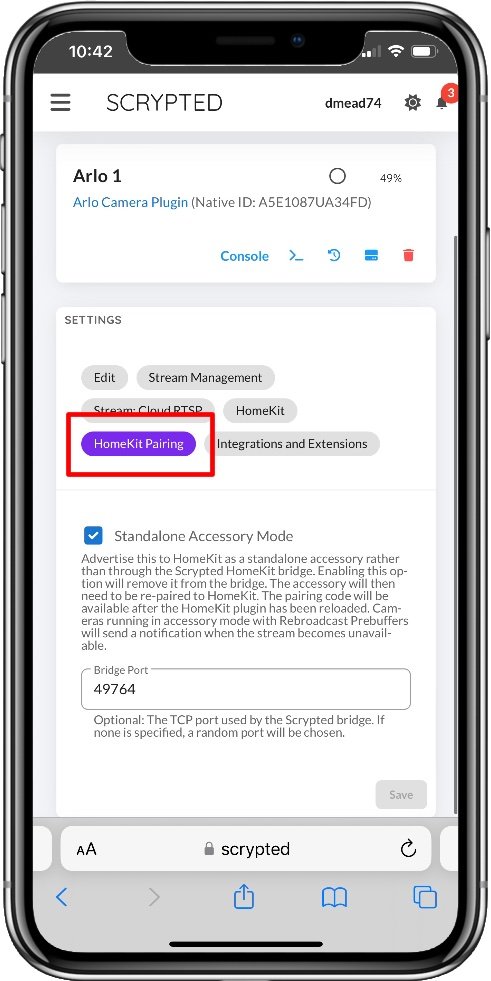
Use this option to select Standalone mode
Here is where to pair the camera to HomeKit
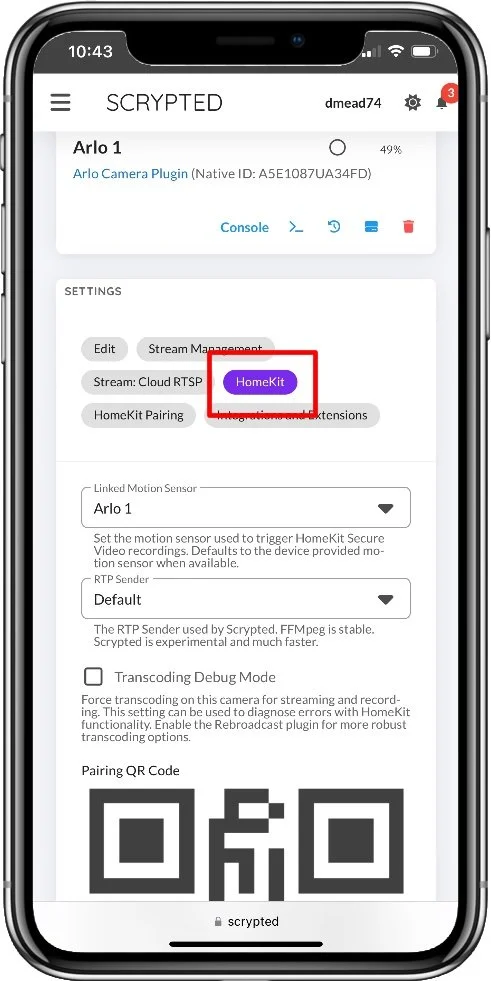
Once we’ve done this, go back to the HomeKit plugin page and click that Reload Plugin button. This will refresh the plugin. Go back to the camera again and you’ll now get a pairing QR code under the HomeKit settings button. You can go ahead and add a new accessory in the Apple Home app using that code either by scanning it or entering the code manually (the text version is below the QR code for easy copy and paste).
Caveats Using Scrypted With Arlo
Scrypted itself performs very well, but having to route through the Arlo cloud introduces significant delays. I’ve also used this process with Ring, and the difference in response time is very noticeable between the two cloud services. Arlo cameras take quite a while to initiate a live stream and update snapshots in the Home app dashboard. Motion notifications are not quite so bad but can still be much slower than a dedicated Homekit camera or wired RTSP camera through Scrypted.
Limited camera features are supported
Arlo limits a lot of the functionality that Scrypted is able to leverage, such as only allowing one video stream at a time. This can cause issues if you are having motion events from multiple cameras at once. You’ll also not have any extra camera functions available in HomeKit such as lights, sirens, or two-way talk. This is an Arlo thing since other cameras are able to use these features through Scrypted.
Arlo two-factor authentication
Arlo still uses a fairly dated authentication token method where the token expires after a set period of time. This means you need to re-authenticate regularly, which is annoying enough when using the app, but when using Scrypted means your Arlo cameras will stop working until you put in the new two-factor code.
The Arlo plugin provides a workaround for this buy tapping into your email account using IMAP. It can then monitor incoming emails for the Arlo code notification and grab it automatically. That solution only works if your email provider supports IMAP and you’re comfortable enabling that access. Otherwise, you need to log into Scrypted and enter the new code from your email into the plugin to re-initialize the connection.
Use the right Home Hub
HomeKit Secure Video is processor intensive and sensitive to poor streaming quality. This is exacerbated if you have a lot of cameras. The Home Hub is having to request a live stream from each camera every time they detect any motion. It then analyzes the video to determine if it needs to send a notification or record anything, based on your HomeKit settings for that camera.
To help with this you should ensure both the device running Scypted and your Home Hub are on wired Ethernet connections, not Wi-Fi. This means using a newer Apple TV 4K as your home hub, and making sure it gets chosen as the active one. This can be a bit hit and miss as you can’t control what any HomePods are doing but turning them off if they are showing a Connected status in the Home App one by one until the Apple TV gets selected is the best way.
You can run Scrypted over Wi-Fi, and through a HomePod, but you may have more issues like missed events, corrupted video, and live streaming issues. This is all very dependent on your Wi-Fi routers and setup and your mileage will vary.
Set your cameras to minimize any motion detection limits
HomeKit will only get involved if the camera says it detected motion. Any settings on the camera side that limit this signal will consequently limit what events HomeKit will even look at. In most cases it’s best to limit and object detection, motion sensitivity, and motion zone settings to maximize motion detection. This is kind of the opposite of what you’d normally want to do.
Doing this will allow you to make the best use of HomeKit’s object detection filters and motion zones, and potentially limit your notification spam better. Which notifications you choose to use will depend on which one is faster and more useful, so you may want run both until you decide on which one to stick with.
You can use Arlo notifications and record to HomeKit, or vice versa as you want. Remember that if you don’t have an Arlo subscription you’ll only have basic notifications from the Arlo app, so HomeKit is going to be the better option in that case.
Summary
Without knowing what Arlo is really doing with our videos, it’s natural for HomeKit users to want to use the well-documented secure solution HomeKit provides for video recording instead. By using Scrypted we have a powerful, flexible solution that allows us to do just that with all the features of a native HomeKit camera. The fact that we can do so without a subscription to Arlo’s cloud is a bonus, for sure.
HomeKit Secure Video notifications can be a bit slow compared to other cloud camera solutions, but I find Arlo’s to be one of the poorer performing options in this regard. You’re losing less capability by relying on HomeKit notifications than with something like Ring, for example, and you get all HomeKit’s object detection options.
Unfortunately, you will lose out on some functions of the cameras that are available in the Arlo app such as two-way talk. Of course, you can still use the Arlo app for that if you choose, but HomeKit won’t be able to record while you do so.
If you just want your recordings and notifications all in one place, and arguably more secure than Arlo’s cloud, then this is a great solution. If you want to rely on it for real-time alerts, it’s not going to deliver the goods.


