
Create Custom HomeKit Notifications For Smarter Responses
As of iOS 18.2 a number of shortcut actions cause the shortcut to crash when run from a HomeKit automation. These actions include the Get content of URL action required by this guide to call a third party app. As such these methods currently do not work when called from inside the Home app.
Being able to get notifications from your smart home about events that you either want to be aware of, or need to do something about, is an important aspect of any smart home platform. Apple’s HomeKit does indeed provide basic notifications for a variety of accessory types, but outside of cameras these notifications are pretty basic, and very limited in how you can control them.
To be fair, the built-in notifications Apple provides will cover most people’s needs. It took me a few years before I started to run into situations that I needed something more nuanced. This is a natural progression that comes with building up a smart home and pushing deeper into automations and smart behaviors. It’s also fair to say that even some of the basic notification scenarios can still benefit from some tighter control over when they get sent.
Quick Process Overview
- Create a notification in your chosen tool.
- Copy the trigger URL for the notification.
- Create a new automation and convert it to a Shortcut.
- Build the shortcut with whatever logic you need.
- Use Get contents of URL to trigger the custom notification.
In This Guide
The Tools We Will Need
The Apple Home app limits notifications to specific events, such as ‘open/close’, ‘locked/unlocked’, or simple sensor detections like motion, smoke, or leaks. For paired events you’ll always get both, whether you care about them or not, and you can only filter them based on one time period, and one occupancy state. This last aspect is also limited to simply if someone is home or not, either you or everyone. Unlike automations, you can’t specify individual household members here.
In order to get more creative, we’ll need to go outside of Apple’s official app and look to a couple of powerful third-party options. Specifically, we’re going to look at Controller for HomeKit and PushCut. Both of these apps come with some cost overhead, and both offer powerful custom notification features along with a whole host of other very cool benefits for HomeKit power users.
These two options are very different beasts, but when it comes to custom notifications they work in similar ways.
Controller is a full featured HomeKit client that you can use as a powerful replacement for the Apple Home app (although there are a couple of important features that Apple doesn’t allow third parties to use, namely access to recorded videos from cameras, and the ability to use Shortcuts in automations). It includes full access to custom HomeKit accessory values, more powerful automation trigger rules, backup capability for your HomeKit settings, logging, and a handy maintenance tool.
Pushcut is an integration tool that allows for the silent background execution of full Shortcuts from HomeKit automations, custom integrations with webhooks, custom server actions with widgets, and integration with other automation platforms like IFTTT. It also allows for almost complete customization of your notifications through software by allowing you to pass a wide variety of parameters through the URL request when it is triggered beyond just the text content.
Controller vs Pushcut Notification Features
|
|
|
|
|---|---|---|
| Notification Settings | ||
| Custom Notifications | ||
| Custom Notifications | ||
| Dynamic Content | ||
| Dynamic Content | ||
| Interruption Level | ||
| Interruption Level | ||
| Snooze | ||
| Snooze | ||
| Supported Actions | ||
| Scene Actions | ||
| Scene Actions | ||
| Shortcut Actions | ||
| Shortcut Actions | ||
| Workflow Actions | ||
| Workflow Actions | ||
| Server Actions | ||
| Server Actions | ||
| Webhook Actions | ||
| Webhook Actions | via Workflow | |
| User Interface | ||
| On Apple Watch | ||
| On Apple Watch | ||
| Default Actions | ||
| Default Actions | ||
| Custom Sound/Image | ||
| Custom Sound/Image | ||
Both of these tools offer a subscription model if you just want to try them out, or a higher priced one-time purchase (about the equivalent of three years of subscription fees). The big difference is that Pushcut requires a spare iOS device you can leave unlocked at all times in order to leverage the full benefits of its background execution capabilities.
What Can Custom Notifications Do Better?
There are two key benefits to using these tools to create your notifications.
Being able to trigger notifications from HomeKit automations means you can create more complex rule sets for when notifications are triggered, and can have multiple different notifications generated from a single automation as required.
Notifications can have a number of action buttons included with them. These actions can then be launched right from the notification on both an iPhone or Apple Watch allowing you to respond quickly to an event without having to open any app.
Additionally, both of these tools allow you to send dynamic content to the notifications. For instance, you could modify the text portion of the notification to include a list of lights that are on. The list would be generated by a shortcut and pushed with the notification when it is triggered.
Even a simple notification to let you know when a door or window has been opened can be improved using these tools. Often, we only care about the open event, not the close one as well. The Home app will send both, and we can’t change that. By using a custom notification, we can have it trigger only on the event we’re interested in. This helps clean up your notifications and prevent you getting spammed with things that don’t matter.
Some of the features in the table above can probably use some explanation so you can understand why these are useful. These constitute the various kinds of buttons you can add to your custom notifications that provide the actionable responses that can be so useful.
Scene Actions
These are the simplest form of action you can take and are common to both tools. Essentially, you can assign a one of more buttons to launch a HomeKit scene of your choice. This will simply call that scene from the local device as you would from the Home app. This requires that device to have access to HomeKit at the time.
Shortcut Actions
Unique to Pushcut, this offers a powerful alternative to HomeKit scenes as you can launch a full shortcut from the Shortcuts app. While HomeKit allows for a limited subset of shortcut actions within HomeKit automation, there are many useful functions that are not available, such as the Announce feature that allows Siri to read out a message on any HomePod of your choice. These shortcuts will also be executed silently, without any notification or confirmation required.
Workflow Actions
Unique to Controller, Workflows are custom scripts that allow you to run a sequence of actions and allow for dynamic selection of accessory values to change rather than having to explicitly define each device as you would with a scene. You can also delay actions within the set, change the state of automations, and execute webhooks.
Server Actions
Unique to Pushcut, this is an alternate way of calling scenes, shortcuts, or integration actions. These will be run from your server device instead of the local device, which allows them to execute if you are away from home, or if your device doesn’t have a good HomeKit connection. This can be useful to get around certain bugs, like the recurring issue of HomeKit becoming unresponsive on Apple Watch.
Webhook Actions
These actions can be run from both tools, although Controller can do this only as part of a workflow. That’s not a big deal, even if you have to create a workflow only with the webhook action in it. These essentially allow you to make a web request to whatever API you need. This allows for flexible integration with a wide variety of third-party tools as well as being able to program your own custom tools if you’re so inclined. It’s certainly the most specialized action on offer, but it’s a useful one for power users to have available.
Creating And Using Custom Notifications
Whichever tool you choose, the way we implement custom notifications is essentially the same. We’ll be using the shortcut action Get contents of URL. This action is available both in regular shortcuts (through the Shortcuts app) and in the subset of actions provided for us in HomeKit automations. This action is simply used to execute whatever the URL points to.
In the case of notifications it makes a call to a server to fire the notification in the link. Controller runs their own notification server to route these messages through, while Pushcut will send this to your local always-on iOS device that is running the Pushcut Server.

We’ll be using the Get contents of URL action for custom notifications
Using Controller to create notifications
In terms of the actual notification itself, Controller offers a few more features than Pushcut. These relate to nuanced notification interruption levels and different notification behaviors such as delayed, scheduled, and counter-based activation. These are a bit more niche but do provide some additional options for functionality depending on your needs.
The process of creating a custom notification in Controller is largely the same regardless of which type you choose.
In the Controller app, scroll down and tap Notifications.
Tap the + in the top right to create a new notification.
Select the type: Instant, Delayed, Scheduled, or Counter. You also have the option of purely local notifications (no server involved) but these are limited to scheduled (Recurring) or Location-based triggers and only fire on the device they are run from.
Now we set up the notification with a Title and option text field. The Text field can be dynamic by pushing text data in the URL call when we trigger it. I’ll show an example of that below.
Select the Interruption level (this is the iOS notification type that determines how it behaves when delivered. Controller gives us all four options: Critical, Time Sensitive, Active, and Passive. Pushcut only gives us Active and Time Sensitive.
We can select a Behavior to be keep everything or just the latest one. This will determine how many of this notification will be visible in the notification center on your iOS device.
Actions is where we can get smart. You’ll get a Snooze option by default that allows you to silence this notification for a set time. You can then add other actions that execute a HomeKit scene, Execute a Controller Workflow, or open an accessory view in the Controller app for quick access. This is particularly useful for cameras, for example. One of these actions can be tagged as the Primary, which will execute immediately if you tap the notification. Tap and hold will bring up all the options as buttons right on the notification screen.
Finally, we specify which devices to send the notification to. These need to be devices with Controller installed on the same account. Multi-user notifications are in the works, but not available as yet.
The URL Triggers section contains the address strings we will use to call this notification. If you’ve selected a Delayed type, you’ll have a second one here to cancel as well. This can be used to create interesting effects like alerting you that something has been in a given state for x minutes.
Tap Save in the top right corner.
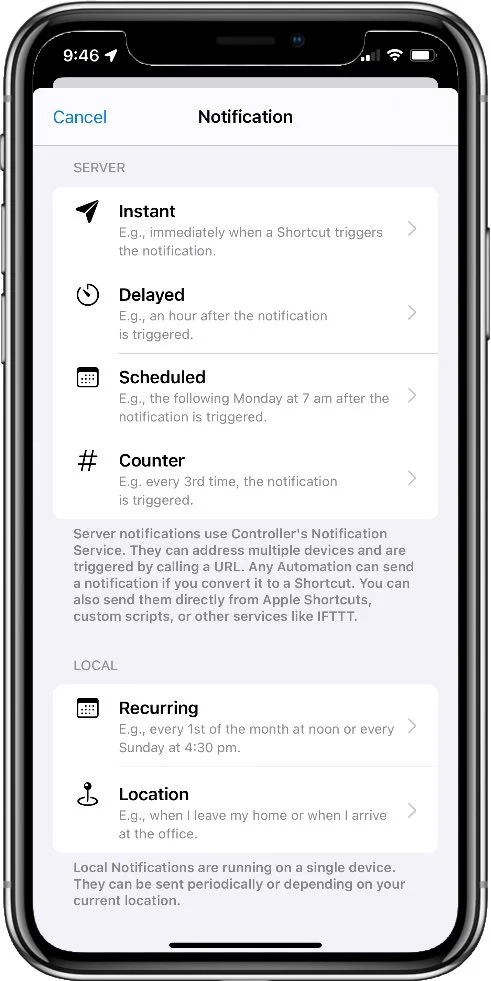
Notification types in Controller
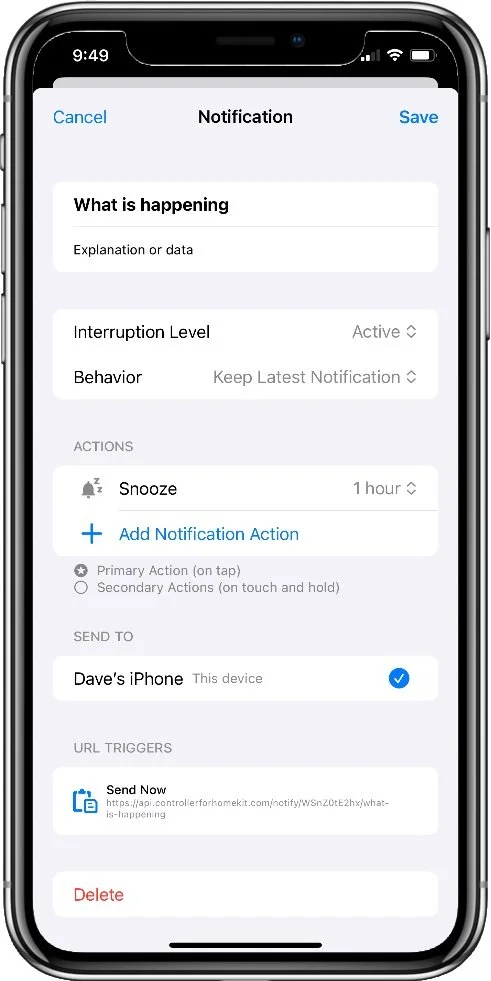
Controller’s notification editor

The additional URLs for Delayed notifications
Using Pushcut to create notifications
Pushcut gives us some additional cosmetic options, as well as some handy testing features that can be useful when crafting notifications intended for dynamic input. Creating the notification itself is similar to Controller with the addition of custom sound and image options, and some testing features that attest to the greater dynamic capabilities of Pushcut notifications.
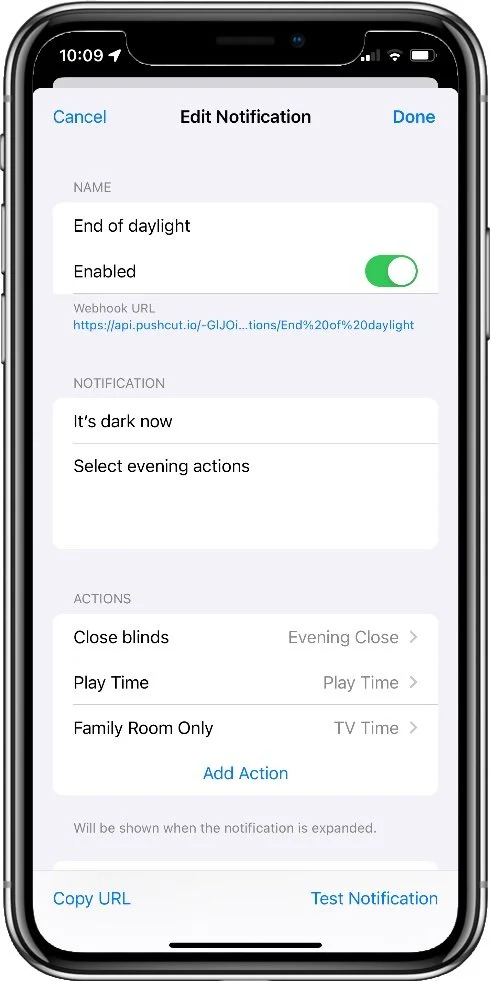
Pushcut separates the Name of the notification from its actual displayed title, this can help a bit with organization if you have a lot of them, so enter something here.
Now we specify the Title that will actually show in the notification, and any optional text we want. This can instructions related to the actions that will be shown, or you can push data into this field as with Controller.
Now add your Actions. Pushcut allows for HomeKit Scenes, full Shortcuts from the Shortcuts app, Server actions to be run from your Pushcut server device, or other URL calls to another service.
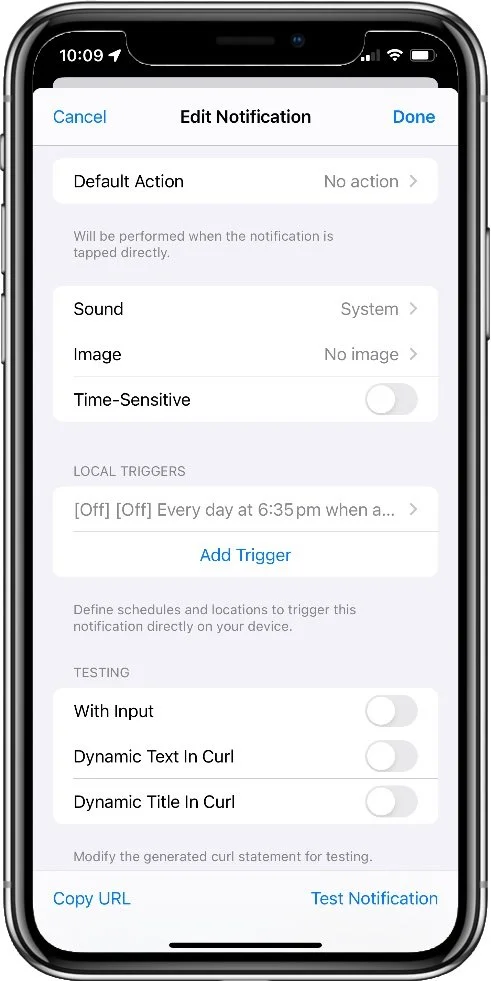
As with Controller, we can specify one of these actions as the Default that will run when the notification is tapped. Otherwise, all options will be presented.
Now we can optionally choose a sound and image for the notification, and if the notification is Time Sensitive.
Like Controller, Pushcut notifications can also be triggered locally by schedule or location. We can create such a trigger here along with the notification.
Tap Save in the top right corner.
The URL we need to trigger it will be shown below the title at the top of the screen. We can copy it from here.
Pushcut’s notification editor
Additional customization and testing options

Server actions can run full shortcuts silently
Triggering the new notification
Now we have our new notification ready to go we have to trigger it somehow. This is where we will use the Get contents of URL shortcut action. We can actually do this from anywhere we can call a webhook URL, such as other integration tools or custom code. In most cases we’re going to use shortcuts, though, either from a HomeKit automation or the Shortcuts app.
Create a new automation in the Apple Home app.
Set the trigger values as you wish.
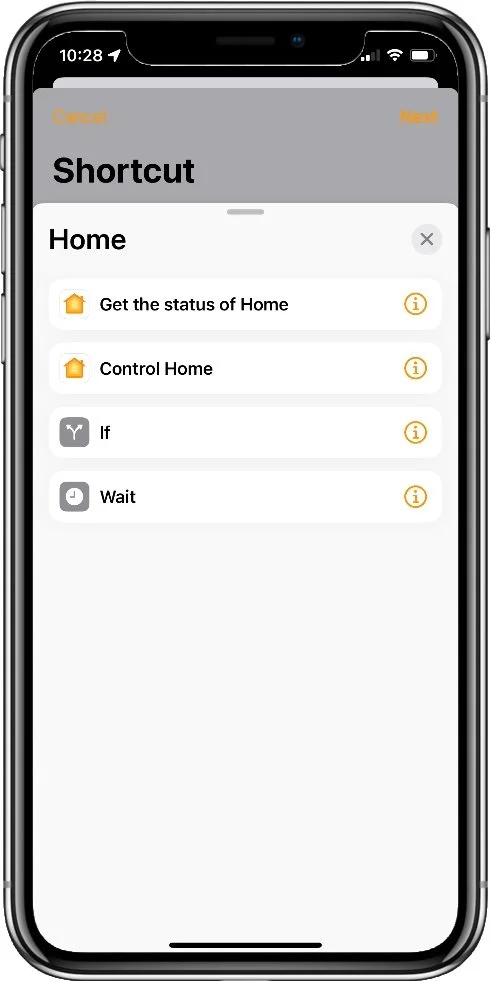
On the accessories and scenes selection, scroll all the way to the bottom and select Convert to Shortcut.
Add in the actions you want. You’ll want to look at actions under the Scripting category, and most likely the ones under the Home in the Apps category. When you get to the point you want to trigger the notification, add the Get contents of URL action from the Web category. If you have already copied the URL to the clip board, this will be auto-filled into the action, otherwise just copy and paste it in.
If you expand the URL action by tapping the small arrow in the bottom left of the action card you’ll see other options for customizing the call. This is where you push data into the notification.
Change the Method to POST.
Add a new Text field to the Request Body section.
Set the Key value to ‘text’.
Set the Text value to whatever you want to push. This can be any text variable from your shortcut.
Pushcut also allows you to push virtually any other changes to the notification in the request, including changing the default action, time sensitivity, image or sound. The full list of key values is provided in the Pushcut documention. Pushcut also lives in the Shortcuts app and provides a number of Shortcut actions of its own. These actions essentially allow you to automatically control your Pushcut server from within Shortcuts and provides an alternative way to trigger notifications using the Send Notification action that can make filling in the custom values a bit easier.

Note the Categories and Apps tabs at the top

A sample of the Scripting category
The Home app actions under Apps
Some Practical Examples
A window left open alert
Using the Delayed notification type in Controller gives us a fairly simple way to set an alert that a window has been left open for a period of time.
The notification will be a Delayed type with the duration you want to be alerted about, say 10 minutes. We then couple this to two HomeKit automations triggered by a contact sensor in that window. One will trigger the notification when the window is opened. The other will trigger the ‘cancel’ URL for the notification when the sensor is closed.
This cancel ability is unique to Controller and facilitates a simple, reliable way to do such timed alerts.
Alert only when something is opened
A common nuisance is being forced by HomeKit to get notifications for both open AND close events when we only really might care about one of these. A simple automation shortcut to a custom notification can allow us to filter this to the specific event we want to know about.
To do this we create an automation triggered by the specific event, say a pool gate sensor opening. We then use a shortcut action to trigger the notification that tells us this. As the logic in this simple case is handled entirely by the automation trigger, we need only use the Get contents of URL action in the shortcut.
This one benefits from Controller’s ability to Snooze the notification. This way we can temporarily turn it off if the pool is in use and we don’t need to know every time someone opens the gate.
Open door reminders
This one is a more complex idea that checks our exterior doors when we leave the house to ensure we haven’t left anything open. This works the same with either tool as it’s a simple Time Sensitive notification with a dynamic text input. We can include actions to close a garage door or lock a smart lock for quick actions to resolve the issue.
This one requires a shortcut run from a HomeKit automation tied to our presence, specifically the ‘When I Leave’ trigger option.
We’ll need a test variable we can pass to the notification to tell us which doors have been left open. We can’t add arbitrary text to a variable, so we make a list first. We then pull the values from the list into a variable based on the status of each door. Finally, we call the notification and pass the variable to it in the Request Body.
Here’s what that looks like:
List with the iteams ‘Garage Door’, ‘Door’2, ‘Door 3’ (these can be the names of your actual doors ie: Garage door, Front door, Back door)
If ‘Garage Door’ Current Door State is Open
Get First Item from List
Add Item from List to stateDoors (this is our variabe name)
End If
If ‘Door 2’ Contact Sensor State is Open
Get Item at Index 2 from List
Add Item from List to stateDoors
End If
If ‘Door 3’ Contacts Sensor State is Open
Get Item at Index 3 from List
Add Item from List to stateDoors
End If
If stateDoors has any value
Get Contents of URL
Method POST
Request body includes ‘text’ key with stateDoors variable as the value.
End If
In Summary
By using a suitable third-party tool we can create more informative, actionable notifications that can be triggered from a variety of sources. Even within HomeKit automations we are able to use the shortcuts scripting actions to create more complex logic to determine when notifications should be produced, and also to generate dynamic content that can provide extra information that makes the notification far more useful.
Being able to define custom action buttons to respond to events, give more choice around scheduled activities, and provide dynamic context based on data from your accessories is sure to level up the utility of your HomeKit setup, allow you to be more aware of the things that matter, and devise new and interesting automations that can actually help with day-to-day activities.
The wealth of options for action buttons provided by these tools, as well as the huge potential of shortcuts scripts to drive them, should give you plenty of scope to get your creative juices flowing thinking about what else you can now do.


