Sensi Touch 2 Review: Easy and Reliable
When you buy through links in this article, I may earn an affiliate commission. Learn More.
Sensi provided the sample for this review.
If you’re looking for a smart thermostat there are a few key things you should be looking for. In no particular order these are system compatibility, ease of use, reliability, and smart features to help you save on energy costs. A lot of smart thermostats fall short in at least one of these, although the situation is improving at the market matures.
Sensi, formerly a brand of HVAC maker Emerson, has been a solid choice for a few years now, but the newest member of the family matures the product into what could be one of the best smart thermostats on offer in three of those key categories. While it’s not the smartest of smart thermostats, I’ve found the Sensi Touch 2 brings a lot to like to the table and for those that prefer to retain control over their home climate, rather than ceding it to the thermostat’s smarts, you’ll be hard pressed to find a better option.
A big clear display, responsive touch controls, and intuitive app experience, easy installation, and flexible schedules are some of the key highlights, but there are a few points that might be a concern for some which we’ll also take a look at.
The Good
✔ Big, clear display with responsive touch✔ Broad system compatibility
✔ Optional room sensors for better climate control
The Bad
✔ No smart learning features✔ Limited to 2.4 GHz 802.11n Wi-Fi
✔ Higher end price tag
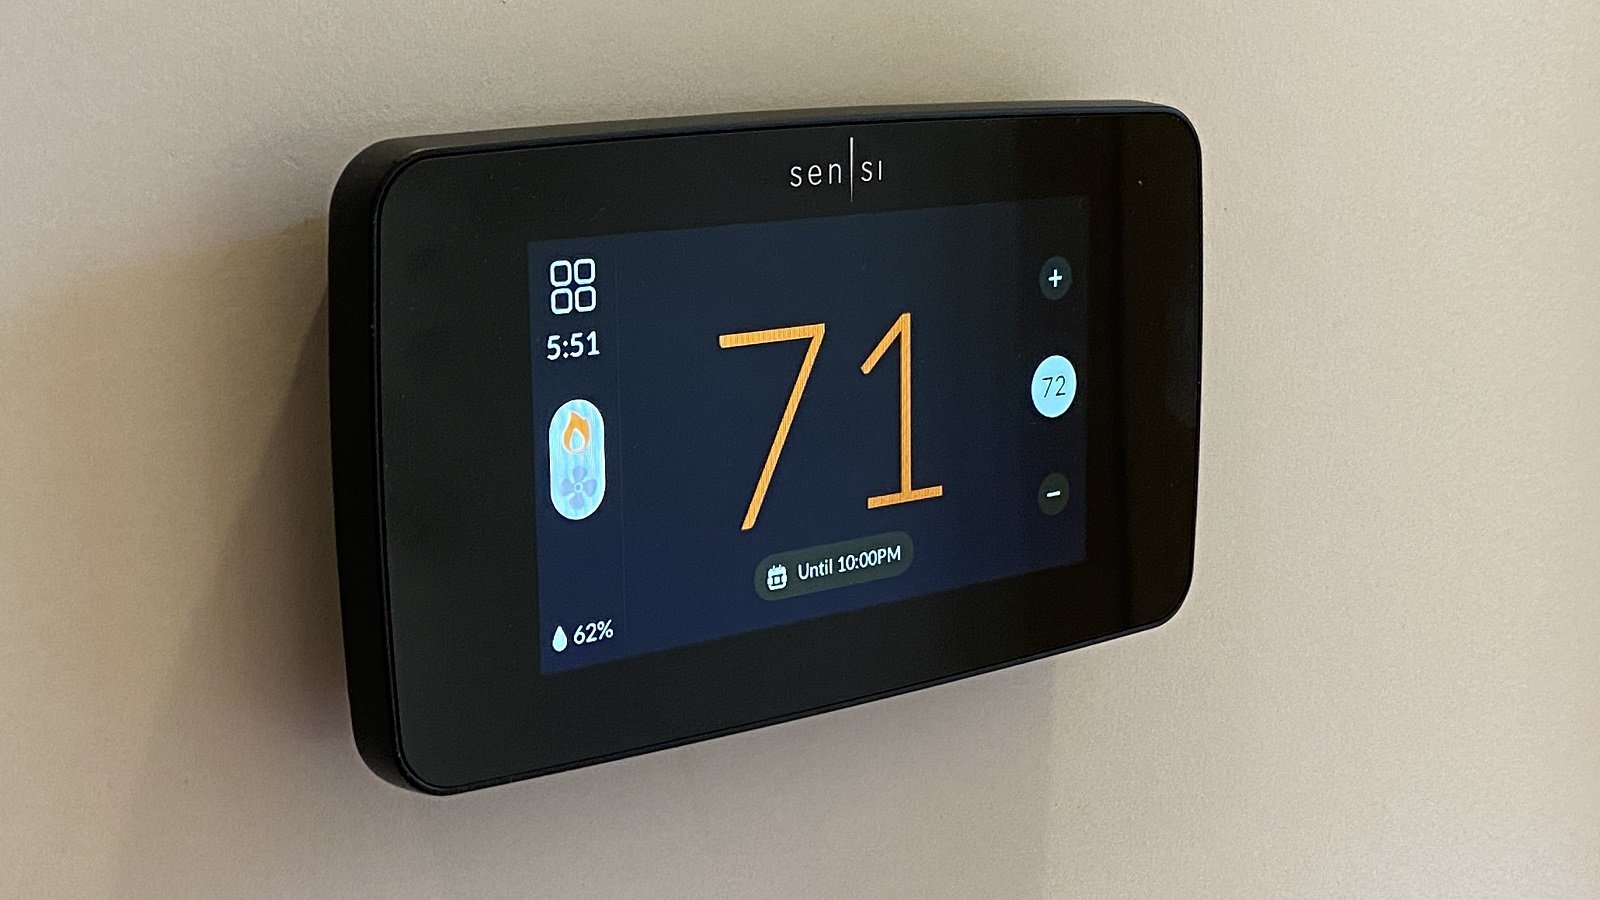
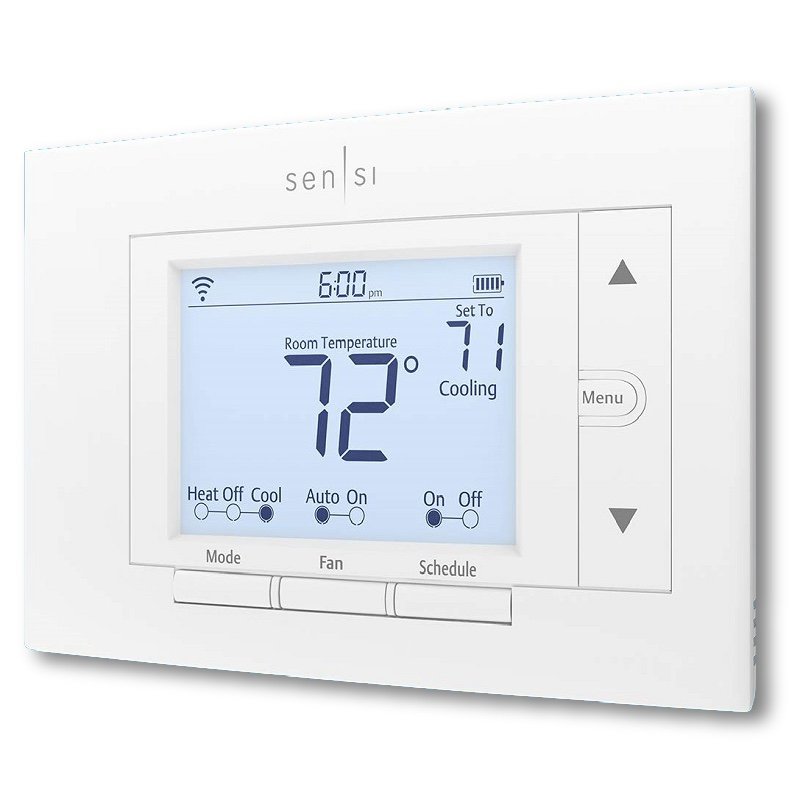
The Sensi Touch 2 offers a low profile dominated by a large color touch screen display. At 4.3” it’s certainly one of the largest touch screens on a smart thermostat, and I was very pleased to find the touch controls fast and responsive. I often find these types of consumer devices to be lacking in this area, but not so here thankfully because you’ll likely be interacting with this on the fly in general use.
The mounting plate comes with the commonly included level to help with mounting, and simple spring clip terminals to attach your HVAC wiring. The clips are easy to use in that they aren’t too stiff, but still hold the wires firmly once they’re inserted. Also included in the box are screws and anchors, a jumper wire, a sticker sheet to help you keep tabs on which wire is which while you switch over from your old thermostat, and a very basic installation manual which essentially just points you to the Sensi app.
The Sensi Touch 2 is compatible with a wide variety of systems including gas boilers, conventional air conditioning, electric furnaces, boilers, and heat pumps. These can be in heat only, cool only, or conventional heating and cooling configurations. You will need a C-wire for any of these, however, so if you need alternatives without that you’ll need to look at other options.
In a blow to Apple Home users, this new model has dropped the support for HomeKit that was available on the first-generation Sensi Touch. We still get integration with Alexa, Google, and SmartThings as before. Confusingly the app still shows HomeKit as an integration option even though this model doesn’t support it.
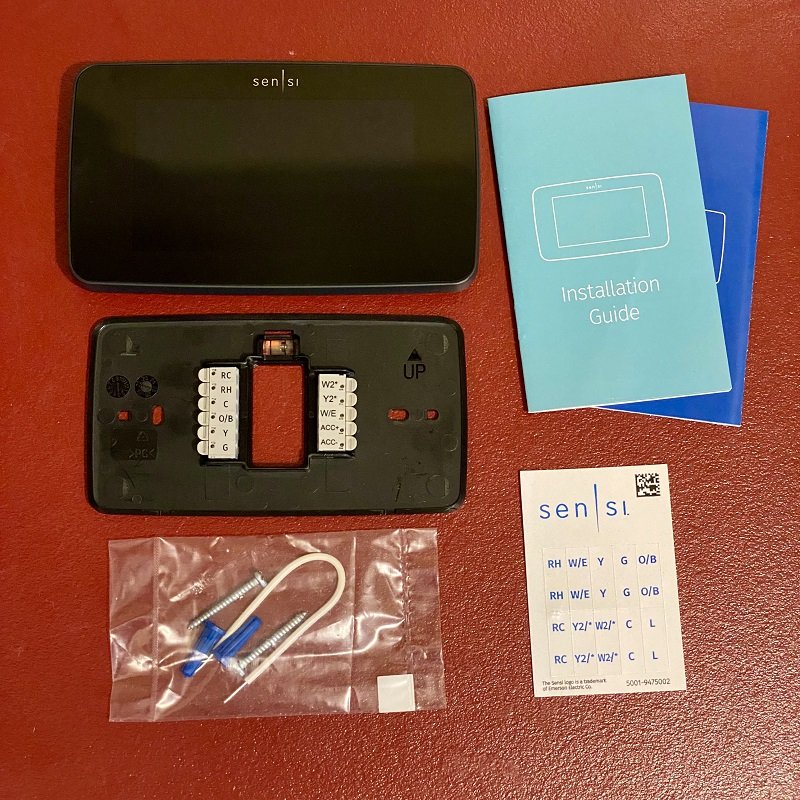
What’s in the box?

The back of the thermostat

Getting installed (I think it’s straight)
Installation and Setup
Not having a printed installation guide might seem like a downside, but the Sensi app guides you through the process so well that it becomes apparent very quickly that it’s a non-issue. Once the app is installed on either an iOS or Android phone and an account created, I was taken through every possible step from how to remove my old thermostat, through configuration selection and wire labelling, to showing me exactly which terminals to put what wire and how to attach the thermostat to the backplate. Videos are available on each step for those that need some extra clarity.
My biggest issue was getting the wires into the terminal holes due to my large hands, and getting the thermostat attached. The thermostat attaches very firmly to the clips on the mounting plate, and I was concerned about applying pressure unevenly and bending the pins that insert into the wire clips. This is probably just me being over cautious having worked with so many, shall we say, less robust devices and I expect I could have just pushed it right on there without a problem.
Wi-Fi setup was also blessedly easy, which is certainly not always the case with smart home devices. Pairing with the thermostat is done via a QR code it shows on the screen. I simply needed to scan that with the Sensi app, enter my Wi-Fi credentials, and it configured itself without issue.
It’s notable that Sensi is still using quite an old Wi-Fi version with 802.11n. While there are a handful of routers known to be problematic as a result, it shouldn’t be an issue for most people. The bigger issue going forward is that this limits you to WPA2 security on your network. While WPA3 is widely available now, many cheap smart devices don’t support it, so most of us are stuck with the older WPA2 anyway. If you are running WPA3 then this would be an issue for you.
Once all that is done the last step is to register the device. This is not optional because if you don’t do it then the thermostat doesn’t get added to the app and you have to start over. It’s also worth noting that the address options for this step are limited to North America, so if you want to use this anywhere else it’s not going to work. The registration is not just for warranty, but it defines the location of the thermostat for time zone and local weather data purposes as well.

Every detail is covered in the setup instructuions

Choose which wires you already have to validate your setup

The app shows you where to put things
Configuration options
Once you’re up and running and the Sensi Touch 2 is showing in the Sensi app, you have a few more useful options you can configure. These are very much optional and allow you to tailor the experience a bit more. The simplest of these is the ability to choose if you want the humidity and time shown on the main display, and what temperature units to use.
More interesting is the ability to either lock the display to keep it safe from meddling hands, or to set limits on the minimum cooling or maximum heating setpoints available. This could be particularly useful in a short stay rental situation. For keeping your system healthy, you can adjust the cycle rates for both heating and cooling separately and enable ‘A/C Protection’ which forces a short delay between off and on actions.
The Sensi Touch 2 will help you keep on top of maintenance by allowing you to configure a range of service reminders for things like general HVAC maintenance, filter cleaning, and other consumables that might need replacing. I like to use these kinds of features as it keeps things related to the system in the one app rather than having to manage that separately. Along those lines you can also put in your HVAC contractor’s number for quick reference.
Automation is provided through the scheduling features. These are also optional, of course, and you can go two ways here. Either set up defined schedules for the thermostat to use or go with Geofencing control which will set the thermostat back 3 degrees when everyone has left home to save energy.
Multiple schedules can be created for each of the three operating modes; heat, cool, or auto, and you can select which schedule to use through the app. For each schedule you can set up multiple day groups (selecting which days that setting applies to) so you can have different set point schedules on different days, and each day group can have multiple time blocks. Each time block either defines the setpoint for heating or cooling modes, or the temperature range to maintain for auto.
This gives a huge amount of flexibility in creating schedules for just about any possible situations and makes it easy to have separate schedules define for when you go away for extended periods that can be enabled with a tap. The mode can be easily selected right on the touch screen, so this also makes it easy to switch schedules along with the mode change without having to do anything else.
Real World Performance
Usability
The Sensi Touch 2 has been very easy to use. Aided by the excellent touch response, the user interface design is also very clear and intuitive. With only a few minutes of tapping around I had figured out where everything was and how it works. As with most smart thermostats, the display is dominated by the current temperature. This is color coded to show the current operating mode of the thermostat: white for off, blue to cool, and orange for heat. The current setpoint is shown as a smaller number to the right and when the screen is active you can easily adjust this with the up and down arrows above and below.
On the left side is the menu button, clock, humidity and a set of icons showing which of the available operations are active. This includes things like fans and other options. Along the bottom of the current temperature is a bar showing the current scheduled behavior. If the schedule is active this will show when the next change is due or if the unit is in hold mode because of a manual change to the setpoint. You can cancel hold by tapping there.

On-screen controls are clear and easy to use
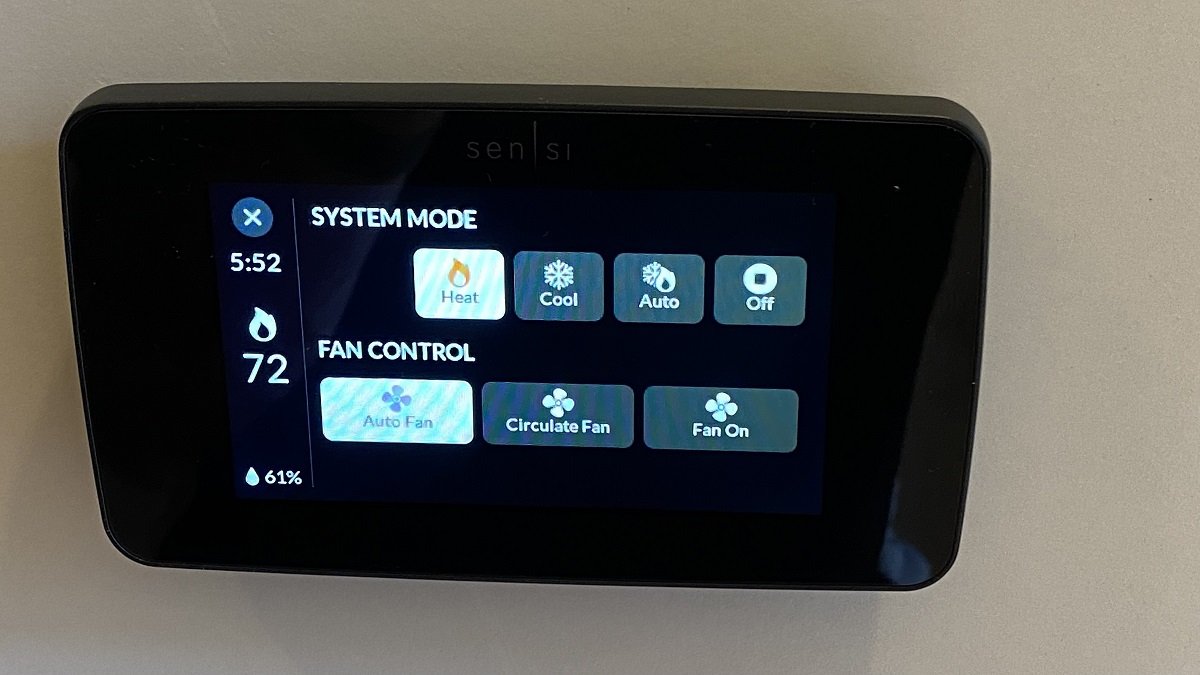
Tap the left icon to access mode and fan controls
After a short time of no interaction the display will revert to sleep mode, which dims it considerably and shows only the temperature and setpoint, the clock (if you have it enabled) and an icon showing if a schedule is active. In this mode the backlight is off and only the reduced brightness of the digits is visible. There isn’t a way to turn the display off completely or adjust the brightness further, but I found it dim enough to not be an issue, while still being visible enough to see the status at a glance so long as there wasn’t any reflected glare on the screen.
This easy user interface extends into the smart phone app. The display of the thermostat is essentially replicated there both as s smaller version on the home screen (in case you have more than one Sensi thermostat to manage) and a more detailed view when you tap on that thumbnail version. I found using the app to be just as intuitive and easy to navigate as the touch display, with the obvious addition of some extra configuration details such as the system settings and editing schedules - you can only do that in the app.
The app also lets you view your usage statistics which provide daily and monthly views of how long each mode was used in a simple bar graph layout. This isn’t as detailed as some higher end smart thermostats, but it still provides a pretty clear image of what’s been going on.
Geofencing
Geofencing works fine, but it gets a bit complicated with multiple household members. Sensi doesn’t provide a way to share devices between accounts, so rather than everyone having their own account they need to all share the same one. This isn’t the best option from a security perspective, and it does make using the geofencing feature a bit tricky.
If any user on that account turns off geofencing, it turns it off for everyone. Going the other way, however, only turns it on for that one user. Each person using the account has to turn geofencing on for it to count them. Ostensibly this is so households can choose who will be the person that the geofencing behavior is based on, but it could just as easily result in it not working as expected. Of course, if you don’t switch back and forth then you can set it and forget about it, but otherwise some extra diligence might be required.
Accuracy
Accuracy of the temperature sensor has been an issue for some smart thermostats I’ve looked at, and you don’t always have the option to calibrate them. The Sensi Touch 2 doesn’t seem to suffer from any heating issues, and monitoring it side-by-side with a temperature and humidity sensor that I trust I’ve found it to be spot on with temperature and reading a little high on humidity.
That over read won’t be an issue though, as the Sensi app allows for offet adjustment of both sensors. You can go up or down by up to 5 degrees for temperature and 25% for humidity which should cover any minor variance in any environment.
Additionally, you can add optional Sensi room sensors to the Touch 2 to provide better readings. Room sensors are very helpful in compensating for the placement of the thermostat if you find that the location doesn’t represent the environmental conditions of your actual living spaces very well. For example, if the thermostat is near the front door and tends to be colder than the living room, or if you want to bias the setpoint to the bedroom for night time.
You can add multiple room sensors to the thermostat and then select which ones to use for determining the current temperature. You can select one or multiple sensors and the current temperature will be an average of those sensors. This allows you to bias certain rooms in determining the heating and cooling performance, and change that bias by selecting different groups of sensors.
The Sensi Room Sensor comes with both a keyhole for wall hanging as well as a clip-on stand for free standing placement on a shelf or table, so there’s plenty of options for where you could put these. They’re powered by two regular AAA batteries which can be monitored through the Sensi app.

The main thermostat control screen

Editing a multi-day schedule for cool mode

The system configuration options
Alternatives

Sensi Lite
The little brother to the Sensi Touch 2 is the Sensi Lite. This model is a cut down version of the smart thermostat that trades a more restricted set of supported HVAC configurations in exchange for the ability to run on batteries, without a c-wire.
Beyond the cut down HVAC features, you have a smaller, more basic display and no humidifier control, but essentially retain the other features including smart scheduling and display lockout control.
Sensi Wi-Fi
If you really want to use the benefits of the simple Sensi app and straightforward user interface with Apple HomeKit, you can still go with the older Sensi Wi-Fi, the original Emerson smart thermostat. This model uses purely manual controls and a more basic LCD display, but this does allow it to run on batteries as well.
This has been a popular option for HomeKit users for a while if you don’t want to spring for the high cost of an ecobee and don’t care about the smart learning features.
The Verdict
Not everyone wants a smart learning thermostat. While they can provide far better efficiency gains and energy savings, you have a give up some control over your home climate which isn’t for everyone. Those models are also pricey and can come with a great deal more complexity to use them well.
The Sensi Touch 2 is for those who want clear, simple control over their comfort levels with some automation and reporting to allow them to take better control of their heating and cooling costs. It’s super easy to install, supports a wide range of system configurations, and has a very clear, intuitive user interface both on screen and in the app.
You’ll get a bunch of helpful reminder notifications, alerts if there are issues detected with your HVAC system, and very flexible scheduling options that are fairly easy to customize to whatever situation you might need. This is rounded out by support for three major smart home platforms, and the ability to add multiple optional room sensors to more precisely target the zones where you want to optimize the temperature.
I’ve been impressed by the whole user experience and the performance of the unit itself. So, while the Sensi Touch 2 sits at the higher mid-price range, it’s solid performance, thoughtful design, and useful features make it well worth the buy in for me.