
How Better Floor Plans Improve Smart Home Design, Coverage, and Automation
Most smart-home mistakes happen before a single device is unpacked. Someone buys a mesh router, three Zigbee bulbs, four cameras, and a handful of motion sensors, then figures out where to put them after they arrive. This is exactly backwards and it's why so many systems end up with dead zones in the back bedroom, cameras that miss half the driveway, and automations that trigger unreliably because a sensor is on the wrong side of a wall.
Physical layout is not a secondary concern in smart-home planning. It's the primary constraint. The materials your walls are made of, the distance between rooms, where your entry points actually are versus where you assumed they were, these things determine what's possible before you've made a single purchasing decision. And the most common reason smart-home enthusiasts don't account for them properly is that they're working from memory or a rough sketch rather than an accurate representation of their home's geometry.
What Goes Wrong Without Proper Layout Planning
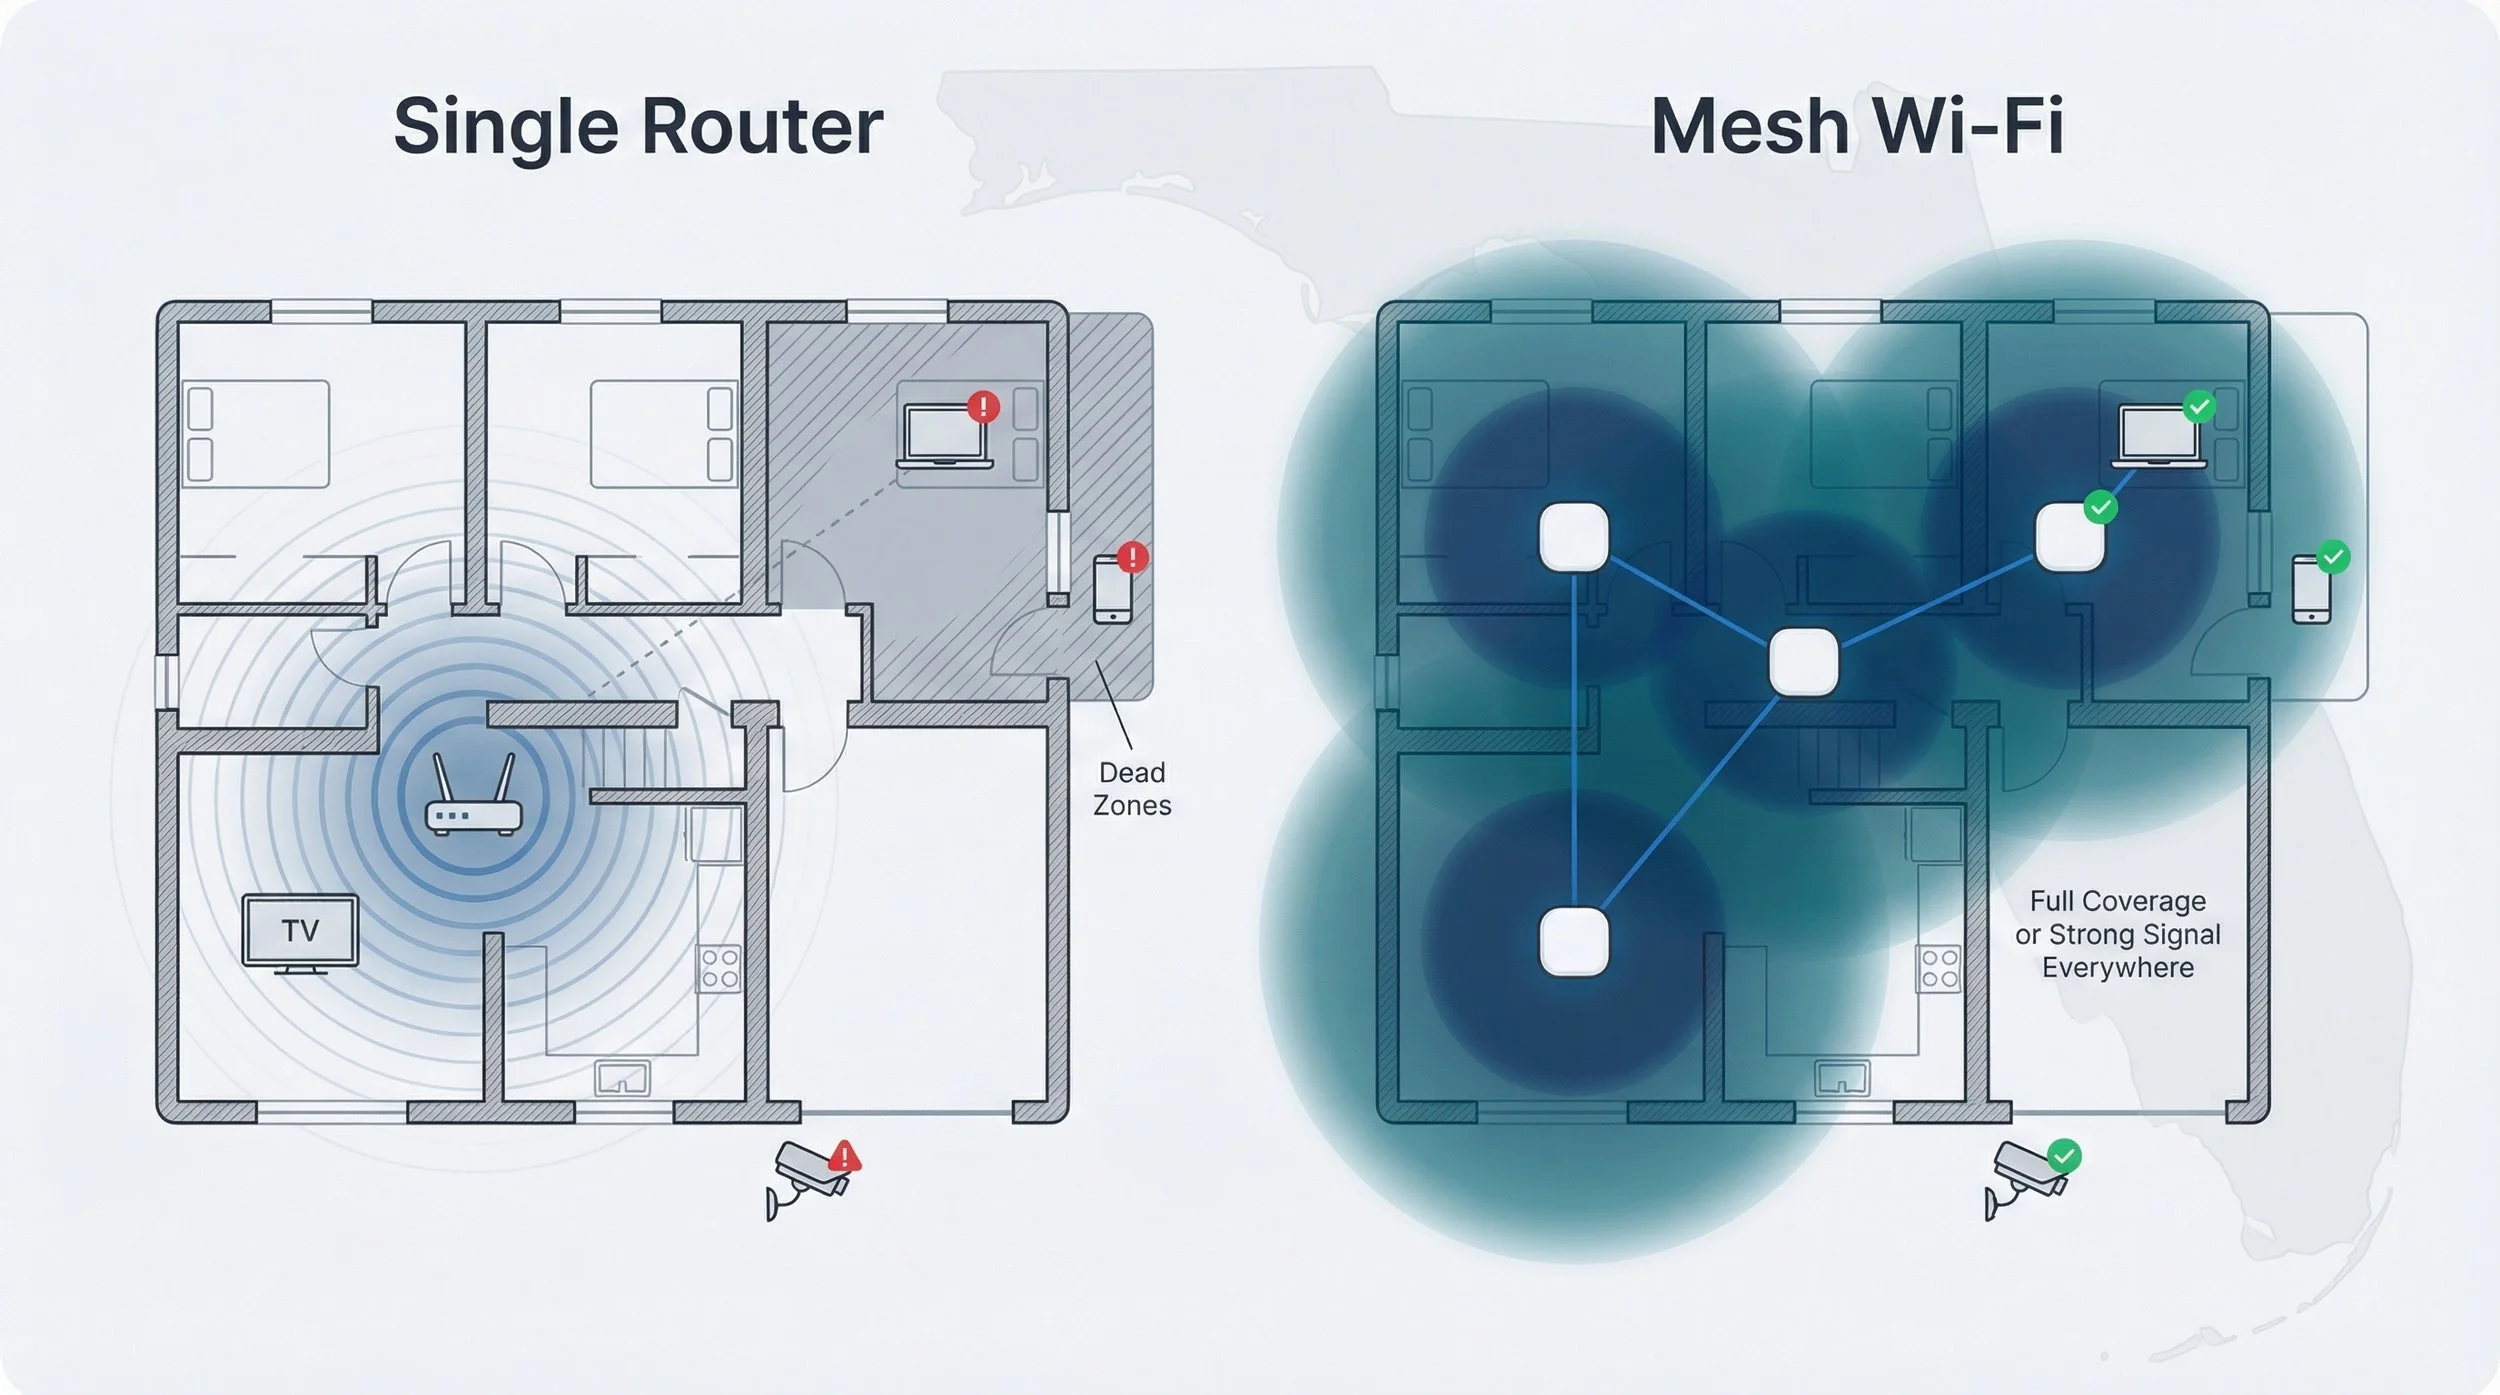
Wi-Fi and mesh dead zones. Mesh networking has solved a lot of range problems, but node placement still matters. Concrete, brick, and plaster-over-metal-lath walls attenuate signal significantly. A mesh node placed in a central hallway that seems logically central might be separated from the devices in your back rooms by two concrete walls and a plumbing chase. If you haven't mapped your home's wall materials and geometry, you're guessing at node placement, and you'll probably spend several frustrating evenings repositioning hardware to fix gaps you didn't anticipate.
Camera blind spots. Security camera placement is a geometry problem more than anything else. A camera mounted in a hallway corner gives you coverage of the hallway. It does not give you coverage of what's around the corner unless you've verified that the field of view actually reaches the relevant sightlines. Entry-point coverage is particularly prone to this: front doors that open inward can put the threshold just outside the effective motion detection zone of a camera mounted too close or at the wrong angle.
Sensor placement and automation failures. Motion sensors, door/window contacts, and occupancy sensors all need to be positioned in relation to how a space is actually used, not just where it's convenient to mount something. A motion sensor at the top of a staircase might seem like a good trigger for hallway lighting automation, but if it only detects motion on the stairs themselves and not in the hallway approaches, you'll get automations that fire at the wrong time and miss others entirely. These problems are almost invisible until you're living with them.
The underlying issue is that smart-home systems are physical systems operating in a physical space. Planning them in the abstract, or from an inaccurate mental model of the home, means the installation will constantly fight the building's actual geometry.
Why Floor Plans Specifically Help
A floor plan makes the geometry explicit. Room dimensions, wall positions, door swing directions, window placements, these are the details that determine sightlines, signal propagation paths, and sensor coverage areas.
For smart-home planning, the difference between a 2D vs 3D floor plan often comes down to how clearly you can understand walls, sightlines, and room relationships before installing devices. A 2D plan gives you the footprint and the room adjacencies. It tells you which rooms share walls, where doors are, and roughly how much distance a signal needs to travel between two points. That's genuinely useful and considerably better than working from memory.
A 3D representation adds vertical context: ceiling heights, mezzanines, open-plan voids, stairwell positions. That becomes important the moment you're thinking about things like camera mounting heights, motion sensor detection angles, or how a Zigbee mesh propagates through a multi-storey home. A camera mounted at 2.5 metres in a room with 3-metre ceilings covers a different ground area than the same camera mounted at 2.5 metres in a room with 2.4-metre ceilings, and the 2D plan won't tell you which scenario you're dealing with.
Planning Wi-Fi and Mesh Coverage
With an accurate floor plan, you can do a rough signal propagation estimate before buying hardware. Mark your existing router location and your proposed mesh node positions, then identify every wall the signal needs to pass through to reach each of your IoT devices and sensors. Concrete and brick walls reduce 2.4 GHz signal by roughly 15-20 dB per wall; plasterboard is considerably less attenuating at around 3-5 dB. A device that's only two walls from your router in the floor plan but those walls are poured concrete is a very different RF proposition from two plasterboard partition walls.
For Zigbee, Z-Wave, and Thread mesh protocols, layout matters even more. These protocols rely on devices routing through each other, and the mesh they form depends on which devices can hear each other. A Zigbee bulb in a remote bedroom corner might only have one or two peers in range, creating a fragile link in your mesh. Mapping device placement against the floor plan helps you identify these thin spots before you've bought your hardware and plan either additional routing devices or different placement strategies.
Camera Sightlines and Entry-Point Security
This is where geometry really matters. Pull out your floor plan and mark every exterior entry point: front door, back door, garage, any ground-floor windows you consider vulnerable. Now think about where a camera mounted at each of those points would have line of sight to and, crucially, what it would miss.
Front doors that are set back from the pavement need a camera that can see both the path approach and the door itself. A single fisheye camera mounted above the door might cover the porch while missing someone approaching from the side. Two conventional wide-angle cameras, one covering the path, one covering the door, might give you better redundancy even if they're technically lower resolution.
Driveways need coverage at the entry point, not just at the house end of the driveway. Most people mount their driveway camera at the garage and discover too late that it only shows them a car that's already parked rather than one approaching from the street.
For motion detection specifically, pay attention to what's in the motion zone besides your actual area of interest. A camera pointed at a footpath will constantly trigger on passing pedestrians if its motion sensitivity isn't tuned and its motion zones aren't restricted. Getting this right requires understanding the geometry of what's in the frame, which you can work out from a floor plan plus a rough knowledge of the camera's field of view.
Multi-Floor Homes and More Complex Systems
For multi-storey homes, larger properties, or any system where you're running Home Assistant with meaningful automation logic across multiple rooms, the planning complexity grows considerably.
When planning larger or more complex connected homes, 3D floor plan rendering services can make it easier to think through camera angles, wireless coverage, and automation zones before hardware is installed. The vertical dimension matters for understanding how many floors a Zigbee mesh needs to propagate through, whether a mesh node on floor two actually covers the attic office or just the ceiling below it, and where to position cameras on staircases to give useful coverage without pointing them at areas where privacy matters.
In Home Assistant, good automation design almost always tracks room-level or zone-level state. An automation that turns on hallway lights when motion is detected anywhere in the house is much less useful than one that distinguishes between motion in the upstairs hallway and motion in the downstairs hallway. Getting zone-based automations right requires knowing where your zone boundaries actually are in physical space, which means having an accurate spatial model of the home.
Applying Layout Thinking to Real System Design
Lighting and occupancy automations. Place motion sensors and mmWave presence sensors to cover the natural paths through a space rather than its geometric centre. In a kitchen with an island, someone working at the sink is in a different position from someone working at the island, and if your motion sensor only covers one of those positions your "occupied" state will be unreliable.
Security workflows. Think through the temporal sequence of your security events. A door contact trigger followed by a motion sensor trigger inside means the door opened and someone entered. A motion trigger without a preceding door contact means either there's motion inside without an entry event (occupant already home) or you have a sensor misfiring. This logic only works if your sensor placement actually captures these sequences. This requires that sensors are on the right entry points and in the right positions to detect occupants moving from entry to interior.
Hub and network placement. Home Assistant running locally on a box in a rack in your basement sounds fine until you realise that the Zigbee USB stick plugged into that box is receiving signals from devices on the third floor through two concrete floors. Zigbee controllers need to reliably communicate with end devices. The mesh only works if there are good paths between both in all cases. Ensure router capable devices, like light bulbs, are positioned to cover any potential gaps.

Ensure mesh nodes provide good paths between all devices
What to Check Before You Buy Anything
Before ordering hardware for a new smart-home installation or major expansion, spend time with an accurate floor plan and work through these questions:
Coverage gaps. Where are the furthest points from my proposed mesh nodes or router? What walls are between them? Are there any rooms where I'm relying on a single wireless hop that might be unreliable?
Camera blind spots. Mark every exterior entry point and identify what a camera at each feasible mounting location would actually see. Where are the angles that leave coverage gaps?
Sensor redundancy. Which rooms have multiple entry paths? A room with two doors and a connecting open-plan area needs more than one sensor to capture all the ways someone can move through it.
Protocol range. Zigbee and Z-Wave have different range characteristics. In a larger home, map where your mains-powered devices (which can act as routers) will be and whether they form a dense enough mesh to reach battery devices in remote corners.
Privacy. Know what's in the field of view of every camera you're planning to mount beyond what you intend it to cover. What will it incidentally capture? Neighbours' gardens, public paths, and shared spaces all need to be considered before installation.
The Planning Investment Pays Off
Smart-home projects that work well tend to be ones that were thought through spatially before a single device was bought. The enthusiast who spends a weekend mapping their home with even basic tools, even a 2D plan sketched from measurements, before ordering hardware almost always ends up with a more reliable system than the one who installs first and troubleshoots later.
The physical space is the constraint. Work with it from the start, and you'll spend less time repositioning nodes, repositioning sensors, and explaining to your home automation system why it keeps thinking someone's in a room they left fifteen minutes ago.