Using Scrypted to Intergate Cameras Into Your Smart Home
Support for security cameras in the major smart home platforms is a bit of a mess. Camera makers have different approaches and integration methods, and the platforms like to do their own thing as well. The experience can be mixed, limited, or non-functional between different brands and apps.
The new smart home standard Matter promises to bring us all under one happy integrated roof. Even then, the major tech companies in the alliance were unable to come to an agreement on a standard for cameras, so that device category will still be left out.
The open-source tool called Scrypted provides some relief, at least for the power users among us. Scrypted is an integration and automation tool that runs as a service and provides an intermediary between various devices and the major smart home players, namely Amazon Alexa, Apple HomeKit, and Google Home. This is similar to the popular Homebridge tool, and while it’s based around plug-ins and can be extended to various devices, it’s primary focus right now is security cameras.
I’ve switched over to using this for my Ring cameras as it gives me all of HomeKit’s camera options instead of just the basic motion detection and live view I used to get from Homebridge. It’s been very reliable and works well with Ring’s eco system if camera integration is your main goal. I’ve also been able to expand into Power over Ethernet cameras which would normally only work with standalone Network Video Recorders (NVRs) and use these in my smart home as well.
What You Need To Run Scrypted
Scrypted needs to be online all the time in order to provide connectivity between your cameras and your smart home. To do this it runs as a service (a server) somewhere on your home network. It supports installation on Windows, Mac, and Linux, and by extension on the popular Raspberry Pi minicomputer. You can also run it on several NAS platforms: ReadyNAS, Synology, QNAP, and Unraid.
My preference is to use a Raspberry Pi simply because it’s a small, low power, silent device I can tuck away with my other smart hubs and not worry about. If you have one of the supported NAS devices, that would be a good option too given the global chip shortage has pushed Raspberry Pi prices through the roof.
I keep a regular check on ‘Pi’ availability and prices, and this Raspberry Pi starter kit is the best offer available as of my last refresh. Starter kits are a good way to go if you don’t have one already as they include all the accessories you need, plus a pre-imaged memory card with the OS ready to go.
If you have a spare one available and want a fresh image on it to install Scrypted, you can get that easily from the free Raspberry Pi Imager. See my step-by-step guide on how to do this. Keep in mind that you’ll need at least a Raspberry Pi 4, the 3B won’t cut it. Processing all that streaming video needs a bit more power than you’ll get out of lower spec models.
Before You Jump In
Scrypted is a great tool for getting virtually any IP-based camera integrated with your smart home. It provides a LOT of technical options and additional plugins to enhance the capabilities of your particular setup. Cloud-based cameras will significantly underperform basically any RTSP model, however. This isn’t Scrypted’s fault, it’s just a factor of the extra steps and latency between the camera and the service.
There is quite a bit of information out there to help you get things working and, in most cases, it should work right away. As with any of these unofficial solutions, complications are also common, so you’ll need to be willing to dig for answers.
There is an official Discord available with a lot of help, but you will be expected to have followed any provided instructions before asking questions. That includes the readme sections for the various plugins, the Scrypted wiki, and Discord rules.
Oh, and it’s strongly recommended to use a wired Ethernet connection for whatever you are going to run Scrypted on. This will help reliability greatly and will be the first thing you’ll be expected to do if you have any issues and ask for help.

IP Camera Protocols Explained
See this comprehensive explainer to learn what each protocol does and how they work together with your cameras.
How To Setup Scrypted
Given there are so many cameras and plugins you might want to use, I’ll be focusing on one popular use case for Scrypted: Using Ring cameras with HomeKit Secure Video. Yes, full HKSV support is on the table for any camera. This may not be for you, but the process will be similar, just with different plugins.
For example, my PoE camera is a Reolink 810A model. I could use the generic RTSP plugin for this, but Scrypted has a specific Reolink plugin as well, which makes it much easier to install. There’s is some configuration that needs to be done on the camera first using its administrative webpage, but once done it’s as easy as installing a Ring device and largely uses the same steps below to get it working in HomeKit.
1 - Install Scrypted
With your chose host platform ready to go, install Scrypted using the instructions on the Github page under the Installation section. In the case of the Raspberry Pi I went with the recommended Docker Compose option. This is literally a matter of copying one line into the console and it took care of everything.
Once the install is complete, the service will be running at port 10443. Use a browser to go to that port. In named my Raspberry Pi ‘scrypted’ so my example is https://scrypted:10443. Note that the connection is secure but as it’s a local certificate you’ll have to accept the warning in your browser that it’s not verified. This is fine as you’re not connecting to an external server, you know what it is.
The first time you connect you’ll be asked to create an account for the Scrypted service. This is a local account for your install used to prevent just anyone accessing the management console.
2 - Install plugins
You’ll see a lot of stuff on the console, but we only need to deal with the top two sections of the menu: Plugins and Devices. The default view is the Plugins page, with the option to install a new one at the top. Clicking the Install link will take you to the plugin search page.
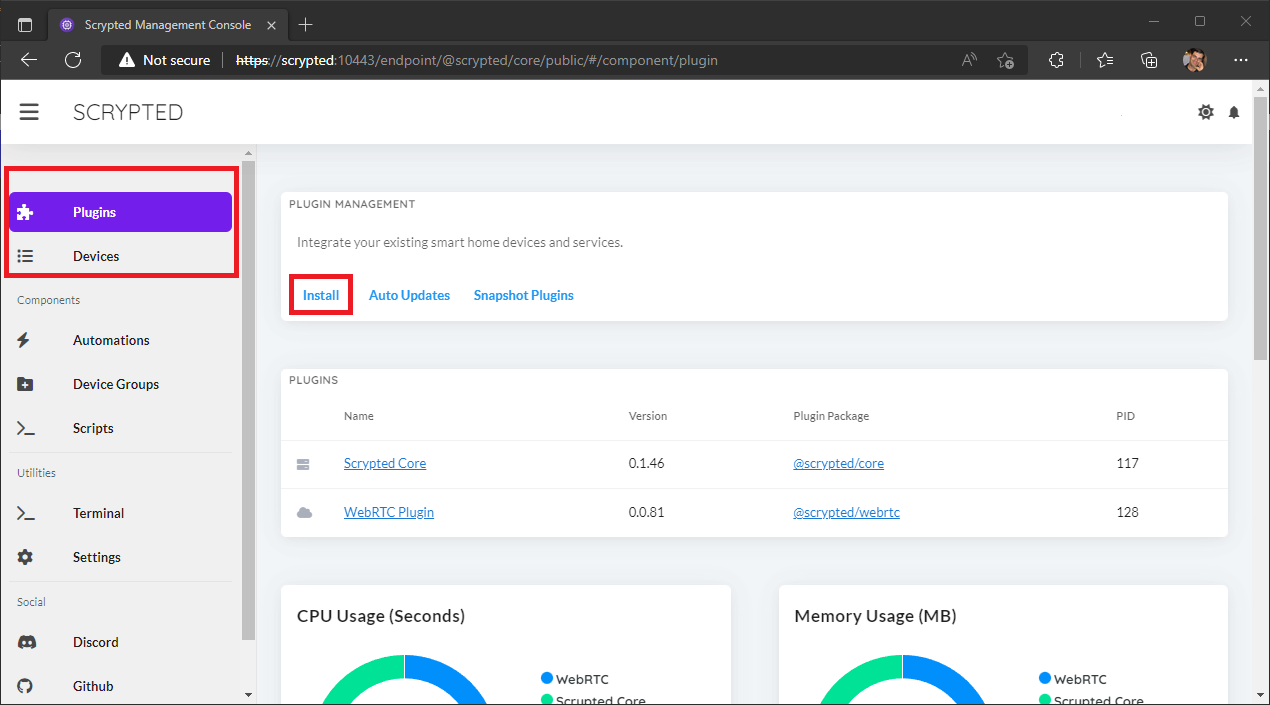
The Scrypted Management Console
A bunch of popular plugins will be listed below the search box, but this is not at all comprehensive. There are more that you’ll need to search for, but you can see all the published ones on the NPM repository by using this search.
For our example we need to install two plugins, Ring and HomeKit. Type ‘ring’ into the search and the plugin will be shown. Click the Install button.
Once installed you’ll be taken to the plugin setting page for the Ring plugin. With any cloud-based camera plugin like this you’ll need to provide authentication details to connect to your cloud account for that service. Enter email and password for your Ring account and click Save at the bottom. This will trigger a login attempt and prompt Ring to send you the two-factor code. Put that in and Save again.
All your Ring camera devices will now be discovered and added to the Devices list. Scrypted doesn’t currently support other Ring device types, just the cameras, doorbells, and their associated features like built-in lights and doorbell buttons.

Scrypted Ring plugin configuration
The HomeKit plugin is next. Follow the same search and install procedure. On the HomeKit plugin page you’ll see a big pairing code, but don’t do that step yet. We need to adjust the Ring camera settings for each device first.
At this point I should note that it’s recommended for HomeKit Secure Video to work better that you assign a fixed IP address to your Scrypted server. You can enter this address into Scrypted to ensure the wired connection is used if your host device has both ethernet and Wi-Fi enabled. Click on the Plugins menu on the left, then select the Scrypted Core item in the list. On the right side is a Settings box to enter this IP address. Click Save underneath it when you’re done.
3 - Configure Cameras
Click on the Devices menu item on the left, this will give you a list of all the individual device components. Many of these are Scrypted system components, but you’ll also have any cameras listed in here. Scroll down and find one of your Ring cameras and click on it. You’ll see a lot more of those setting buttons in the top right. Below that are some options for the camera you can set, but we don’t need to do anything with those. You can optionally set a Room name there, but that’s for Scrypted automations and doesn’t affect HomeKit.
All we need to do here is click on HomeKit in the top section and then Pairing below it. Ensure the Standalone Accessory Mode option is ticked. This is now the default as it provides better performance in HomeKit and allows more flexibility in which devices you share with it. Using this this option does mean we’ll need to pair each camera individually. A little extra work, but it means we can add only those devices we want.

HomeKit Pairing settings for a Ring Spotlight camera in Scrypted
Once we’ve done this, click on the HomeKit button next to Pairing to get the pairing QR code for this camera. You can go ahead and add a new accessory in the Apple Home app using that code.
If the camera has a built-in light and sirens these will also show in HomeKit as switches in the same room as you assigned the camera. They don’t have a name, however, so you’ll need to figure out which is which by trying them and rename them as appropriate in the Home app.
HomeKit Secure Video Caveats
It’s pretty exciting to be able to get Ring and other camera brands working in HomeKit with all the video features such as secure recording, object detection, facial recognition, and configurable notifications. HomeKit provides good object detection options and more control over recording and notifications than many camera platforms. It’s not all good news, though.
Even though HomeKit Secure Video can sometimes miss more motion events than other recording systems, I’ve found its performance through Scrypted to be surprisingly good. Running recording and notifications in parallel between HKSV and Ring I’ve managed to capture everything in both so far. The biggest drawback with HomeKit is the notification speed. It’s several seconds slower than a first party app, and it’s no different with native battery powered HomeKit cameras like the Eufy Cam 2C.
HomeKit also relies on the camera to tell it motion has been detected. HomeKit will then request the video stream and decide what to do with it. To maximize event detection, you’ll need to reduce any motion filtering features on the camera side to the minimum. This can result in getting a lot of spam recording and notifications in the Ring app, so it can be a bit of a journey finding a good balance between the two. Also keep in mind that arm/disarm states that some camera systems use, like like Ring Modes, can impact when HomeKit is triggered as they can completely disable motion detection.
On the plus side, Scrypted does seem to provide faster snapshots and live streaming on average than Homebridge, and it has worked far better with AppleTV where my Ring cameras were regularly listed as ‘Not Responding’ before.
More You Can Do With Scrypted
Setting up cameras to work with your smart home is benefit enough for most people to try this out, but there’s more to Scrypted than that. It’s also an automation platform and can create virtual devices to do pretty cool stuff.
Some examples:
You can create device groups that can combine multiple devices into one which can then be controlled as a single entity. Pair a temperature sensor with a smart switch to create a virtual thermostat for a dumb heater.
You can select which motion sensor you want to trigger a motion even for a camera. This can be used to trigger event recording sooner than the camera might do itself.
You can set up automation rules using the built-in rule editor, or you can create much more complex logic using full blown scripts right in the GUI.
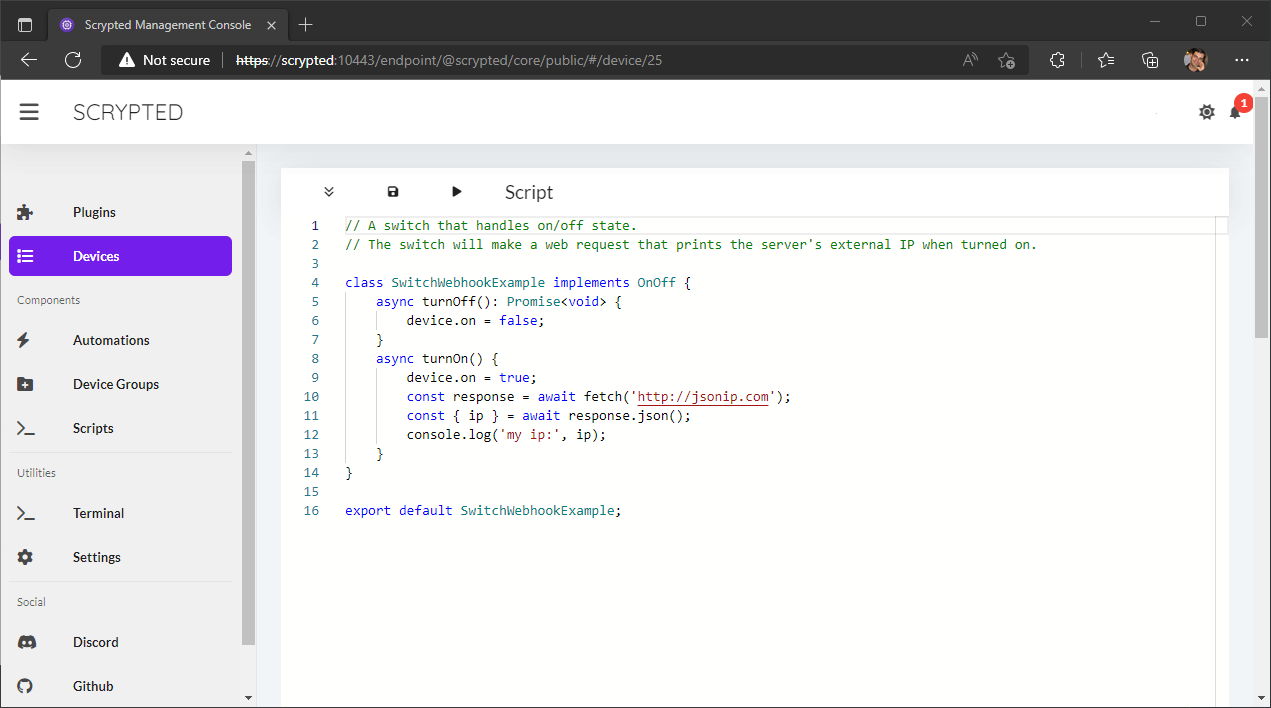
Scrypted editor with the basic switch template ready to go.
Summary
Having to select specific security camera solutions that have decent support for your preferred smart home platform can be a pain, and often exclude good options that you might want to use. You can also end up with duplication, multiple apps, and separate recording devices. This can all be worked around with careful buying choices, of course, but it’s all too easy ending up overlooking something, wasting time and money.
I love that Scrypted provides an open platform that can take virtually any IP camera out there and add it into your smart home with a lot of control around performance, motion behaviors, and more. It supports full HomeKit Secure Video integration, advanced automation capabilities, and has a vibrant community to back it up. Not only that, but you can run it on a wide variety of host devices depending on what you have or prefer to use.
A cheeky extra bonus is that you can use various cloud-based cameras without the subscription they would normally require. So long as the free tier provides live streaming and basic motion detection, they’ll work with Scrypted. You might still prefer to look for options that don’t need a subscription, but if you already have the hardware, you might not need to.