Qingping Air Monitor Lite Review: The Best HomeKit Air Quality Sensor?
When you buy through links in this article, I may earn an affiliate commission. Learn More.
Ever since smart air quality room sensors became a thing, I’ve had a bit of a fixation with them. Being able to monitor the temperature and humidity in every room at once was cool, but adding air quality was quite an eye opener. Of course, ‘air quality’ has been measured differently by different devices for a while, especially when it comes to the poorly defined rating in Apple’s HomeKit.
I was recently made aware of these new HomeKit compatible air quality sensors from Qingping, so I thought I’d check out their nicest looking model, the Air Monitor Lite. This is a clean, compact table-top sensor that features a bright OLED display and rechargeable internal battery. Not only does it cover the usual temperature and humidity options, but actual CO2 concentration and both PM2.5 and PM10 particulates.
It’s a great little device, but it has some flaws that limit its usefulness to an extent. Let’s take a look at the details.
Qinping Air Monitor Lite Overview
Qinping Air Monitor Lite
Key Features:
• Supports HomeKit, Mi Home
• Temperature and Humidity
• Carbon Dioxide
• PM2.5 and PM10 sensors
• Bright display
• Compact design
• Data logging (in app)
While the Air Monitor Lite works with Qinping’s own app, and the Mi Home platform from Xiaomi, but aspect that caught my eye was its native support for HomeKit. Most HomeKit room sensors are limited to temperature, humidity, and maybe air quality, which is just a rating like ‘poor’ op ‘excellent’. The extra sensors included in this room sensor had the potential to be both more informative, and more useful from an automation perspective.
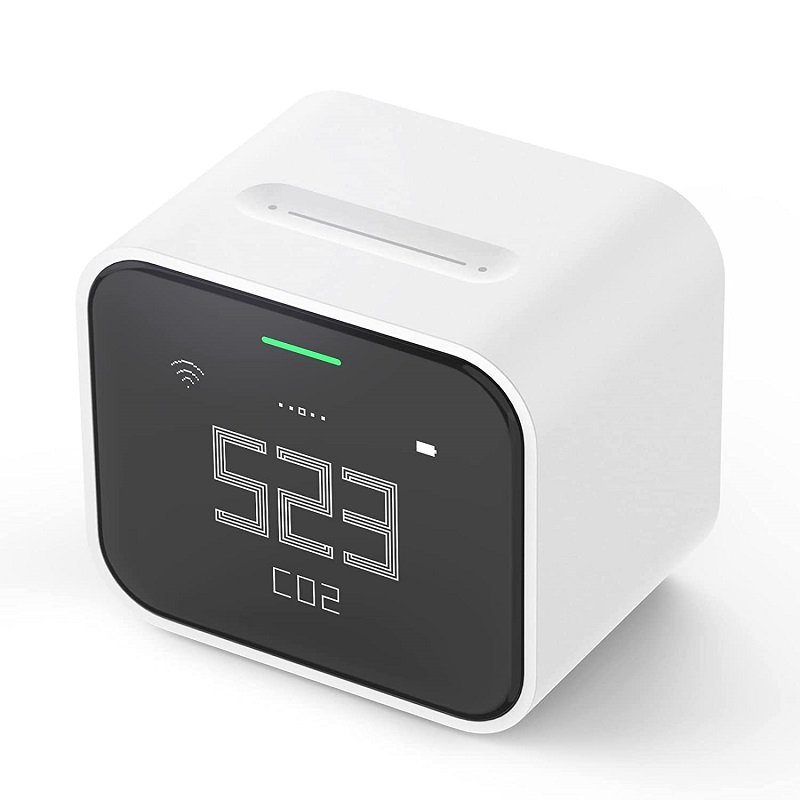
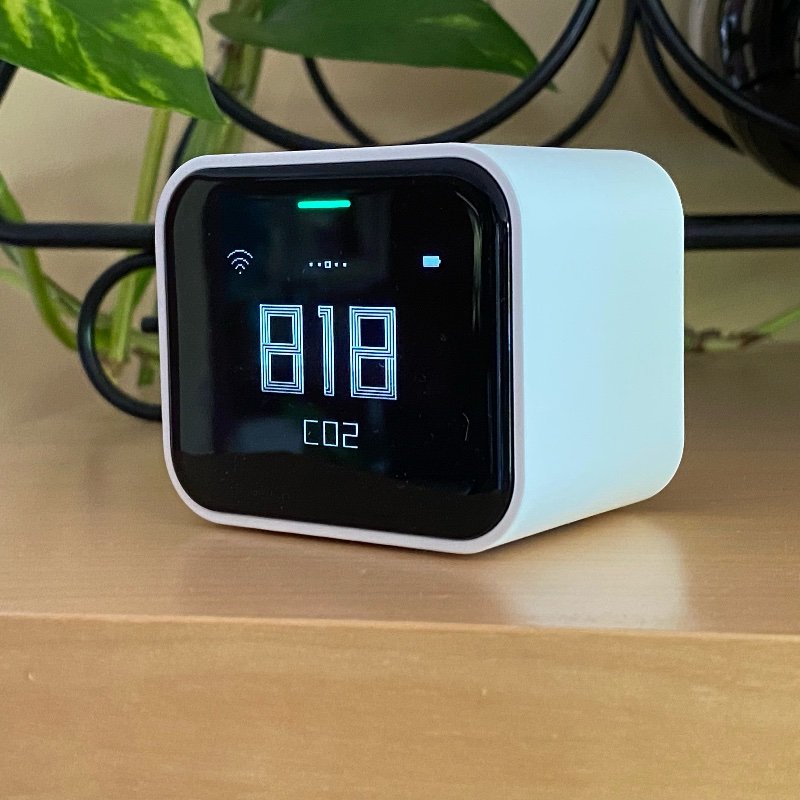
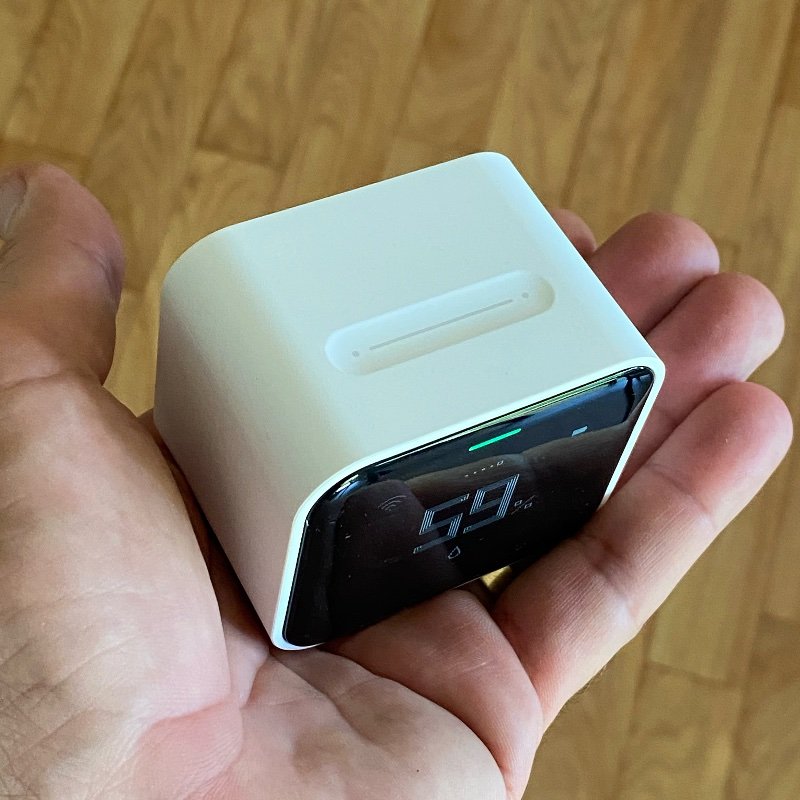
Physically, the Air Monitor Lite is about the size of a typical motion sensor and can easily sit in the palm of your hand. The OLED screen makes it easy to check on any of the sensor readings at a glance and is backed up by a colored LED bar at the top which changes color depending on where the currently displayed value sits in its range. For example, it will be green for CO2 until the value goes above 1000 ppm, then it switches to orange. Higher values will turn red.
The top of the unit has a capacitive touch bar that is used for scrolling between values to display, just swipe left or right to change the screen. The rear of the device is an open grill for circulating air through the sensors, assisted by a tiny fan. You’ll also find a small on/off button, and a USB-C port for charging the internal 2000mAh battery. Finally, the bottom of the device has a rubberized finish so that it sits firmly on any flat surface without scratching.
The materials and build quality appear to be of a high standard, and the screen is perfectly blended into the device with no perceptible edges. Curiously, connectivity is provided by Wi-Fi. I was expecting Bluetooth for something this small in order for it to work on battery power. There’s not much else in the box except a USB-C cable for charging, but no charger. I don’t mind this as I have a box full of them anyway, as I expect most people would at this point.
Looking good
Small and light

Intake vent, USB port and on/off button on the back
Installation and Setup
Getting the Air Monitor Lite up and running is trivial, it pretty much works out of the box by itself by simply plugging in the provided USB-C cable. I just needed to long-press the power button on the back and the device turned on and ran through a short boot up sequence on the screen. The next was to get it into HomeKit.
It’s always desirable for HomeKit users to not have to use a third-party app to do the setup, and this is certainly possible with the Qingping monitor. You can go ahead and scan the QR code on the bottom with the Home app and it will pair just fine. You may not want to do it this way, however. There are a few settings you might want to change, like the temperature units that default to Celsius, and you can only do this with the Qingping app. You’ll also need the app for firmware updates.
You can’t do any of that without pairing with the Qingping app first. You don’t need an account or anything and can use it in local only mode, I accessed this by pressing the small ‘Skip’ option on the login page. This seems to communicate with the Air Monitor Lite over Bluetooth, since it asked me for access the first time I used it. To get it into the app you’ll need to add it as a new device. This asks if you want to add it via HomeKit or using their own service. Of course, if you’ve already paired it with HomeKit this will fail, and you’ll have to remove it and reset the device to do it again.
I had to do this, so went through the hoops of removing it from HomeKit, resetting the network settings on the device by holding the touch bar for 8 seconds, and re-doing it in the app. Doing the HomeKit pairing through the Qingping app worked fine, it simply triggers the normal Home app pairing process anyway, but now it was also added to the Qingping app.
Configuration options
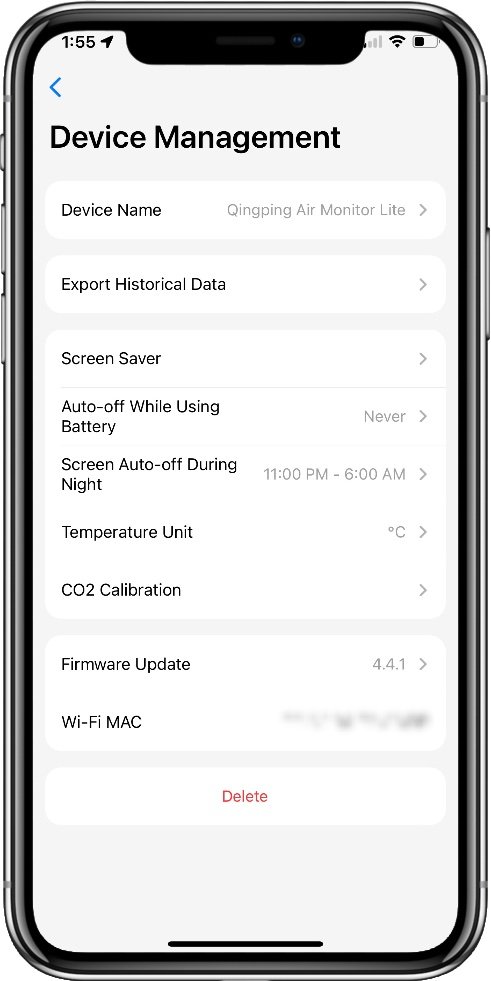
Once you have the device paired in the Qingping app, you can access a number of useful settings. Simply tapping the device summary card on the home screen will take you into a more detailed sensor display, with a wrench icon in the top right corner. Tapping this gets you into the settings screen. There’s only one page of options, and the most obvious one will be to set the temperature units you prefer. Beyond that there are a few useful options you’ll want to play with.
The Screen Saver mode allows you to display one value that bounces around the screen, or setting it to rotate through all values continuously with, or without, a clock. You can also adjust how long until it starts, which affects how long a manually selected display value will stay on the screen.
The Auto-off behavior determines how long the device will stay active on battery. This defaults to 5 minutes, so you might want to change it. Options are 5, 10, 30, or 60 minutes, with a Never option as well. This has consequences, which we’ll get to in a moment.
Finally, there’s a useful Night mode that turns off the screen between certain times. I set it to 11pm to 6am, but you can choose any times. This is particularly useful if you have it in a bedroom as the screen is quite bright. You can manually turn off the screen using the on/off button on the back as well. A short press will only do the display, a long press will turn off the device entirely.
There are a few other tools here you might want to use as well. The firmware update, definitely, but also the ability to export the data logs to email, and a manual calibration tool for the CO2 sensor. This sensor does auto-baselining, but you might need to manually reset it under certain conditions.
Real World Performance
Sensor Accuracy
The most important consideration for an air quality sensor is the accuracy of those sensors. Now, I don’t have lab level testing equipment to validate these, but I do have a bunch of other smart home devices that have demonstrated decent accuracy that I can compare with. My go to here is the older Eve Room device that has proven reliable for many years.
Comparing it with this, the Qingping showed identical temperature readings, and Humidity within +/- 5%. One callout with the temperature is while charging. The temperature will over read by a few degrees when plugged in if the battery is under 100%. This returns to normal once the battery is fully charged and cools off. CO2, on the other hand, seems a lot more variable. Comparing with the Eve sensor and a Sensibo Air yields very different results.
The Eve sensor doesn’t measure CO2 alone but combines it with VOC into an overall air quality value for HomeKit. This is expressed as a ‘CO2 Equivalent’ in the Eve app data logs. Subsequently, I would expect the Eve value to always be a little higher than CO2 alone. Sensibo does measure CO2 directly, but I’ve had concerns over their sensor accuracy with temperature and humidity, so I can’t vouch for CO2 accuracy either.
Placing all three together for 30 minutes gave me a CO2 value of 563 for the Eve Room, 656 for the Sensibo Air, and 868 for the Qingping. That’s a pretty huge gap and does suggest that the Air Monitor Lite is over reading. To be sure, I moved it outside and ran a manual recalibration, this didn’t improve the gap.
Looking at test results for other higher-end CO2 monitors it seems to be common for them to have significant differences in their baselines, so this may not be a problem. The Qingping sensor has a +/-15% error margin in the spec anyway, and the change in values was largely consistent between the three, which is likely what you’ll want to monitor anyway.
Particulate matter was a better story. I had no cause for concern with the variance between the Air Monitor Lite and official PM2.5 and PM10 levels in my area. It was interesting to see the very pronounced changes in these values during cooking. You would expect this but it’s not something I’ve been able to observe before. Values dropped back to normal levels after ventilating the room quite quickly.
Battery Life
Battery life is a big call out. As with other room sensors I’ve used I expected to be able to run this on battery alone, making it easy to place where I need it for best results. Unfortunately, this is not the case.
While there is a sizeable internal battery, the use of Wi-Fi and an internal circulating fan doesn’t do it any favors. With the screen set to never turn off I achieved about 4 hours before the device died. You could stretch this by leaving the screen off, but that’s not actually an option for the screen saver.
It’s also notable that the default behavior is to turn itself off entirely after 5 minutes on battery. This makes it pretty clear it’s not intended to be a wireless sensor. You can use it as one for ad-hoc checking of the environment, but only for short periods. Using the battery has been useful for me by allowing temporary relocations for testing, but it needs to go back on charge shortly after.
User Interface
There’s not much to this on the device itself. I’ve already covered the on/off button and the touch strip for changing the displayed sensor value. This is very responsive and works well. I’m not so sure about using this strip for resetting the network settings as well. At one point while moving the sensor to a new location I inadvertently had my finger resting on the strip. This naturally reset the device connection settings. Now I had to go and remove the device from HomeKit and the Qingping app and start over. It easy to avoid if you are being careful, but I feel it’s also too easy to do this accidentally.
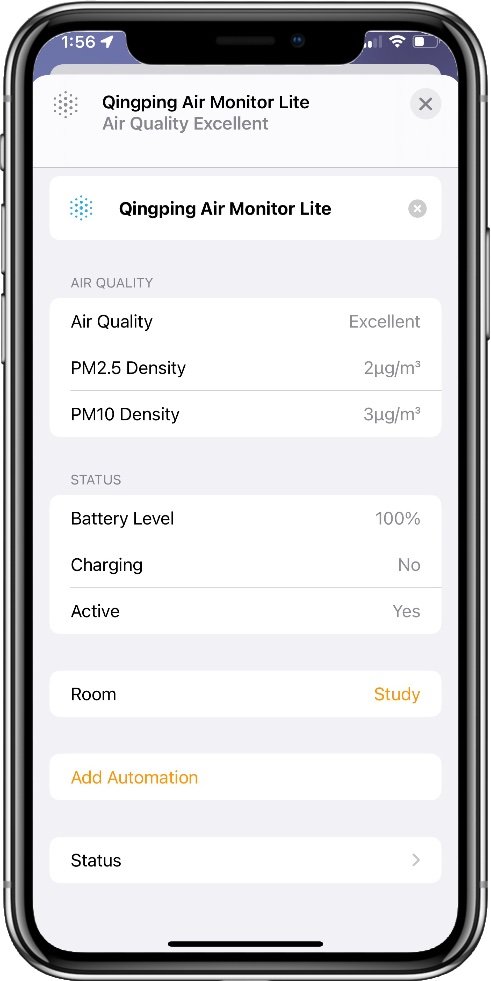
In the Home app, it’s notable that the Qingping sensor uses some HomeKit values that are provided, but often not used. This is the actual CO2 value, as well as the PM2.5 and PM10 values. All three are presented in the device properties page as numeric values, with the combined PM values being also shown in the form of the basic ‘air quality’ rating. This means you can use these values to create automations, although you’ll have to use third-party apps to do so as the Home app doesn’t provide access to the PM values in automations, and only ‘High’ CO2 levels for carbon dioxide.
The Qingping app itself provides an at-a-glance view of all five sensor values, with color coding matching the LED indicator on the device’s screen. Below that are a set of graphs giving you historical values over time for all of them. You can scroll through the last 24 hours for each value, or switch to a 30-day view which shows the high and low points for each day. You can’t drill down on a given day for any more info, but if you email the historical data you’ll get an Excel sheet with all the values listed at 15-minute intervals.

The Air Monitor Lite in the Qingping app
Qingping app settings page
Extra sensor data is present in HomeKit
Alternatives
Aqara TVOC Sensor
This air quality sensor from Aqara provides monitoring of temperature, humidity, and TVOC concentrations. It has an e-Ink display that shows all three values and runs on ZigBee to give up to 1 year of battery life. ZigBee provides the very low power consumption to acheive this, but does require an Aqara hub in order to connect it to HomeKit. It also supports integration with Alexa, Google Home, and IFTTT, as well as Aqara’s own smart home app for automations.
Eve Room
The latest Eve Room covers the same data points as the Aqara sensor, temperature, humidity, and VOC concentrations. Also sporting an e-Ink display it runs on Bluetooth or Thread (with a suitable hub) and is powered by an internal rechargeable battery that is good for six weeks.
Eve provides the most privacy concisous option as they are a premium HomeKit device maker that doesn’t run their own cloud service, everything is pure HomeKit. The Eve app is actually a well regarded alternative to Apple’s own Home app, and allows for the creation of more advanced automations.
Netatmo Smart Indoor Air Quality Monitor
This smart indoor air monitor comes in a sleek brushed metal case, but needs to plugged in for power. It monitors temperature, humidity, noise levels, and CO2. It provides a more aesthetically pleasing alternative to the Aqara and Eve sensors, but has no display for quick reference. All monitoring must be done through the Netatmo app or HomeKit.
The Verdict
The Qingping Air Monitor Lite provides an attractive and functional air quality sensor that works natively with Apple’s HomeKit platform. The physical design is slick and easy to use, with enough customization available through the Qingping app to display things the way you want.
The big difference between this room sensor and others available for HomeKit is the presence of PM2.5 and PM10 sensors. Normally the province of much more expensive sensor systems, these give a more meaningful interpretation of air quality, while also providing CO2 levels as an additional value. All three can be used as automation triggers as they provide raw numeric values to HomeKit, not just the generic ‘air quality’ rating that other sensors do.
While the absolute CO2 values are subject to some scrutiny, the other sensor values seem to be on the money. If you want to be able to track and respond to particulate levels in the home, this is the best option for HomeKit available while still providing meaningful tracking of CO2 fluctuations.
I find the Air Monitor Lite to be an attractive addition to any room that provides easy-to-read data that updates in real time. Just don’t plan on running it on battery power for long.