Arlo Pro 3 Floodlight Cam Review
When you buy through links in this article, I may earn an affiliate commission. Learn More.
A lot of wireless security cameras now offer some kind of lighting on top of the ubiquitous infra-red night vision that has been the norm for many years. Usually this is in the form of a single LED built into the camera, which does OK for adding some illumination to an small area, but sometimes you need much more.
A few camera brands are offering solutions for these cases, primarily as an extra deterant along the lines of commonly used sensor lights, but with a camera (and often siren) built in. I’ve been spending some time with Arlo products for my Ring vs Arlo comparison, and one of those is the Arlo Pro 3 Floodlight camera.
This model has proven to be a solid camera offering, with good performance, high quality video, and some nice extra features in the software. Importantly, the floodlight has been pretty amazing, as well as being unique in it’s design.
There’s a lot to like here, although the unit itself is quite bulky which is a drawback in my opinion. Let’s take a look at that aspect, and then we’ll drill into the features and performance of the camera and software.
Arlo Pro 3 Floodlight Overview
While the Arlo Pro 3 is an older model camera in the Arlo lineup, this is still the only model that offers the floodlight option using a fully integrated design. That design necessitates a larger battery pack, and uses the XL battery over the normal size used in other Arlo Pro models. This contributes to it’s bulk by extending the length of the body and increasing the weight.
When coupled with the light panel, which is a large curved LED array that forms the whole from of the unit, it would simply be too heavy to use one of Arlo’s normal magnetic mounts. As such, they’ve gone with a more robust screw-in bracket and adjustable ball mount. The ball mount gives you about 45 degrees of rotation in any direction, and of course you can twist it around 360 degrees as well to ensure you have a level picture at any angle.
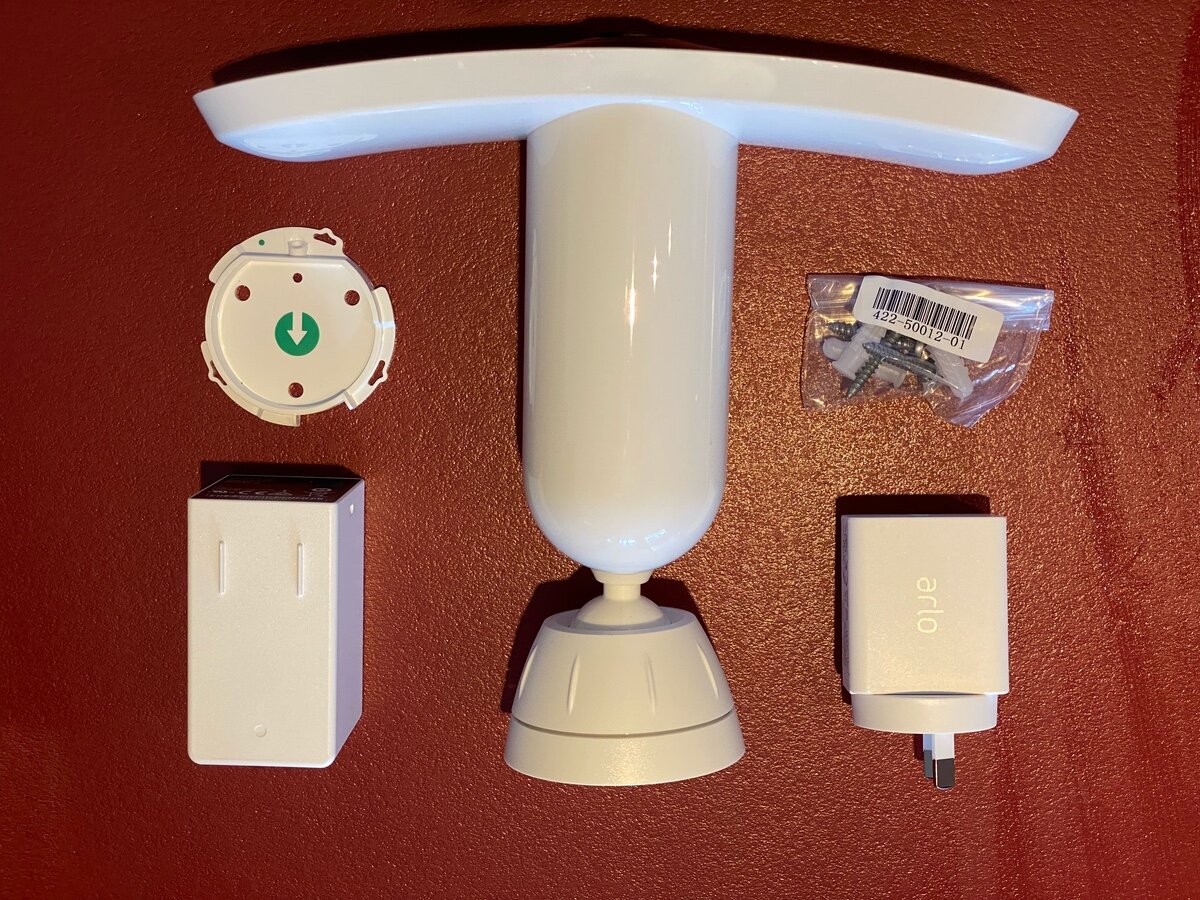
Along with the mount, bracket, and hardware, you get a standard USB charger and cable to keep it going, although any micro USB cable would work fine.
Charging is performed by removing the camera from the housing using a simple push button on the bottom. That exposes the micro USB on the side that can be used to charge the battery in place, or you can purchase a battery charging dock from Arlo which allows you to charge two batteries at once. Doing it that way means you can simply swap them over and avoid any downtime on the camera.
Alternatively, Arlo offers a magnetic charging cable that can attach to the bottom of the camera housing and be used with either an AC charger, or their optional solar panel, which is always a good option for outdoor cameras to cut down on maintenance.
On the front of the camera, you get the speaker and microphone (also used for the siren), and some infra-red and colored LEDs. The latter are used primarily for showing charging status and during setup. The whole thing is UV and weather resistant, although Arlo don’t provide a specific resistance rating.
I’ve using the camera on a pure WiFi connection to my router, but you can also opt to connect it to an Arlo Smart Hub. This provides a few extra features, notably a local storage option for video recordings, and improved smart home integration options. On that front Arlo offers more supported platforms than most of the competition, so that’s a big plus.
Arlo Pro 3 Floodlight box contents
Installation and Setup
Getting the Arlo Pro 3 Floodlight camera up and running is actually very easy. You’ll first need to grab the Arlo app on your smart phone, of course, and you’ll need to set up and account. Arlo is a cloud-based service, and even if you opt not to take up a subscription your camera settings are still managed through your account.
Once you’re in to the app, just tap the prominent Add New Device button and you’ll be asked to select your camera model from a list of images. To pair the camera with your account securely, Arlo uses novel approach the involves displaying a QR code on your phone that you need to show to the camera. The app advises you to explicitly connect to a 2.4GHz network in order for the discovery to work. This can be a common issue when doing device discovery on some routers, but not always. I was using my dual-band mesh network and it found the camera just fine without me having to do anything.
You’ll need to enter your WiFi password to complete the join to your network, and then the camera will do an automatic firmware update. Once done you’re goo to go with mounting. The app will help with this too by giving you a live preview image showing the optimal area of the image for motion detection. You can actually access this later as well, so no need to get things perfect right away.
Mounting the floodlight camera is simply a matter of using the three provided screws (or equivalent) to attach the mounting bracket to a solid surface and then twisting the base of the all joint to snap it into place. That is secured by an integral locking screw on the base, while the position of the ball joint is locked by tightening the large surround. You do all that with the camera removed from the housing, and once you’re done you can simply slide it back in until it locks in place.
If you’re using the outdoor charging cable (with a solar panel for example), it’s nice that the connector for that is on the housing and not the camera. That means you don’t have to remove it to take the camera out for whatever reason.
Arlo App library and settings
There are various options you can configure in the Arlo app to fine tune your camera’s behavior. These are all pretty standard on decent smart security cameras now and include marking motion zones, selecting whether to record audio or not, adjusting quality settings to optimize battery life, and setting up the notifications you want to receive.
Arlo supports the full range of object detection: person, animal, vehicle, and packages. A snap shot of the event will be included in the rich notifications sent to your phone, and you can also enable ‘animated preview’ where the camera will create a kind of short GIF animation of the motion event to include instead. This is pretty neat, and gives you a bit more info to go on when deciding it you need to open the app and take action.
As a nice addition to that animation, the Pro models like this one include the option for Zoom and Track. This has the camera automatically lock onto the source of motion when triggered and use digital zoom to focus on that object. That’s makes good use of the extra camera resolution in the Pro 3.
Arlo also has native integration with emergency services for US-based customers. That’s provided in the emergency actions list that is always visible in the top right corner of the app. In addition to those services you can configure a friend for quick dial or activate the built-in siren directly.
For better control over notifications and privacy, you can set up the Modes feature. This is something that’s becoming more common in smart camera platforms and offers functionality similar to alarm systems with Armed and Disarmed states. Arlo stands out here, though, because they’ve treated modes more like automation rules.
You can create as many as you like and trigger them off motion or audio input on specific cameras. Then various actions can be taken including recording video, sending notifications, turning on light and sirens and so forth, depending on the camera features. These modes can also be selected based on geofencing or schedules, so you have quite a lot of control over what your cameras do, and when.
How does it stack up?
The key benefit of going with a Pro range camera from Arlo is the higher 2K resolution, which stands above most other major brand offerings on the market, even today. Higher resolution cameras can help with things like seeing smaller details like faces at further distances, and when zooming, but they suck up more bandwidth and storage, and can take longer to stream. 1080p still has it’s advantages for quick response and reliability, and I’ve noticed this does appear to be a factor when comparing live view from the Arlo Pro 3 versus the Arlo Essential Spotlight that I’ve also been testing.
The image itself has good color reproduction and contrast, and recordings are sharp and without excessive artifacts (live view is harder to quantify as the stream quality adjusts for internet performance at the time, your mileage will vary). I’ve found the microphone to be good as well, easily picking up any sounds in the area including birds and rustling leaves. When using the Zoom and Track feature the image looks about as sharp as a normal full frame from a 1080p model.
Color night vision is all the rage with camera makers right now. What this means is the camera has better low-light performance, and can capture color video with much lower light levels. It does still need some light to do this, and on an overcast or moonless night the camera will still drop back to black and white infra-red only.
Of course, this is the floodlight model, and that will activate on motion by default. The floodlight is impressive at 3000 lumens (max brightness), but you can adjust what level you need in the app to conserve battery life. The curved light panel design ensures really good, even coverage of a wide area and can easily light up my whole yard to a good level.
Being a fixed panel, you can’t adjust direction to cover specific areas like with typical motion activated floodlights, but there wouldn’t be many cases that this design wouldn’t work for. My biggest gripe about the design is how far out it protrudes from the wall due to the long battery body plus the swivel mount.
Streaming both live view and recordings from the cloud works well, there is a delay of course as with any cloud-based camera, but it’s at the top end of the range, similar to Ring’s service, and much faster than smaller brands like Canary. This will depend on your geographic location and internet, though, so your results may be different.
Notifications are similarly constrained, and I’ve found these can be a bit slower than I’d like. In my case a motion notification can take 5-10 seconds, which means you could miss something important (it will still be recorded).
I mentioned up front some gripes with the Arlo app. This mostly revolves around the navigation to the various features. While many camera controls are under each camera’s respective settings page, others are located in a general settings areas, or buried under a few layers of menus. In each case when selecting one of these features you then need to select which camera to modify, so it’s odd they aren’t under the camera settings as well. This made it difficult to find how to do a few things and had me searching Arlo’s support pages, which I found can also be out of date as features are added or changed, which didn’t help.
You can use the Arlo cameras without a subscription, but with severely limited features. Basically you’ll get live view only, with basic notifications only. You can get some recording if you pair your cameras with an Arlo Smart Hub, as they can do local recording to a removable storage card. The downside is that the camera then connects to a separate WiFi network hosted by the hub. This can limit your range, especially if you use a mesh network, and adds another 2.4GHz network to your home, which can further clutter up your WiFi channels.
The Arlo subscriptions are quite competitive, and open up the full range of features, give you 30 days or cloud storage, and discounts on certain Arlo products. You can unlock that for $3/month for a single camera, or $10/month for unlimited cameras. They do give you a generous 3 month trial to make up your mind, but I’d go into a system like this expecting to cough up for the sub.
Alternatives
The Ring Floodlight Cam has been the prime competitor for Arlo for a while, and they now have their new Pro model with a sleeker design and some new smarts. Those new features include 3D tracking which allows the camera to determine the accurate distance to an moving object and record where in the field of view it went. This allows you to see that activity at a glance in a birds-eye view and jump right to the parts of the video that you’re interested in.
This model is only available with hardwired power, but that does mean you get more flexibility with your floodlight usage. There are two of them with some degree of adjustment in position, and a combined output of 2000 lumens. As with other Ring cameras, they’re still staying with 1080p for video recording. As with Arlo, Ring’s products are best used with a subscription. While you can use them without, they are severely hobbled in what you can do with them.
The eufy Floodlight Cam is a great option for those that really don’t want another subscription. eufy has been focused on providing options for those people, and this one does it by providing you 4GB of storage right on the camera. This is not removable, so you can’t upgrade it, but that gives you about 4 days of recording.
This model also stays with 1080p for video, and similar to the Ring model has two adjustable LED floodlights with a combined out put of 2500 lumens. Also like the Ring you’ll have to hard wire this one for power. Oddly eufy has opted to not allow this camera to work with their Homebase base stations, it’s a completely standalone product.
The Verdict
The Arlo Pro 3 Floodlight camera offers a very good option for those needing to illuminate large areas for security reasons. The LED panel is the brightest of the floodlight cameras currently on the market, and also appears to be the only viable battery powered option. The limitations of the battery can be easily mitigated by pairing this with Arlo’s solar panel accessory to keep it charged without having to worry about swapping batteries at all.
Video quality is good, and the app offers a wide range of handy tools to tailor your notifications to your needs, with particularly credit to the way Arlo handles modes. It’s really nice how these modes are treated like automation rules, and you can create as many different combinations as you need for various scenarios. The object detection is also very good, with options for various types of objects and very accurate identification of each type.
My only real issues with this model are it’s bulky design, and some gripes with the somewhat haphazard navigation design in the Arlo app. If you’re looking to get into a whole home security camera solution and don’t mind a subscription, then Arlo offers a very good product with this and other models in the line up.


