Sensibo AirQ: Feature-packed, but Flawed
When you buy through links in this article, I may earn an affiliate commission. Learn More.
Having used the wonderfully reliable Sensibo Sky for many years I thought it was about time I jumped into the newer models, especially now that they support HomeKit natively along with the other major platforms. I’ve been using Sensibo Sky units in the bedrooms for many years so I largely knew what to expect, but testing the new air quality sensors would be a must as well as seeing how it stacked up against the Tado Smart AC Control for HomeKit functionality.
For the main living area automation was a big consideration for me, and the Tado has been doing a pretty great job of it for a while now. I also threw in the optional Sensibo Room Sensor to see how that would work to help automate my heating and cooling needs in the living area. Sensibo approaches this aspect very differently, and I found it a bit convoluted to get setup by comparison.
The need to juggle different features to cover different scenarios made getting my preferred automated behavior more difficult, but it’s a one time thing, and the Sensibo app definitely gives more responsive, and detailed control of the AC. Overall I’m sticking with it as my preferred smart AC controller, but it does have some annoyances, especially around sensor accuracy. Let’s dive into the details.
Sensibo AirQ Overview
Sensibo AirQ
✔ Supports Alexa, HomeKit, Google Home
✔ WiFi - no hub
✔ Easy remote detection
✔ Simple install
✔ Automation features
✔ Air quality sensors
✘ Some automation requires sub
✘ Basic HomeKit features
✘ Poor temp/humidity sensor accuracy
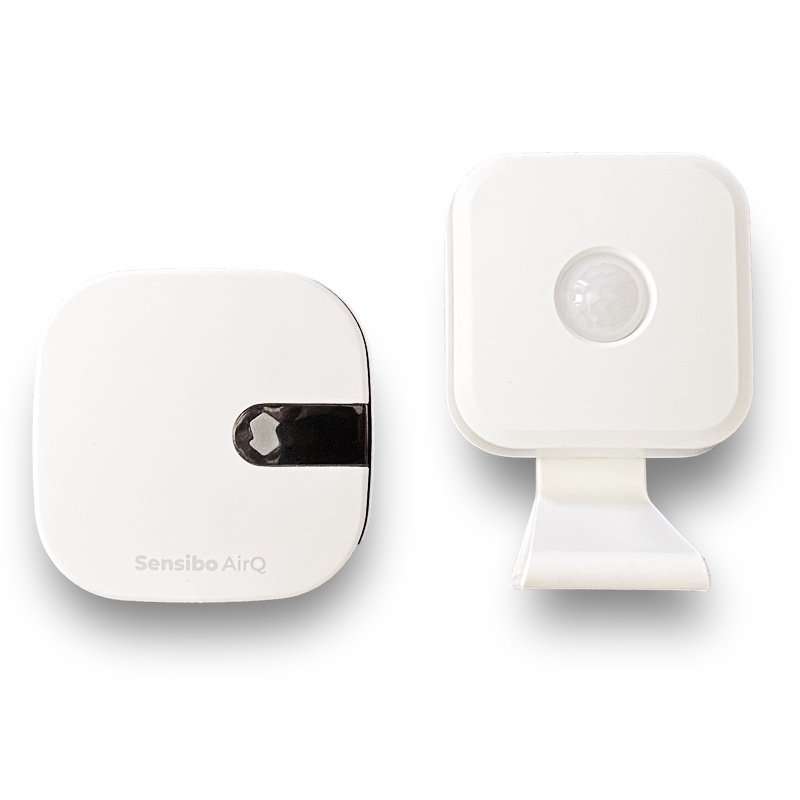
Physically the Sensibo AirQ is largely similar to the original Sensibo Sky, a small box with an infrared permeable strip for sending remote signals and a micro USB port for power. The AirQ is more square and has more mounting options than it’s predecessor. A keyhole slot on the back for hanging from a screw or hook, an optional adhesive pad (instead of the previously pre-attached one), and rubber feet in the corners, so you can simply place it on a flat surface if you wish.
If wall mounting the USB cable is designed to hang flush against the wall from the bottom of the device, and needs only a standard 5W USB charger to power it. The only physical control on the Sensibo AirQ is a small hole for performing a factory reset, otherwise it’s all done through the Sensibo app.
While I’ve included the room sensor in the photo above, note that this is an optional extra purchase and is not included. These sensors allow you to monitor the temperature in different parts of the room and allow you to avoid the issue of the Sensibo itself being in the air conditioner’s air flow. They are also required to use the ‘Presence React’ feature, which allows you to control the on/off state of the air conditioning based on whether someone is in the room.
A basic USB charger and cable is included in the box as well, but you can use anything if you need something longer or just want to plug into a USB wall socket.
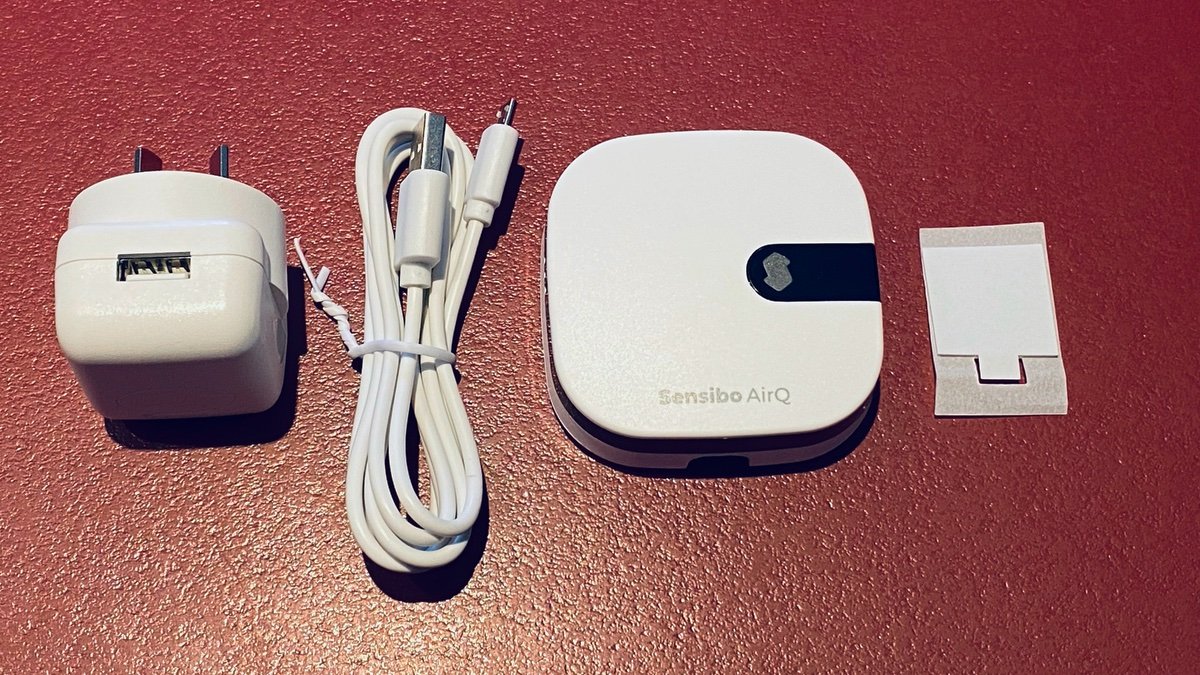
Sensibo AirQ box contents
Installation and Setup
One thing that Sensibo excels at is the initial detection or your air conditioner remote. It’s the easiest I’ve used and only requires pointing the remote at the device and pressing the off button. That’s it, the Sensibo app will automatically determine which control set to use and set up the correct options in the app for you. I have several different split systems and it’s always picked the correct set up without issue.
Getting it on your Wi-Fi is also pretty easy. Once you pair the device with your account in the Sensibo app by scanning a QR code on the back, you just enter your Wi-Fi credentials and it connects without and fuss. You can then pair the room sensor through the device settings, this is done via Bluetooth directly between the AirQ and the sensor and should be equally easy. I did have a hiccup where this didn’t work the first time, and the app provides virtually no status information for the sensor. After pulling the batteries and reinserting them it worked, so no harm done.
At this point you can control your air conditioner with the Sensibo app, or go ahead and add it into your preferred smart home platform using the normal methods. For Alexa and Google, add the Sensibo plug in to your account and detect the new device, for HomeKit users there is a pairing code on the back to scan with the Home app.
I had some trouble with my HomeKit pairing as the device seemed to have been shipped with the wrong pairing code. Sensibo support was very responsive and worked through the problem with me until it was resolved, so kudos are due to them on that count.
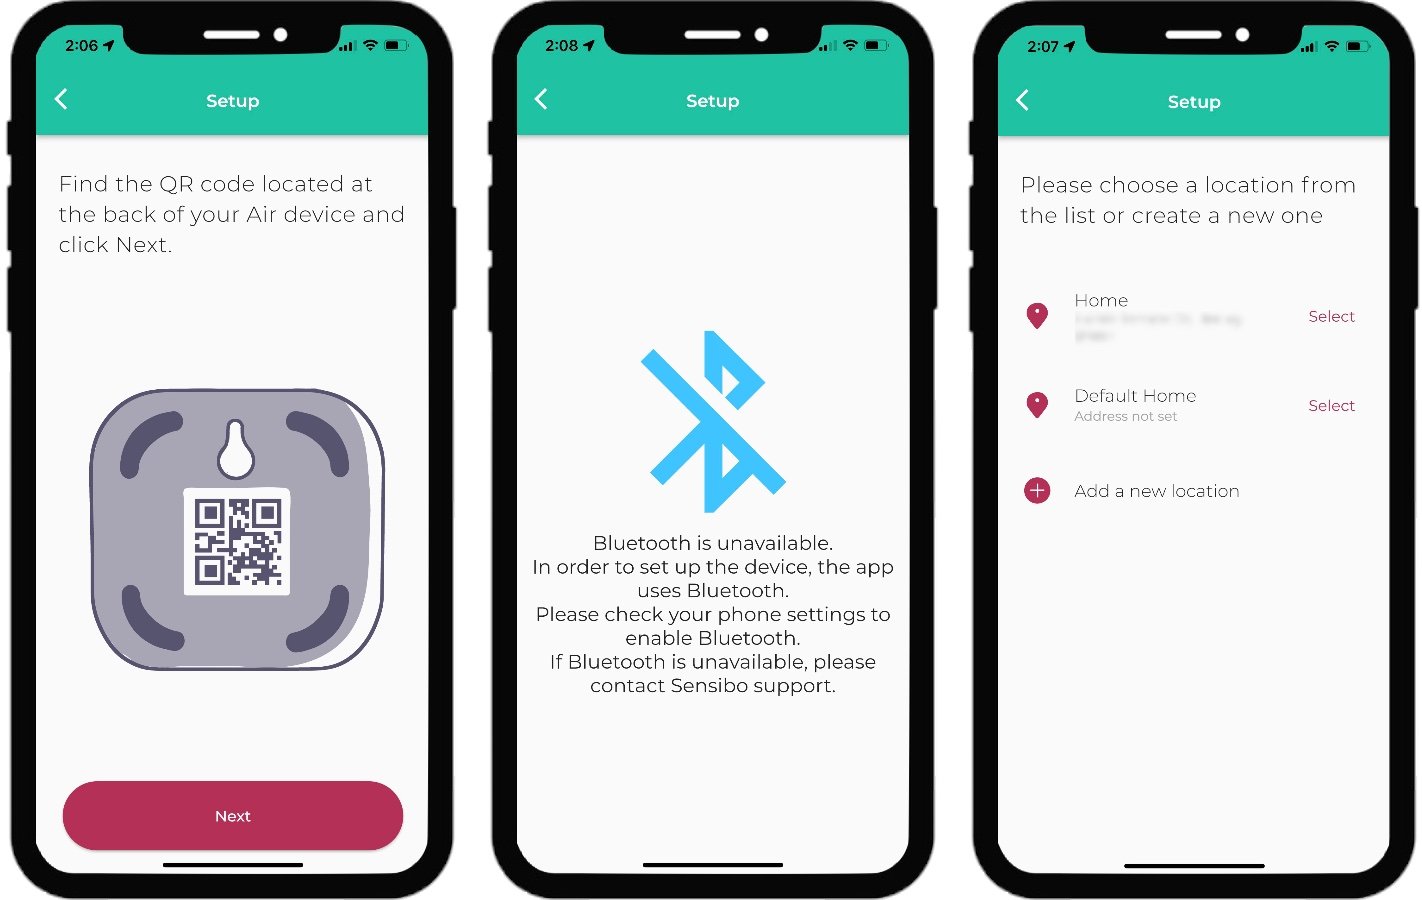
Sensibo setup screens
How Does It Stack Up?
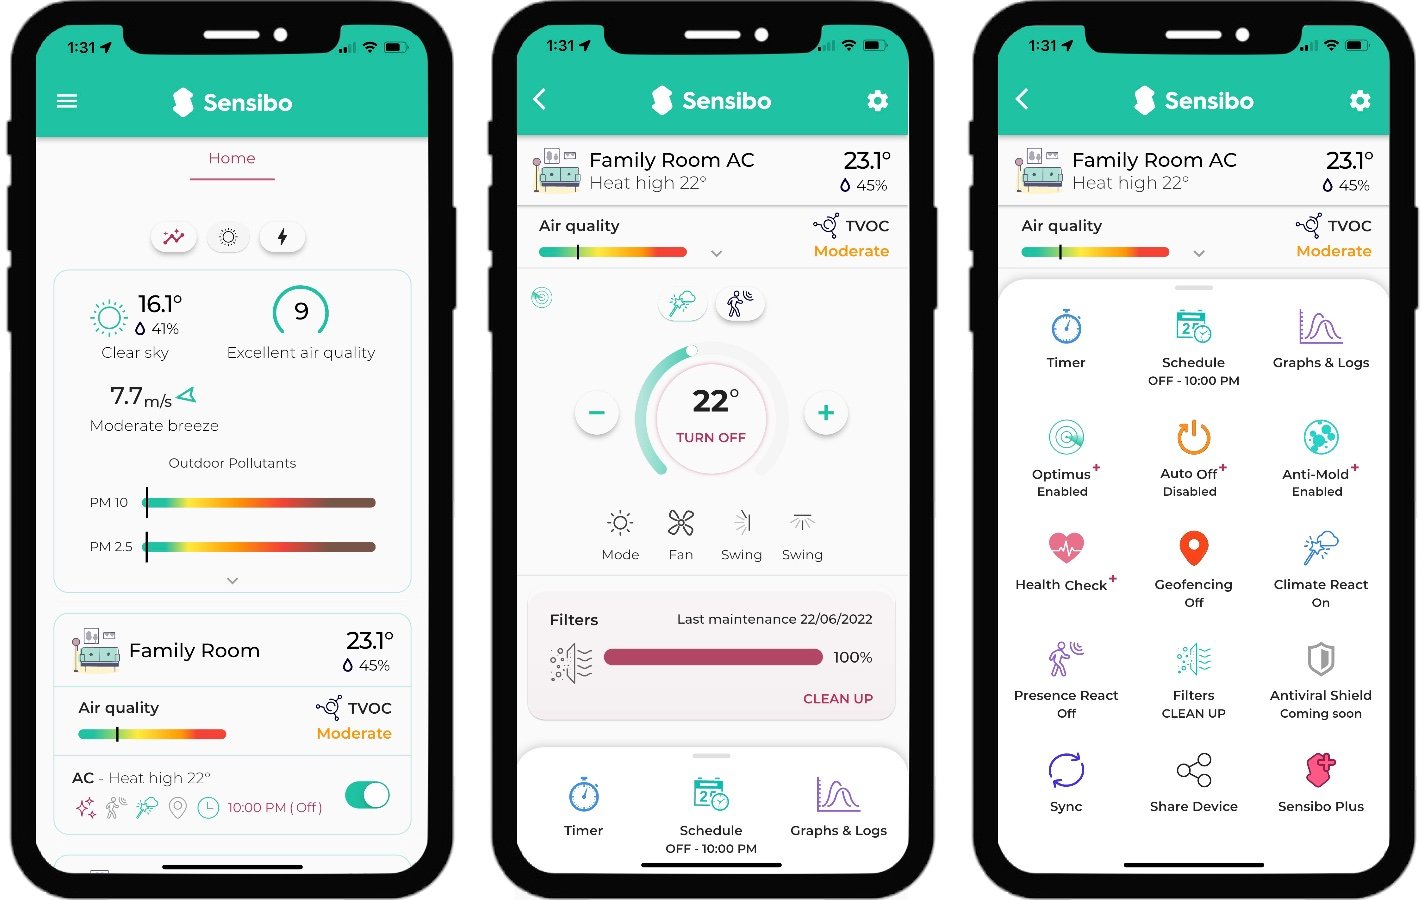
Easy set up is certainly a good start, and it is very easy to get going compared to some of the competition. Easy control of your AC is also mandatory, as this is a key reason for having the device in the first place. Sensibo does this well, presenting an attractive and informative at-a-glance view of all your Sensibo units on the home screen, with a tap on any of them jumping into the controls page for that unit. That page has all the relevant controls, as determined by the remote detection, right there along with all the sensor readings.
In the case of the AirQ those sensors include temperature, humidity, and air quality. The AirQ has two sensors for this last one, CO2 and VOC, or Volatile Organic Compounds. These are essentially chemicals the vaporize at room temperature such as cleaning solvents, perfumes, pesticides, glues, and so forth.
One thing I’ve consistently found with Sensibo devices is that their temperature and humidity sensors tend to be poorly calibrated. I verified this on the AirQ by co-locating it with three other temperature sensors from different brands. All three agreed within 0.1 of a degree, but the Sensibo was over reading by almost 2 degrees and 15% humidity.
I had this on the Sensibo Sky as well and, while you can’t fix this in the app, if you log into your account on the Sensibo site you can set an offset value. That’s good, but unfortunately you can’t do the same for the Room Sensor which suffers from the same issues. I also found that the calibrated value is not sent to HomeKit, only the raw one. My guess for this is that the value is only being applied by Sensibo’s web service, which is what the app displays. HomeKit talks to the device directly, so doesn’t have visibility of the offsets on Sensibo’s servers.
Wrapping up the control display, along with the controls for the AC unit itself you also get quick toggles for Climate React and Presence React, and a nice big filter usage bar to remind you to clean things out regularly. This is important for efficient operation of the system, so it’s good to keep on top of it.
At the very bottom of the screen is a slide up card that contains all of the various other automation options and reports for easy access, both free and paid.
Main Sensibo app control screens
Automation Features
Given the plethora of smart features the Sensibo app provides, I’ve pulled this out into a separate section. As I noted in the intro, getting my main living area automated, and in an efficient manner, was a key requirement. If this is of interest to you, then you’re probably going to be up for a Sensibo Plus subscription as anything beyond the basics is locked behind this paywall.
First let’s look at the free stuff. The usual basics that could be expected of a smart device are all included, such as geofencing, multi user support, basic usage reports, and basic scheduling. These will give you a fair bit of flexibility in setting your AC state for when people arrive and leave, and as many time specific changes as you like. You also get Sensibo’s Climate React and Presence React features, which allow the AC state to be changed when trigger by a sensor threshold, be it temperature, humidity, or motion.
On top of these control features, you also get a timer function, which can turn the AC on or off after a fixed period. This is used as a one off for situations where you might be manually controlling the AC and don’t want to forget to change it after a certain time period up to an hour. There’s also a filter tracker that can help you remember when to clean the filters. It will measure filter usage based on run time and how dirty it was last time you cleaned them (it’ll ask you when you reset it), which can be quite handy as it’s displayed right on the controls page for each AC unit.
Finally you get some detailed reporting for each AC showing a log of events, and a graph. The graph can be switched between temperature/humidity, volatile organic compounds, CO2, or outside pollution levels and shows either over an hour or a day with the free plan. Sensibo Plus adds weekly and monthly views of the same data.
Now while these automation features sound reasonably good, there are some caveats mixed in that make fully automated control difficult. If you use Climate React you can’t mix that well with geofencing, because the climate react feature will still trigger AC changes even if you set it to turn off when everyone leaves. The same applies to scheduled events. This limitation alone may force you into a subscription if more automated operation is your goal. Interestingly you can combine geofencing, scheduling, and Presence React just fine, but they are less likely to conflict anyway.
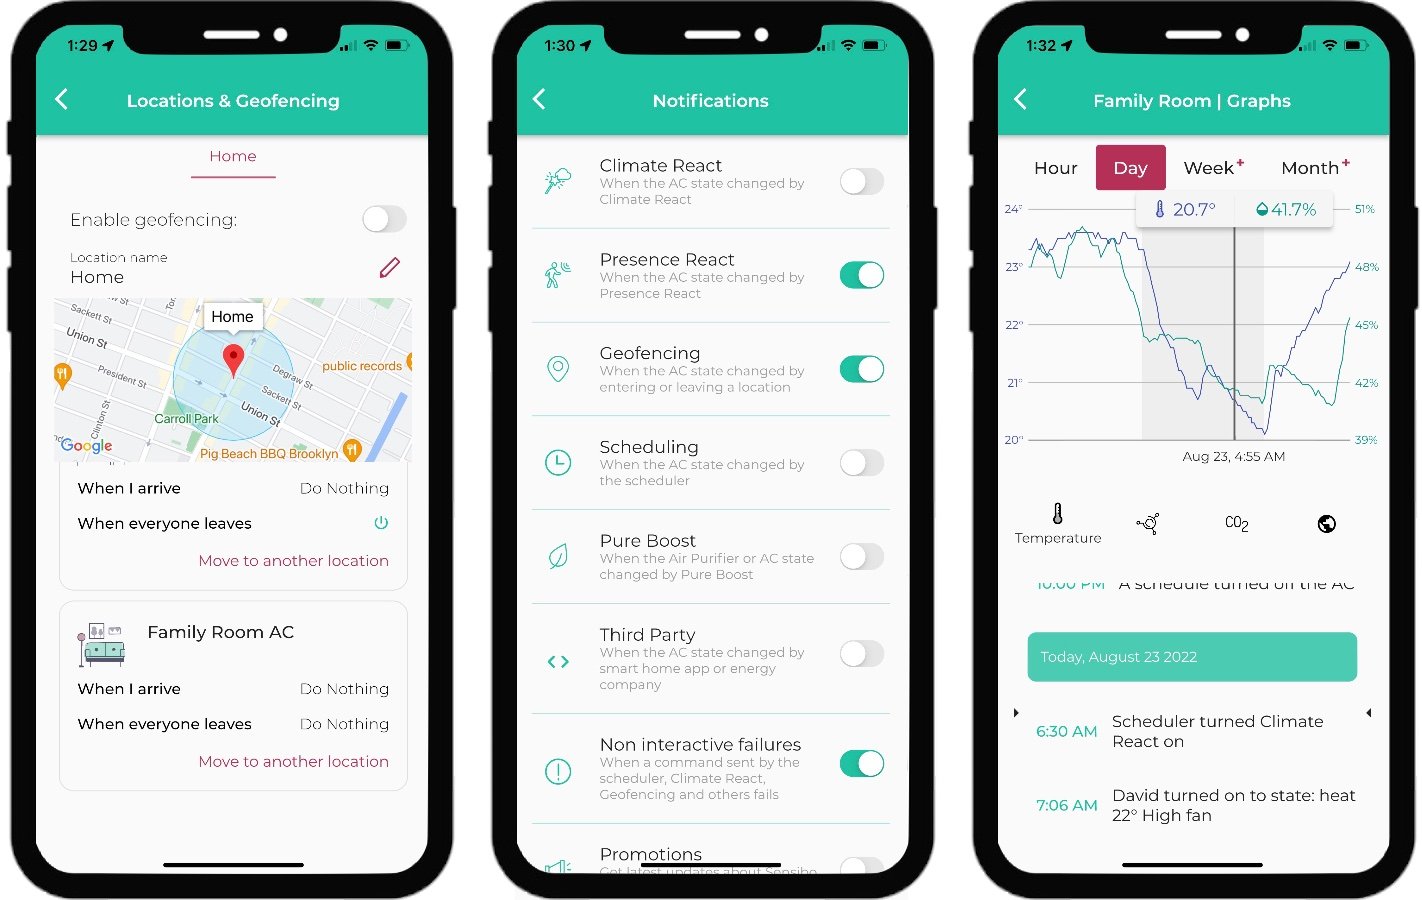
Sensibo app screens for geofencing, notifications, and reports
Unlocking the integration of Climate React is a key benefit of the Sensibo Plus subscription, but you do get a bunch of other features with that as well. Anti Mold well run the AC on fan mode for 5 minutes after you turn it off to help dry it out. Health Check monitors the effectiveness of your AC on the temperature and alerts you if it seems to be running poorly. Optimus is a supposed ‘AI’ feature that will monitor things that effect air quality and energy usage and alert you to changes you could make. Finally, Auto Off can forcibly turn off the AC after a set period up to 6 hours every time it is turned on.
Many of these features feel more like icing on the cake than game changers, indeed they can end up just being a source of notification spam depending on your normal usage habits. What’s perhaps more useful is the addition of a 2 year extended warranty when you sign up for the annual plan.
Performance
This is an area I’ve always found good with Sensibo. Even though the device is controlled entirely from the cloud, commands sent from the app are executed in under a second in most cases, and I’ve only ever had one server outage in 5 years. Still, local control is always preferable, which is why HomeKit support got my attention as it does just that.
The Room Sensor has been a bit less of a positive experience. I’ve had it stop responding a few times, and it’s frustrating to fix as there is literally nothing to tell you if it’s working, or even turned on. You just have to re-insert the batteries and wait for a while to see if it comes back. The sensor itself is a pretty basic design and, for the price, has a cheap feel to it which jars with the high quality finish of the Sensibo controllers themselves. Unless you really want to use Presence React I’d avoid the extra cost.
Geofencing is another area that has caused some frustration. It works most of the time, but sometimes will fail to detect someone entering or leaving, causing the AC to not do what it’s supposed to. There is also no way to troubleshoot this as it doesn’t show you the presence state of the various users who have the Sensibo AirQ shared. The Tado Smart AC control, by comparison, has always worked correctly, and shows the presence state of each household member in the app.
Finally, I have a minor beef with Climate React. It has the potential to be super useful in automating things, but is hobbled by only having one upper and lower threshold to trigger actions. That is, you can tell it to do something when the temperature goes above a value, and something else when it goes below a value, but that’s it. This sounds fine, but consider during milder weather where you might only want to run the AC during shorter periods where it’s necessary. In that case it would be good to have a second set of thresholds to turn it off once the temp is in a sweet spot, and only turn it back on once it deviates far enough.
The Verdict
So will I be using the Sensibo AirQ going forward? I’m settling on yes, because the level of control the Sensibo app provides is industry leading, the response times are very good, and there are a ton of extra features to help manage your air conditioners and keep them working well. Detecting the correct control set goes a long way to ensuring smooth operation, and this is something the Sensibo does extremely well compared to the competition. The air quality monitoring is a nice bonus, and might well afford you some extra awareness of how to best manage that inside your home.
Are their issues? Absolutely, and the main one for me would be geofencing reliability. It’s something to be aware of if you use that feature, and how much of an impact a missed event would have will depend on your situation, but in most cases it’ll be an occasional nuisance rather than a major issue.
I’d like to have a bit more control over Climate React, but again, that’s a me problem. Those limitations can be worked around by creating automation rules in your smart home platform (if you use Alexa or HomeKit at least, since Google doesn’t support sensor triggers) rather than using Climate React. It would be more work to set up, but it’s not a deal breaker.
All up, controlling your dumb AC is made easy, even fun, using Sensibo, and their service and support have proven very reliable over the years. If you don’t need the extra automation you can use the device quite effectively without a subscription, but the small extra cost adds a raft of features that can help when you want some extra smarts in play. For me I expect it’ll be worth while.