
Evvr Smart Relay: Flexible Installation With no Neutral Wire
When you buy through links in this article, I may earn an affiliate commission. Learn More.
I’m a big fan of smart lighting, both for automation and energy management, and it’s certainly easy to get into with a huge range of smart bulbs and light strips on offer. However, doing it that way can be expensive, and it’s not always possible to simply swap a bulb to get things working.
A popular alternative is to put the smarts in the switch and leave the lights alone. This has the bonus of preventing someone inadvertently turning off the power to your smart bulbs, but often requires that you have a neutral wire to the switch.
There are no neutral switch options, but these often have limitations on what lights they support or require a hub of some kind to communicate. If you prefer to use Apple’s HomeKit platform, then the choices are even more limited.
Here is where new smart device brand Evvr comes to the rescue. The new HomeKit compatible Evvr Smart Relay solves these issues by wiring the smart switch directly to the light and using a tiny switch module to detect when the physical switch is changed. This means it can use normal Wi-Fi, so no hub, and the neutral wire is tapped from the light socket where it always has to be anyway.
Evvr Smart Relay Overview
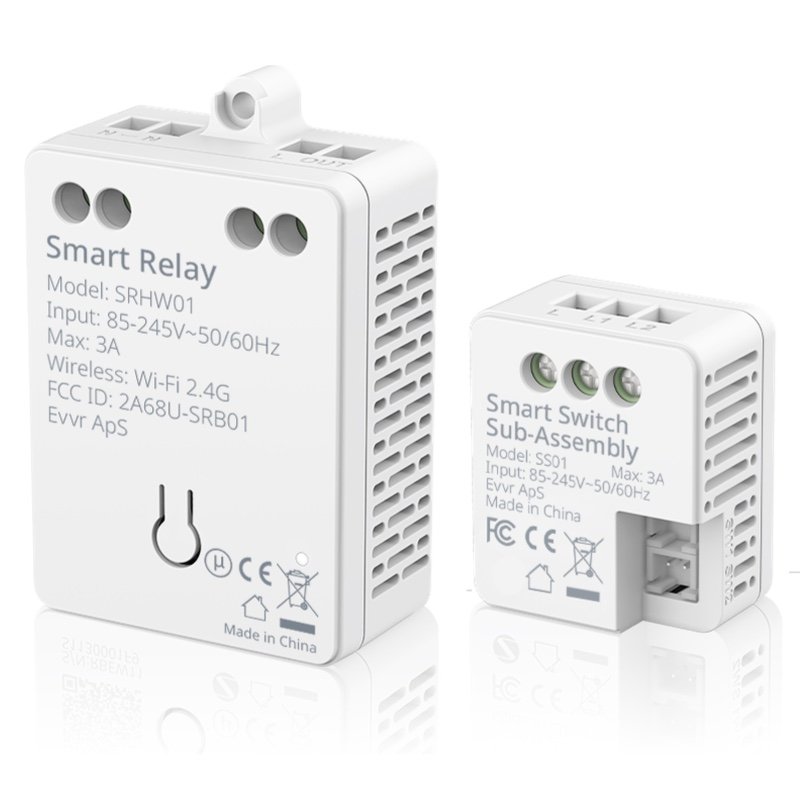
Evvr Smart Relay
✔ HomeKit Certified
✔ Wi-Fi - no hub
✔ Compact design
✔ No neutral required at switch
✔ Any light type
✔ Toggle or momentary switches
✔ 3-way and 4-way control
✔ 2 light circuits per sub-assembly
✘ Not a dimmer
✘ 2.4GHz only
Evvr claims this smart relay is the most compact model on the market. I can’t definitively confirm that, but it is indeed smaller than all the ones that I’ve seen so far. The unique switch sub-assembly (that detects the switch press) is even smaller and should easily fit in any switch box with ease. Small enough, in fact, that you could handle 2 or 4 gang switches by fitting multiple switch modules into the one wall box, and it will support 3 or 4 way switch setups as well.
Wiring is straight forward for both the relay and sub assembly using the simple recessed screw clamps, and unless you’re running a seriously high-power lighting setup off the one switch you should be able to use it on just about anything. Indeed, with voltage support from 85V to 245V at 50 or 60Hz it can handle pretty much any installation scenario in any country and has no minimum load requirement like many other no neutral switch models.
In the box you’ll get the relay and the switch assembly, plus adhesive backing for both parts, a small screw as an alternative fixing for the relay, and some jumper wires to connect your physical switch to the switch sub assembly using the small connect pins provided. The image below shows the box contents plus an Uno card for scale
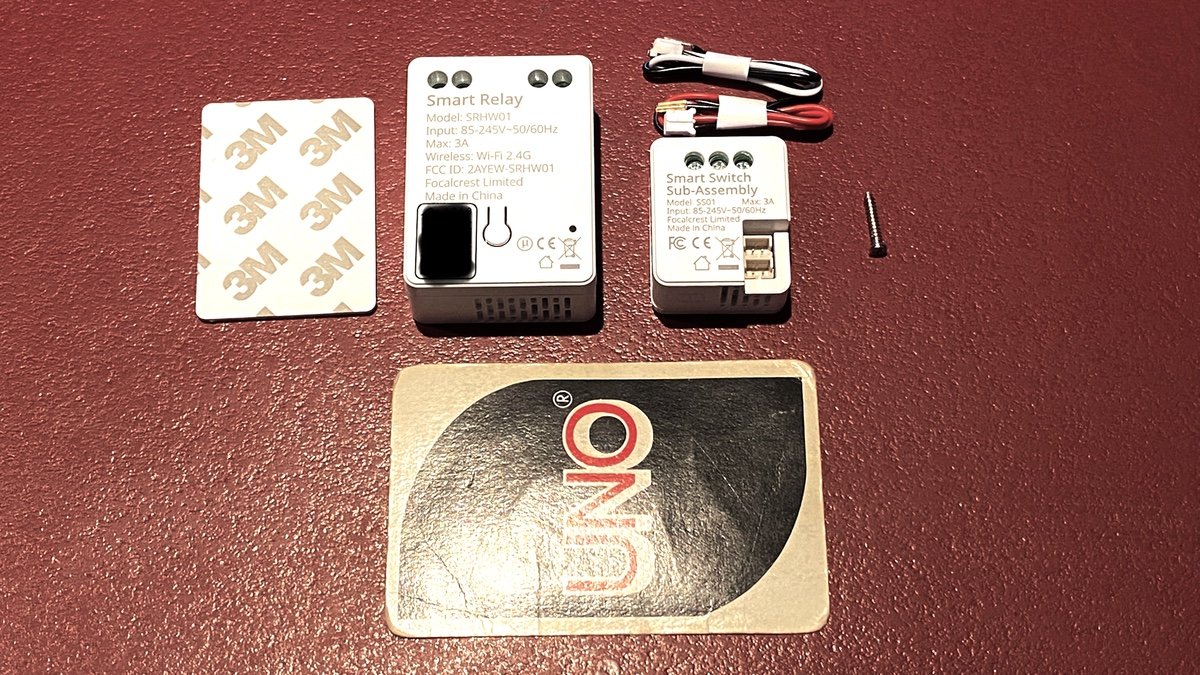
Evvr Smart Relay and Switch Assembly Box Contents (Uno card for scale)
Installation and setup
Getting the smart relay wired into your chosen light fitting is similar to a smart switch and fairly simple, made all the easier by well written and clear setup instructions and wiring diagrams for both the relay on its own, and with the option switch sub assembly. Yes, you don’t have to use that if you just want to control the relay remotely, but it makes sense to add it to avoid the power to the relay being turned off at the switch, and because it’s so trivial to install anyway. Plus, it gives you an easy way to reset the relay if you need to by quickly switching it 10 times.
The wiring is as simple as disconnecting the existing live and neutral wires from the light fitting, then inserting them into the marked holes on the relay. Two additional short wires will be required to then run from the relay’s other two holes to the light, and you’re done. Obviously do this with the power cut off to your lighting circuit at the main breaker board.
Once connected and the power restored you can proceed with HomeKit pairing, no additional app required. There is a HomeKit QR code on the relay itself, and another copy on the instruction booklet. The relay goes into pairing mode on boot up automatically, so scan away in the Apple Home app to both join it to your Wi-Fi and add it to HomeKit.
This is where I encountered the only issue I’ve had with the device. Despite having near perfect Wi-Fi signal (my router showed a -7 RSSI and ‘Great Connection’), HomeKit pairing wouldn’t go through. Either pairing would fail with an ‘unknown error’, or it simply wouldn’t find the relay. It always joined the Wi-Fi fine, though, and I could see it on the network and ping it successfully. After a few factory resets (by holding the button on the relay for 5 seconds) and retrying it eventually played nice and joined the home.
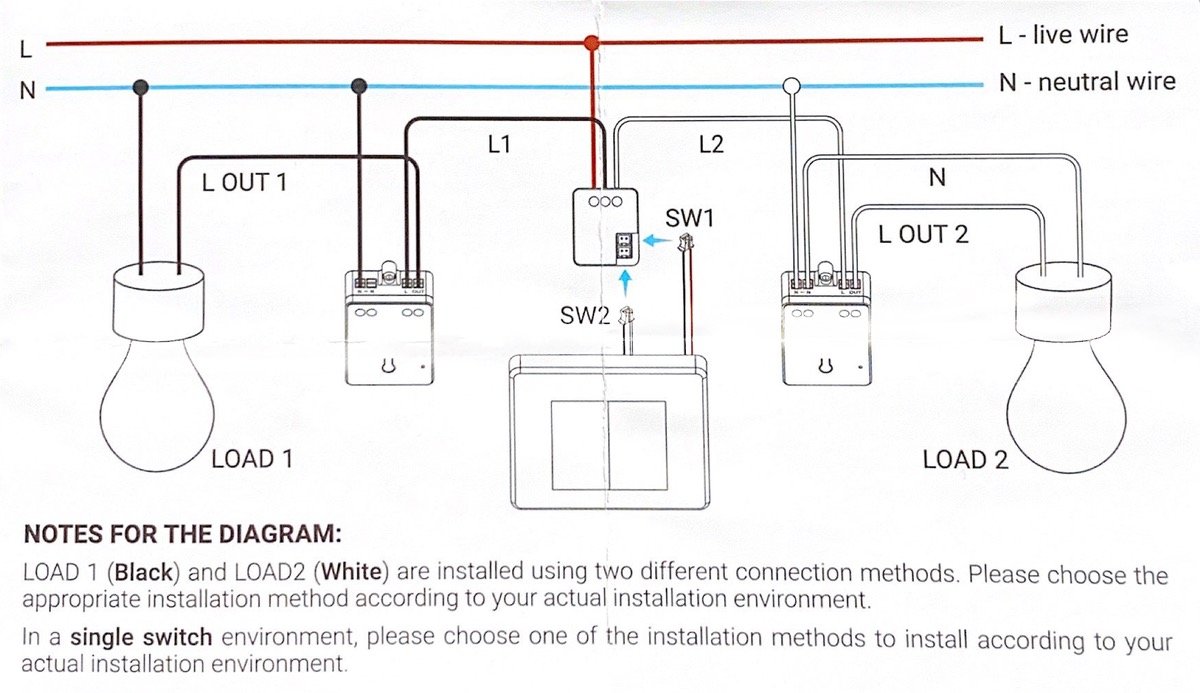
Evvr Smart Relay Wiring Examples
How Does It Stack Up
Most of my lighting has been replaced with smart bulbs, but I have a few stubborn fittings where this wasn’t possible. There is a track light in that family room that has no neutral to the switch, so that was a candidate, but the relay would need to go in the ceiling due to the transformer for the lights being up there. Do-able, but not as easy as my other option, the garage.
In the garage I have a small bunker-style dome light, also with no neutral to the switch. It’s easy to access by removing the light cover, but it’s actually too small to accommodate a smart bulb. There was, however, plenty of room to fit the Evvr Smart Relay right inside the light cover. Attaching it to the light’s mounting plate using the adhesive backing, wiring it in was simple and convenient.
Arguably installing a smart relay like this can be more difficult than a typical smart wall switch as you need to get it above the light fitting. This will vary depending on your home’s construction and the fitting in question, but it does solve a number of other issues if you can’t, or don’t want to, replace your wall switch.
The relay presents in HomeKit as a normal smart switch and can be controlled as normal via the app or Siri, and of course added to scenes for automated behavior as I’ve done. Performance is excellent, with near instant response to a command in the Home app, and of course it works as normal from the wall switch. It reports its status right away too, no long ‘Updating’ period in the Home app, and I haven’t had any odd ‘No Response’ issues so far.
Being able to keep the existing switch could be a big selling point for some. With other smart switches you have to accept the design style of the switch maker and, unless you’re replacing all of your light switches, they will probably be different from the ones already in your home. Using a smart relay like this makes the smarts invisible, and all your switches look normal.
If you have toggle-type switches, the switch state may not match the light state. That is, if the switch is in the off position and someone turns the light on via the app or Siri the physical switch will still be ‘off’. In these cases, the switch position becomes irrelevant, you just have to get used to flicking it to change the light state regardless of its position. Push button momentary switches won’t have this issue, of course, and the relay supports both kinds.
The Verdict
If you’re looking to get some smarts into lighting situations where you don’t have a neutral wire at the wall switch, you don’t want to change the look of your wall switches, or you have a light fitting that can’t take smart bulbs, then using a smart relay is a good alternative.
Smart relays aren’t restricted to using low power communication technologies that require some form of hub and avoid issues with minimum load limits that can cause flickering lights or installation headaches. If you’re a HomeKit user there haven’t been any no neutral relay options until now.
With simple installation instructions, no third-party app requirements, and no hub, the Evvr Smart Relay provides a solution for those situations where you want to keep your wall switches, but still have them smart without needing a neutral wire to the switch box. If also provides more flexibility in multi-gang and multi-way switch setups that many smart switches don’t support thanks to the tiny switch sub-assembly.
On top of that it’s very affordable, comparable to the cheapest smart switches on the market (none of which support HomeKit anyway). If you have a situation that could benefit from this type of installation, it’s definitely worth a try.


Walk through your home tonight and notice where the lighting frustrates you. That's probably where you should start. Most fixes take less time than you think and make a difference you'll notice every single day.