
How To Use Ring With HomeKit
When you buy through links in this article, I may earn an affiliate commission. Learn More.
I’ve long used both Ring and Apple’s HomeKit platform and in spite of Ring’s string of bad press they still offer value for money in terms of features, and they’ve been pretty damn reliable in my experience. I’ve longed to be able to integrate the two systems, but even though Ring has officially announced it at least twice, we’ve only had alternating vague excuses and silence.
Given Amazon now owns Ring I think it’s safe to say that official integration is never coming, no matter how much we might ask for it. So, what’s the answer for those of us that want a truly integrated smart home experience? I’ve found two third-party integration methods that achieve what I wanted. I’ll show exactly how to make these work for you too.
Does Ring Work With HomeKit?
You can get Ring devices to work with HomeKit thanks to a couple of third-party tools. While Ring doesn't, and likely won't ever, officially support Apple HomeKit, thanks to the ingenuitey of the HomeKit community there are two very good software solutions that add all the functionality of HomeKit to any of our Ring devices.
These tools will give you a lot of HomeKit functionality depending on what features you are most interested in, but you will have to be willing to get a bit hands-on with setting them up. I recommend Homebridge for generally adding all your Ring stuff to HomeKit, or Scrypted for focusing on full HomeKit Secure Video support for Ring cameras.
In This Guide
Ring Features In Homebridge vs Scrypted
Many smart devices connect to smart home platforms by way of a hub or bridge. Such devices act as translators that handle communication between different platforms or network protocols. I mess around with many smart home products, so I have plenty of these around the house anyway.
Thanks to some inventive engineering by the open-source developer community we have similar solutions that I can safely say offer more features than any first-party support would have brought to the table anyway. These two solutions act like software bridges that handle the translation of commands between Ring and HomeKit - even without official support.
Homebridge (Show Me How)
This is to go-to solution as it offers support for the full range of Ring devices including cameras, alarms, lights, and sensors. The downside is you can only access live streams and basic notifications from Ring cameras in HomeKit, and you can’t record using HomeKit Secure Video.
Scrypted (Show Me How)
This newer option provides comprehensive support for all kinds of Ring cameras and doorbells with full HomeKit Secure Video support and better performance. The downside is that it doesn’t support other Ring connected devices like Ring Alarm sensors or modes at this point.
In this article I’ll focus on the Homebridge option as it’s more comprehensive and easier to set up, so is a better option for most people. If you really want HomeKit Secure Video functionality, I have a separate guide on how to get Scrypted set up for Ring cameras. You can, of course, run both and get the whole enchilada, if you’re game.
|
|
|
|
|
|---|---|---|---|
| Video Features | |||
| Live View | |||
| Live View | |||
| Two-way talk | |||
| Two-way talk | |||
| HomeKit Recording | |||
| HomeKit Recording | |||
| View on AppleTV | |||
| View on AppleTV | |||
| Snapshot Thumbnails | |||
| Snapshot Thumbnails | |||
| Notification Features | |||
| Rich Notifications | |||
| Rich Notifications | |||
| Fast Notifications | |||
| Fast Notifications | |||
| Person Detection | |||
| Person Detection | |||
| Vehicle Detection | |||
| Vehicle Detection | |||
| Animal Detection | |||
| Animal Detection | |||
| Package Detection | |||
| Package Detection | |||
| Facial Recognition | |||
| Facial Recognition | |||
| Other Accessories | |||
| Motion Sensors | |||
| Motion Sensors | |||
| HomePod Chime | |||
| HomePod Chime | |||
| Floodlight Switch | |||
| Floodlight Switch | |||
| Modes Control | |||
| Modes Control | |||
| Non-Camera Devices | |||
| Non-Camera Devices | |||
What is Homebridge?
HomeBridge is a piece of software that runs quietly in the background somewhere on your home network and acts just like a normal smart home bridge device, just like the Philips Hue Bridge and similar. Being open source, it’s free to use, and runs on a wide variety of computer platforms, so you’ll be able to find a option that works for you.
Just like formally supported bridges, it translates the device maker’s commands to and from HomeKit. HomeKit only requires the bridge device to be supported, so any devices that connect to the bridge will be recognized by HomeKit automatically.
Normally such devices are defined by the bridge maker but, in HomeBridge (being third party bridge software) it’s defined by third party plugins, kind of like Alexa skills. There are hundreds available that you can simply install to add those devices to your HomeKit smart home, so on top of the Ring plugin you’ll be able to find all sorts of other useful opportunities once you have HomeBridge installed.
In Ring’s case, the appropriate plugin provides a connection between Ring’s cloud services and your Home Hub allowing HomeKit to see your Ring devices just like any other HomeKit accessory. I’ve found the plugin to be very reliable, and surprisingly responsive given the extra hops things have to go through.
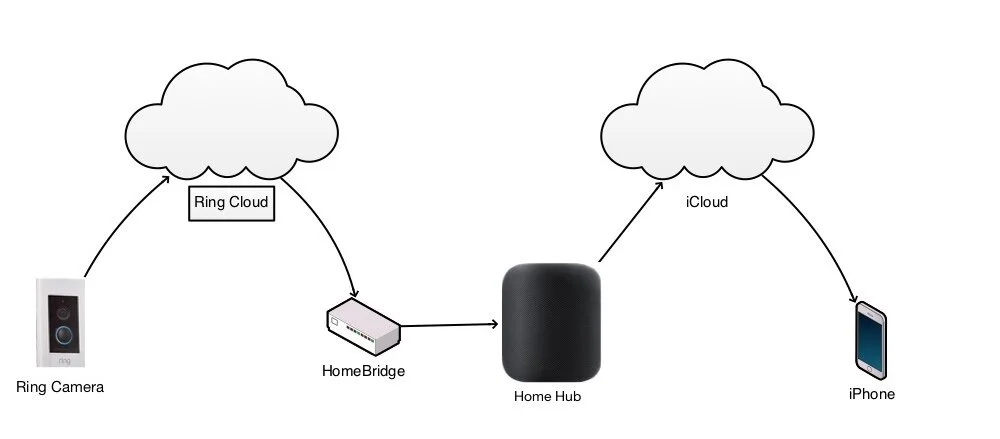
Ring HomeKit communication
How To Get Homebridge
Since HomeBridge is very light on resources you want a low-cost server to run it on that can sit in the background and do its thing 24/7. As such, I find the best way to run it is on an inexpensive Raspberry Pi. These are tiny computers about the size of a deck of cards, similar to other smart home bridge devices, so they’re easy to place out of the way and you don’t have to worry about heat or noise.
I find messing around with smart home stuff and integration projects can be fun, but if I’m going to make something a permanent feature of my smart home, I ultimately need it to be reliable and low maintenance. For that reason, I recommend a version of HomeBridge called HOOBS (HomeBridge Out Of Box System), which has taken care of all the fiddly bits.
HOOBS runs right out of the box - hence the name. All you have to do is connect it to your network and its ready to start installing plugins using its easy-to-use interface. Afterwards, this interface, or a nice companion iPhone app, can be used to do the odd update to the bridge or the plugins with a couple of taps, just like any other accessory.
HOOBS offers three ways to get your initial setup done and have a server up and running quickly. In order of increasing cost (and simplicity) these are:
Buy a Raspberry Pi and Download the image to put it on a Micro SD card yourself.
Buy a Raspberry Pi and buy a pre-imaged Micro SD card from HOOBS.
Buy a pre-configured Raspberry Pi based device provided by them.
Getting Started Checklist
Your HomeKit setup needs to include a home hub to ensure HomeBridge can work reliably.
A Raspberry Pi device (for option 1 or 2). I recommend this starter kit as it has everything you’ll need. You’ll need a 3B+ or 4 model to handle video streaming from multiple cameras.
(Note: I’ve listed the most cost-effective option at the time of writing. You might be able to find the individual parts for less).
A HOOBS image if you didn’t go for the pre-built unit (option 3). You can buy this preinstalled on a MicroSD card from the HOOBS site, or you can download it onto your own. See my HOOBS Guide for how to get the image onto your card. It’s a bit more work, but it’s the cheapest option.
How to Add Ring to Homekit Using HOOBS
There are five main steps to getting this up and running, and I’ll look at each in detail. The high-level steps I took are:
Plug in the Raspberry Pi.
Connect HOOBS to my network.
Install the Ring plugin.
Connect the plugin to my Ring account.
Pair HOOBS with HomeKit.
1 - Connect the Raspberry Pi
I went with option 1 above - download the HOOBS image and put it on a microSD card myself. This is the cheapest method but does require a bit more work on your part.
Once you unboxed the Pi, just insert the prepared MicroSD card, connect it with an Ethernet cable, and power it up. Using Ethernet is only required for the initial setup. This just makes it much easier to configure the Wi-Fi network if that’s your preferred connection method.
You’ll need to download the HOOBS app for whatever platform you want to use to manage your HOOBS server. Apps are available for all mobile platforms and desktop operating systems.
Install and launch the app of your choice. You’ll need to create an account to start. Once you register, you’ll be sent a verification email. Verify the email address using the email link provided.
The HOOBS app will now scan for any existing HOOBS instances running on your local network. This is why we needed the Ethernet cable plugged in. Select your HOOBS instance from the scan results and you’ll be logged in to the management interface.

HOOBS Windows App Login
2 - Set up HOOBS on your network
HOOBS will take care of network configuration if you elect to plug it into a wired Ethernet connection but, if you want to use Wi-Fi, you’ll need to configure this in the app now.
Click the gear icon at the bottom left and select Networks.
Choose your Wi-Fi network SSID from the detected list.
Enter the Password for your network.
Click Connect.
Once the Wi-Fi has successfully connected, you can disconnect the Ethernet cable.

HOOBS Welcome Screen
3 - Install the Ring plugin
Now HOOBS is up and running you’ll need to install the Ring plugin. HOOBS - as with vanilla HomeBridge - uses plugins to connect to a wide variety of devices and services. Don’t worry about HomeKit pairing just yet. That gets done after the plugin bridge is installed.
Click the Bridges icon on the menu bar.
Click +Add Accessory at the top.
Click the big Install a Plugin button.
Type ring into the search box and hit Enter.
Hover over the required plugin (with the Ring logo) and click the Install button.

HOOBS Plugin search page
Now you’ll be asked if you wanted to Create a new bridge. I recommend that you do this as it protects both your Ring install and any other plugins you may add later for interfering with each other. Running our major services on their own bridge ensures that problems with any one plugin don’t affect anything else. This makes troubleshooting much easier and limits the fallout of a bad plugin.
Leave the settings for Name, PIN, Bridge Port, and Bridge Advertiser as the defaults. These are simply the settings for the HomeKit interface, and you wouldn’t normally need to change them.
Just click Install at the bottom to begin the process. HOOBS will run through the installation and then returned you to the Ring plugin page. A small blue spinning circle on the menu bar will indicate the install is running and turn green when it’s done.

Create a new bridge for the plugin to run on
4 - Connect Ring to the HOOBS plugin
Now you need to log into your Ring account in the plugin so it can access your devices. Ring is a platform service, which means all of its control is managed by Ring’s servers, so all we need to do is hook into that the same as the Ring app does, and we get the same access for HomeKit.
Ring mandates two factor authentication now, and you certainly don’t want to have to enter a code into HOOBS all the time. The way around that is to generate an authentication token that HOOBS can use instead of your login details. The plugin provides a tool to do this right in the user interface now, which makes things super easy. Doing this create a unique access token for the HOOBS server which will show up in the Ring app Control Panel as a separate device so you can keep track of what has access to your account.
Once the install is complete, click Bridges menu icon again.
Hover over your new bridge and click Configure.
You’ll see all the bridge details, and the installed Ring plugin.
Click the gear icon to the right of that to access the Plugin Settings.
Enter your Ring login details and click Log In. (this is only sent to Ring and not saved by HOOBS)
Ring will send you a two factor auth code via SMS. Copy that code into the box and click Link Account.
While you’re here you can peruse the various Optional Configuration settings for how you want Ring to behave in HomeKit and what features you want to see (you can always adjust this later).
When you’re done, click the Save Configuration button at the bottom of the screen.

Link your Ring account to give HomeKit access
5 - Pair the new bridge with HomeKit
With the bridge ready to go you need to add it into HomeKit. This is done as with any other HomeKit accessory, by adding a new accessory in the Apple Home app.
First, you need to get the QR code to scan in the HOOBS interface.
Click the Bridges menu icon.
Hover over the Ring Bridge and click Scan.
This will show the bridge HomeKit QR code.
Now we can add this to the Home app as normal.
Open the Home app and tap the + button in the top right corner and tap Add Accessory.
Scan the QR code in HOOBS with the iPhone camera.
Complete the usual accessory setup steps.
After doing this your Ring devices will start appearing in the same HomeKit room you just selected for the bridge accessory. I just had to reassign them to the correct places in the home like any other HomeKit device to finish up.
What Ring Integration With HomeKit can do
How a Ring Spotlight Cam looks in the Home app
There are a number of options in the plugin’s configuration page that you can play with to customize your Ring experience in HomeKit. Depending on your needs or preferences, you can show and hide various features, and adjust things like the smart lighting timers and whether to share light groups from the Ring app.
This gives you a great deal of flexibility in how you want your Ring devices to be shown and used in HomeKit. This includes things like the ability to have separate manual controls for camera floodlights and sirens, how often to poll for event changes, or to trigger an AppleTV doorbell ring from just motion detection.
The options all have good explanations so they should be easy enough to follow and experiment with. Just remember to Save Changes after adjusting anything.
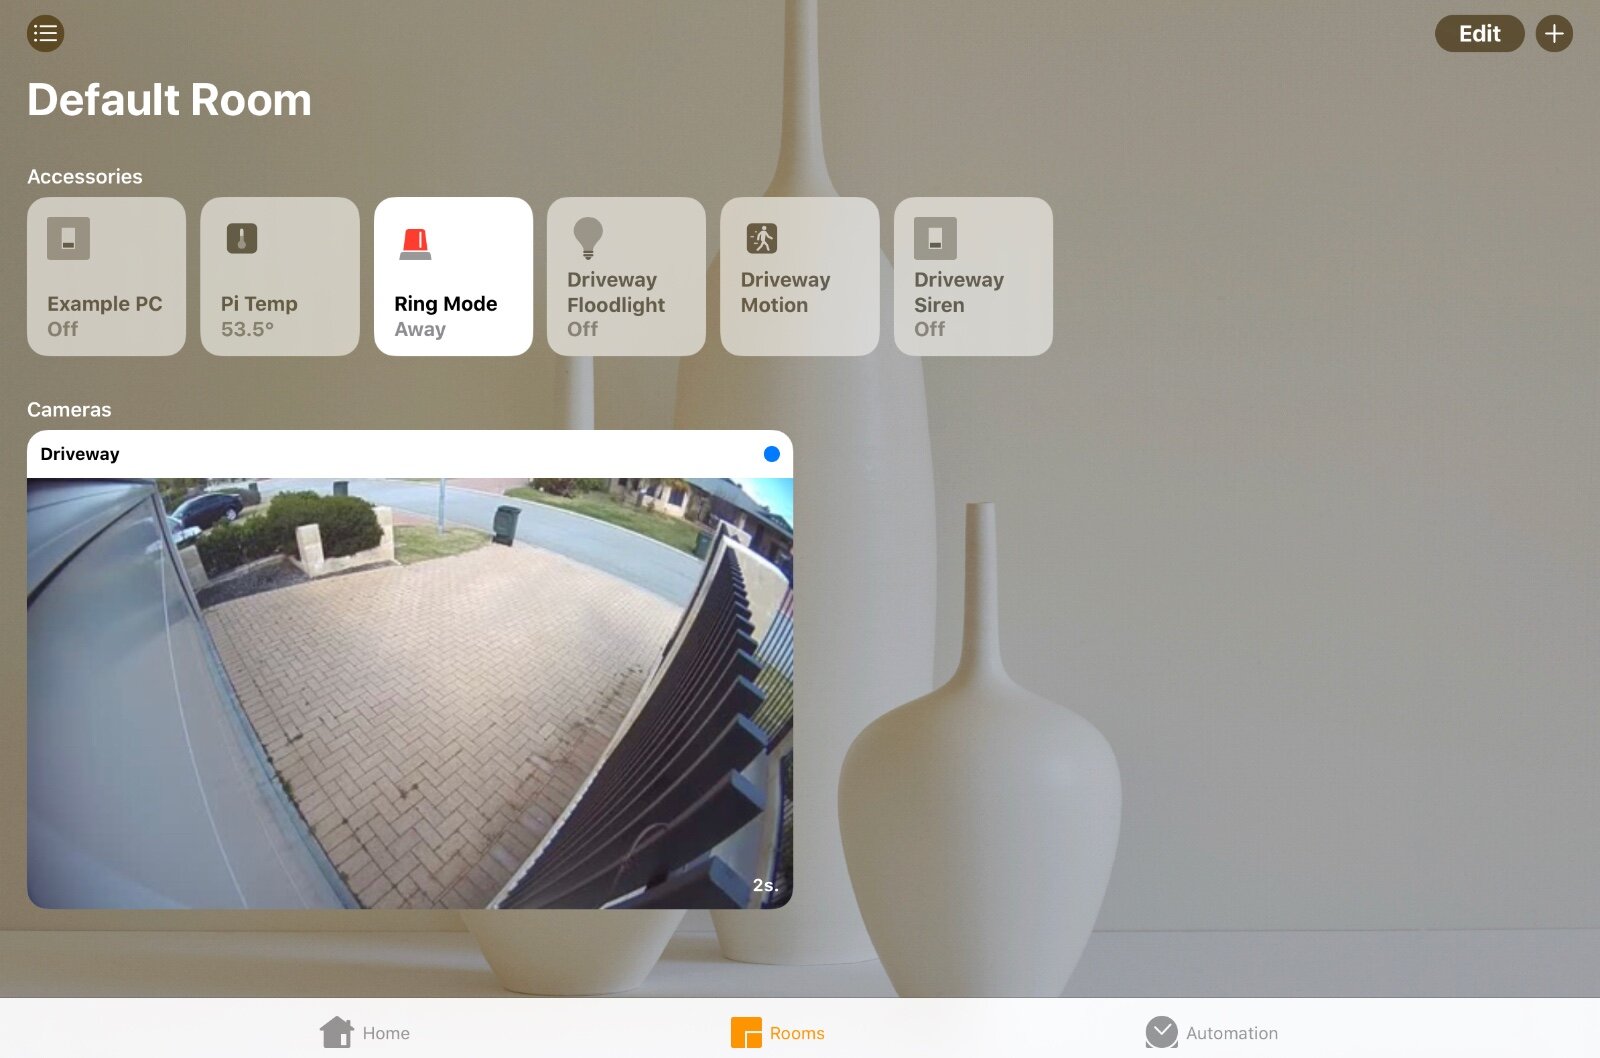
Ring cameras in HomeKit
All Ring cameras are now available and will generate thumbnails in the Home app the same as any other HomeKit camera, refreshed every 10 seconds. This is dependent on your Ring mode settings, as the cameras will not generate snapshots if their motion detection is turned off in the Ring app (this is separate to notification settings).
You can initiate live view from the Home app by tapping the camera thumbnail, and the stream will start in about the same time as you would see in the Ring app. This is significantly slower than native HomeKit cameras, though, because it’s going via the Ring cloud, where HomeKit cameras are directly connected to your local WiFi.
Other features on the cameras will be available as well, including flood lights, Ring camera sirens, and motion sensors, depending on the model. All of these can be used in automations and scenes as with any other HomeKit devices. You’ll also be able to use the two-way talk feature right from the Home app.
Note that you can’t use HomeKit Secure Video for video recording because the videos are automatically stored in Ring’s cloud service and are not accessible to HomeBridge in the first place. You’ll still need to use the Ring app to view any recorded clips or to turn off recording, and you’ll still need a Ring Protect subscription for that.
Ring doorbells in HomeKit
As with other camera devices, Ring doorbells have the same capabilities and will act the same as cameras. But you also get the doorbell button itself, which can be used to trigger scenes when pressed.
If you enable HomeKit notifications for a doorbell device, you’ll also receive a snapshot from the camera when the doorbell is pressed on your iPhone, and you can enable it to Chime on a HomePod, if you have one.
Ring Alarm in HomeKit
All the Ring alarm accessories are supported, presenting various values and controls. For example, you can monitor the keypad battery level, trigger automations off of contact and motion sensors, Get alerts from water, smoke, and CO sensors, and control smart locks connected to your Ring system.
You’ll see a security panel in the Home app that shows the status of the system, and the ability to change modes between Home, Away, and Disarm. Note that this will appear even if you don’t have the alarm products, as it also controls the Camera modes for Ring cameras. You can change this state via automations, but as a security precaution HomeKit doesn’t allow this to be done via location triggers without asking you for confirmation.
You can also create virtual Home app emergency buttons as options in the plugin configuration. Burglar Alarm, Fire Alarm, and Panic Buttons are supported, but beware that these will trigger the monitored alarm response from Ring and may result in emergency services being called.
Ring smart lighting in HomeKit
Various Ring products that connect to the Ring bridge can be controlled as normal HomeKit accessories. These include lights, fans, thermostats, and switches. They will appear as a normal HomeKit accessory of that type and behave the same as native accessories do.
This means all of these devices can be used in scenes and automations along with your other HomeKit devices to make a much more cohesive smart home.
HomeKit notifications For Ring devices
As your Ring devices will be seen by HomeKit as normal accessories, any notifications that are supported can be enabled for them as well. This includes motion notifications from your cameras, doorbell rings on your HomePods, and other triggering notifications from the various sensors in a Ring Alarm setup.
Note that because the link between the two systems has to go through a number of steps over Wi-Fi, notifications can be a bit slower than using the Ring app directly, but I’ve found they can still be faster than some other security cameras I’ve tested. There are still reasons to use HomeKit notifications such as getting different options to control when to receive them than Ring provides.
The Modes feature in the Ring app provides some control over notifications, but you might not want to use those in all cases. If you wanted to have events recorded, but not be notified while you’re at home, HomeKit can do that as it provides for better conditional control around notification settings per device.
What else can Homebridge do?
For me, Ring was the initial driver that pushed me to finally bite the bullet on installing HomeBridge. It was harder back then, since HOOBS didn’t exist yet, but now it’s an almost commercial-grade product and far easier to install and maintain.
I found that once I had a HomeBridge or HOOBS instance running in my HomeKit setup, I started looking to add other plugins. Many of these add HomeKit support for specific products and services, like Sensibo, Chamberlain, Broadlink, and even Alexa. Others provide useful enhancements to HomeKit such as Dummy Switches, which I love for how useful they’ve become.
If you have other unsupported smart home devices, it’s worth searching the plugin list to see if there is something there you can use. With over 2000 plugins available there’s a good chance something will pique your interest. This also opens up other options for selecting accessories to buy - it’s quite likely there will be a plugin for it - or enhancing your automations by connecting to online services like weather forecasts.
Conclusion
The Ring devices ecosystem is growing constantly, and these devices all have the potential to be useful in HomeKit beyond just their base functionality. Once they’re added, you can start to create automation rules and scenes tying all your devices together.
It’s unfortunate Ring can’t or won’t provide this capability themselves, but really, it’s unlikely a native offering would be any better than what HomeBridge provides these days.
The ability to connect all manner of additional smart home devices, sensors and switches to your HomeKit automations, and leverage the motion detection capabilities of the cameras is super useful. Siri commands can be used to control the Ring Alarm state if you have one, such as “Set Ring alarm to away” or “Turn off Ring Alarm”, and the ability to integrate with other third-party devices only extends the utility of this plug-in.
HomeBridge can be setup on a Rasberry Pi that can be left to run just like any other smart hub, and once you have it in your smart home you’ll likely find other products you want to use it with to expand your HomeKit setup.


